repl.it linkIndividual Project (iP):
Team Project (tP):
Week 6 [from Wed Feb 12 noon] - Summary
eLearning instructions
As this week is done in eLearning mode, please follow the instructions below in the given sequence.
Git and GitHub Topics
This week, we build on our knowledge of git branching and GitHub PRs to learn how to use them when the code is updated in parallel multiple branches. Do the following activity (in-lieu of the usual in-lecture activity) to learn the relevant techniques which you will need for the iP this week. The activity can earn you lecture participation points too. The deadline is next Tuesday midnight.
Activity - please do it if you are not a Git expert
This activity teaches you how to merge parallel git branches,
- first, in your local repo (using git commands),
- and then, in a remote repo (using GitHub PRs).
To keep things simple, we use a simple repo that uses two files food.txt and stationary.txt to keep track of items in the shop. There are 2 shop employees (John and Amy) and two vendors (Ravi and Musa) who have updated the files, but each person using their own branch. Your job is to merge the four branches so that the files reflect the final tally of goods in the shop.
First, let us set up the repo and checkout the branches.
-
Step 1.a Fork the https://github.com/nus-cs2113-AY1920S2/shop-inventory to your Github account.
-
Step 1.b Clone it to your computer. No need to set it up in your IDE because it is not a Java project.
-
Step 1.c Note how the remote repo has 4 branches in addition to the
masterbranch. If you can't see the branches, make sure you have ticked theShow Remote Branchesbox (shown in the top center of the screenshot below).
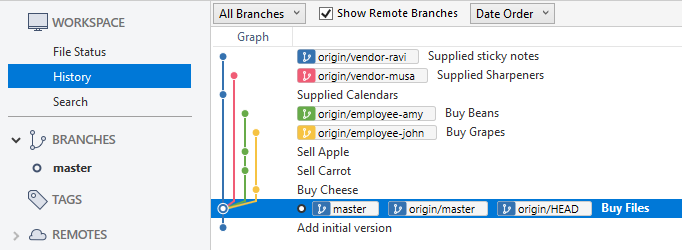
Now you are in themasterbranch. Open thefood.txtfile to check its contents. -
Step 2 Checkout the
employee-johnbranch by double-clicking it.
See an animation of this step
Now, you should be in the employee-john branch. This also means now you have a local branch named employee-john which has the exact content of the remote branch origin/employee-john and it is i.e., git knows that this branch is meant to be a copy of the corresponding remote branch'tracking' the corresponding remote branch. This is how the revision graph should look like now:
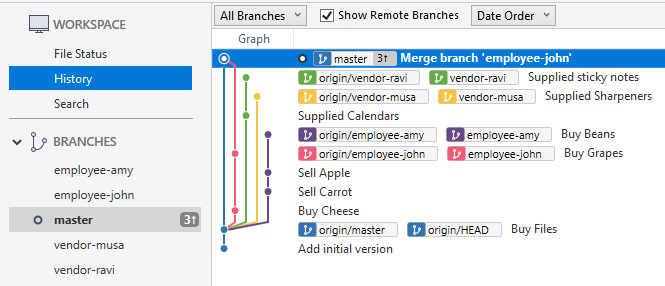
- Step 3 Checkout the other three branches one at a time to get local copies of them too.
After that, go back to themasterbranch. The revision graph should look this this now:

Next, let us merge the branch created by John.
- Step 4 Merge the
employee-johnbranch to themasterbranch: Right-click on theemployee-johnbranch label and choosemerge. Remember to request a merge commit even if a fast-forward merge is possible.
See an animation of this step
- Step 5.a Undo the merge: To learn how to undo a merge, let's undo the merge we did just now.
- First, ensure that you are still in the branch that received the merge (in this case, that's the
masterbranch). - Next, right-click on the commit in that branch that is just below the merge commit.
- Choose
Reset current branch to this commitand choose theHardoption in the next dialog. - Proceed with the reset and note how the revision graph is in the state it was before the merge.
- First, ensure that you are still in the branch that received the merge (in this case, that's the
See an animation of this step
- Step 5.b That was just to practice undoing of a merge. Let's merge the
employee-johnagain by re-doing the Step 4 again. The revision tree should look like this again:
Now that you know how to merge a branch, and undo a merge, let's try to merge Amy's branch. We are going to encounter a dreaded merge conflict this time around.
- Step 6.a Merge the
employee-amybranch to themasterbranch, similar to the previous step. Note how git reports amerge conflicthalfway into the merge, with a dialog like this:
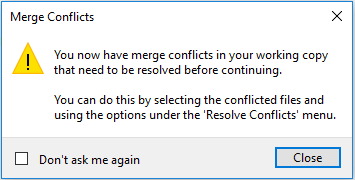
Close the dialog.
- Step 6.b Resolve the conflict: The conflict happened because both branches modified the same location of the same file and git could not decide which changes to keep. The straight-forward way to resolve this is to open the file yourself and manually edit the content to fit the desired state. Given below are the steps:
-
When you open the conflicted file
food.txt, the content will be like this:banana
<<<<<<< HEAD
carrot
cheese
=======
beans
>>>>>>> employee-amy
dates
egg
fish
grapes -
Note how git has marked the conflicting changes done by the two branches using markers
<<<<<<<,=======, and>>>>>>> -
We can modify that part in any way we like. For example, we can edit the file to make the content look like this.
banana
cheese
beans
dates
egg
fish
grapes -
When we are happy with the content of the conflicted file(s), we can simply stage the changes we did and complete the merge by committing the changes (similar to how you do a normal commit).
See an animation of this step
Good. Now we can handle branch merging in our local repo even if there are merge conflicts. Next, let us find out how to do the same in a remote repo, using GitHub PRs.
But first, let's learn how to create PRs using branches, within the same remote repo.
Creating PRs between branches in the same repo is a way for different team members to propose changes to the code and get the changes reviewed by others.
-
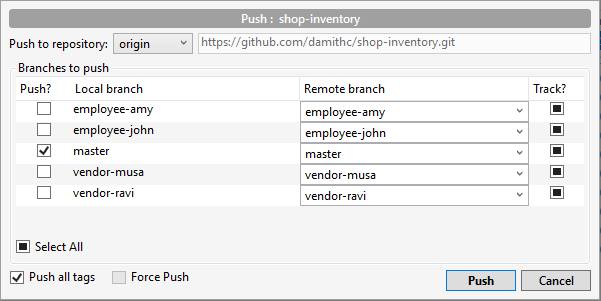
Step 7 Push the
masterbranch to the fork, to upload the new merge commits to the fork.
-
Step 8 Create a PR within your own fork, from the
vendor-ravibranch to themasterbranch:- Go to your fork on Github and click on the button.
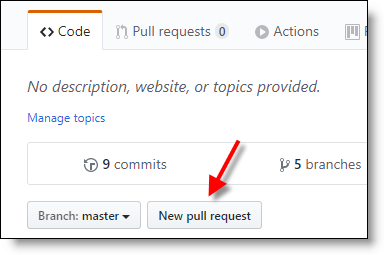
- By default, GitHub tries to create a PR from your fork to the upstream repo. Change the base repo to your own fork instead.
- Set the
comparefield to thevendor-ravibranch.

- Complete the PR creation by filling in appropriate info as directed by GitHub.
- Observe how you have one PR in your own fork now.
- Go to your fork on Github and click on the button.
-
Step 9 Create another PR for the
vendor-musabranch. As you did in the previous step, create another PR to themasterbranch from thevendor-musabranch. -
Step 10 Update the PR of
vendor-musawith reviews and new commits, to simulate PRs going through a review process.- Add a review to the PR. Here is an example
- In your local repo, switch to the
vendor-musabranch, add a line at the end of thestationary.txtand commit it. This is to simulate a developer updating a PR based on review comments.
- Push the
vendor-musato your fork to upload the new commit to the fork. - Go to the corresponding PR and observe how the PR has updated itself to reflect the new commit you pushed.
- Add a review to the PR. Here is an example
The next step is to learn how to merge PRs, thereby merging the corresponding branch.
- Step 11 Merge the PR. Use the GitHub UI to merge the PR you updated in the previous step (i.e., the one for the
vendor-musabranch).- Click on the button (at the bottom of the conversation tab)
- Click in the next step.
- You should see something like this after the merge is complete:
Do not click the button as our scripts will look for the branch in your fork.
- Click on the button (at the bottom of the conversation tab)
So far so good. Next, let's learn how to merge PRs when there are merge conflicts.
-
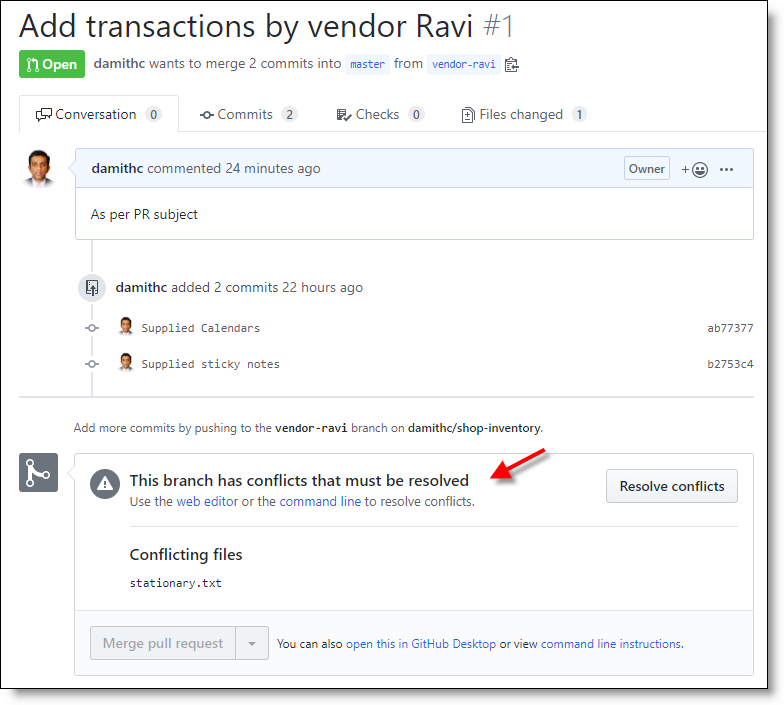
Step 12 Observe the other PR is now showing conflicts: If you go to the
vendor-raviPR, it will show something like this at the bottom, indicating that the code in that branch has a conflict with themasterbranch (caused by the other PR we merged just now).
-
Step 13 Resolve the conflict. Note that GitHub gives a button that provides a way to resolve conflicts on the Web UI itself. However, that method is more suited for simple conflicts. In this activity, let's use the method that works for even more complicated conflicts.
- As the merging the PRs on GitHub updates the
masterbranch on the fork only, pull themasterbranch from your fork to your repo to get the latestmasterbranch onto your Computer. - Next, merge the local
masterbranch to thevendor-ravibranch to sync thevendor-ravibranch with the latestmaster. This will result in a conflict due to both vendors editing the same location of thestationary.txt. - Resolve the conflict, as you did in Step 6.b.
- Push the de-conflicted
vendor-ravibranch to the fork. - Go to the PR again and note the warning about the conflict does not appear any more.
- As the merging the PRs on GitHub updates the
- Step 6.b Resolve the conflict: The conflict happened because both branches modified the same location of the same file and git could not decide which changes to keep. The straight-forward way to resolve this is to open the file yourself and manually edit the content to fit the desired state. Given below are the steps:
-
When you open the conflicted file
food.txt, the content will be like this:banana
<<<<<<< HEAD
carrot
cheese
=======
beans
>>>>>>> employee-amy
dates
egg
fish
grapes -
Note how git has marked the conflicting changes done by the two branches using markers
<<<<<<<,=======, and>>>>>>> -
We can modify that part in any way we like. For example, we can edit the file to make the content look like this.
banana
cheese
beans
dates
egg
fish
grapes -
When we are happy with the content of the conflicted file(s), we can simply stage the changes we did and complete the merge by committing the changes (similar to how you do a normal commit).
See an animation of this step
- Step 14 Merge the
vendor-raviPR as you merged the previous PR in Step 11.
Step 11 (for reference)
- Step 11 Merge the PR. Use the GitHub UI to merge the PR you updated in the previous step (i.e., the one for the
vendor-musabranch).- Click on the button (at the bottom of the conversation tab)
- Click in the next step.
- You should see something like this after the merge is complete:
Do not click the button as our scripts will look for the branch in your fork.
- Click on the button (at the bottom of the conversation tab)
- Step 15 Sync your local repo with the latest
masterby pulling themasterbranch from your fork. After that, your revision graph should look like this:
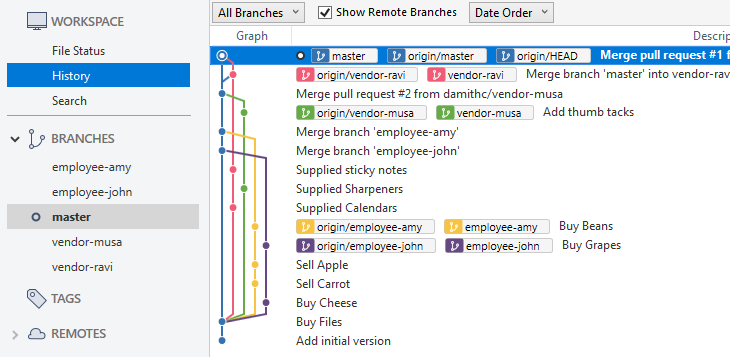
Nice! Now you know how to merge work done in parallel branches.
Java Topics [W6.1 - W6.6]
- Read the Java topics scheduled for this week.
- Do the corresponding exercises on Repl.
Requirements [W6.7 - W6.9]
- Read the following textbook chapters in full (some bits of it were covered in previous weeks).
- Submit the three post-lecture quizzes (to be released on LumiNUS), one for each chapter.
IDEs [W6.10]
-
Read the relevant topics scheduled for this week.
-
Although the following video appears in an optional section, we recommend you to watch it before the next tutorial as you will be asked to demo debugging in an IDE during the tutorial. If you use a different IDE, learn how to debug in it from other resources.
Code Quality [W6.12]
- Read the relevant topics scheduled for this week.
-
[W6.1] Java: Generics
-
[W6.2] Java: Collections
-
[W6.3] Java: File Access
-
[W6.4] Java: JAR Files
-
[W6.5] Java: Varargs : OPTIONAL
-
[W6.6] Java: streams : OPTIONAL
-
[W6.7] Requirements: Intro
-
[W6.8] Requirements: Gathering
-
[W6.9] Requirements: Specifying [continued from last week]
- [W6.10] IDEs: Intermediate Features
Full ToC
- [W6.1] Java: Generics
- [W6.2] Java: Collections
- [W6.3] Java: File Access
- [W6.3a] C++ to Java → Miscellaneous Topics → File access
- [W6.4] Java: JAR Files
- [W6.4a] C++ to Java → Miscellaneous Topics → Using JAR files
- [W6.5] Java: Varargs : OPTIONAL
- [W6.5a] C++ to Java → Miscellaneous Topics → Varargs : OPTIONAL
- [W6.6] Java: streams : OPTIONAL
- [W6.6a] C++ to Java → Miscellaneous Topics → Streams: Basic : OPTIONAL
- [W6.7] Requirements: Intro
- [W6.8] Requirements: Gathering
-
[W6.8a] Requirements → Gathering Requirements → Brainstorming
-
[W6.8b] Requirements → Gathering Requirements → Product surveys
-
[W6.8c] Requirements → Gathering Requirements → Observation
-
[W6.8d] Requirements → Gathering Requirements → User surveys
-
[W6.8e] Requirements → Gathering Requirements → Interviews
-
[W6.8f] Requirements → Gathering Requirements → Focus groups
-
[W6.8g] Requirements → Gathering Requirements → Prototyping
- [W6.9] Requirements: Specifying [continued from last week]
Prose
- [W6.9a] Requirements → Specifying Requirements → Prose → What
User Stories [Repeated from last week]
-
[W6.9b] Requirements → Specifying Requirements → User Stories → Introduction
-
[W6.9c] Requirements → Specifying Requirements → User Stories → Details
-
[W6.9d] Requirements → Specifying Requirements → User Stories → Usage
Feature Lists [Repeated from last week]
- [W6.9e] Requirements → Specifying Requirements → Feature Lists → What
Use Cases
- [W6.9f] Requirements → Specifying Requirements → Use Cases → Introduction
Glossary
- [W6.9g] Requirements → Specifying Requirements → Glossary → What
Supplementary Requirements
- [W6.9h] Requirements → Specifying Requirements → Supplementary Requirements → What
- [W6.10] IDEs: Intermediate Features
- [W6.11] RCS: Doing more with Branches and PRs
- [W6.12] Code Quality: Unsafe Practices
-
[W6.12a] Implementation → Code Quality → Error-Prone Practices → Introduction
-
[W6.12b] Implementation → Code Quality → Error-Prone Practices → Basic → Use the default branch
-
[W6.12c] Implementation → Code Quality → Error-Prone Practices → Basic → Don't recycle variables or parameters
-
[W6.12d] Implementation → Code Quality → Error-Prone Practices → Basic → Avoid empty catch blocks
-
[W6.12e] Implementation → Code Quality → Error-Prone Practices → Basic → Delete dead code
-
[W6.12f] Implementation → Code Quality → Error-Prone Practices → Intermediate → Minimize scope of variables
-
[W6.12g] Implementation → Code Quality → Error-Prone Practices → Intermediate → Minimize code duplication
Admin:
- Submit coding exercises on repl.it
- Submit post-lecture quiz before the lecture
- [optional] Submit mid-term feedback to tutors by Sunday (Feb 23rd)
iP:
- Add Increments as parallel branches:
Level-6,Level-7 - Add Increment:
A-Jar
tP:
- Conceptualize v1.0
- Draft the UG midnight before the tutorial
- Refine the product design