- Start implementing v2.0
- Update DG with design details IMPORTANT
- Make the code RepoSense-compatible
1 Start implementing v2.0
- Revise your v2.0 plan if necessary, based on your experience from v1.0. At this stage, don't allocate any features to v2.1. Let's keep that as a buffer, in case you were not able to finish v2.0 in time.
- Start evolving v1.0 towards v2.0, moving the product forward in small steps from one working version to another, while working in parallel.
2 Update DG with design details IMPORTANT
Do a sincere job on this task because this is your only chance to get feedback on the DG before it is graded at v2.1.
- Update the Developer Guide file in the repo as follows:
- Each member should describe the implementation of at least one enhancement she has added (or planning to add).
Expected length: 1+ page per person - Describing the design at a multiple-levels (e.g., first, describe at architecture-level, then describe at component-level) is optional. It is also acceptable to have one Design & Implementation section in which you describe the entire thing at the class- and object-level.
- The description can contain things such as,
- How the feature is implemented (or is going to be implemented).
- Why it is implemented that way.
- Alternatives considered.
- Diagramming tools: You may use any tool (e.g., PowerPoint) to draw UML diagrams. If you do, choose a tool that allows incremental updates to diagrams (reason: because diagrams need to be updated multiple times as the product evolves). For example, if you use PowerPoint to draw diagrams, also commit the source PowerPoint files so that they can be reused when updating diagrams in future.
If you want to use PowerPoint to draw UML diagrams, you can use the 'UML Reference Sheet' pptx file in LumiNUS as a template (it has all the basic shapes you need). After drawing the diagram in a slide using PowerPoint shapes, select the entire diagram, right-click, and chooseSave as picture.
Can IDE-generated UML diagrams be used in project submissions? Not a good idea. Given are three reasons each of which can be reported by evaluators as 'bugs' in your diagrams, costing you marks:- They often don't follow the standard UML notation (e.g., they add extra icons).
- They tend to include every little detail whereas we want to limit UML diagrams to important details only, to improve readability.
- Diagrams reverse-engineered by an IDE might not represent the actual design as some design concepts cannot be deterministically identified from the code. e.g., differentiating between multiplicities
0..1vs1, composition vs aggregation
- Each member should describe the implementation of at least one enhancement she has added (or planning to add).
DG Tips
- Aim to showcase your documentation skills. The stated objective of the DG is to explain the implementation to a future developer, but a secondary objective is to serve as evidence of your ability to document deeply-technical content using prose, examples, diagrams, code snippets, etc. appropriately. To that end, you may also describe features that you plan to implement in the future, even beyond v2.1 (hypothetically).
For an example, see the description of the undo/redo feature implementation in the AddressBook-Level3 (AB3) developer guide. - Use multiple UML diagram types. Following from the point above, try to include UML diagrams of multiple types to showcase your ability to use different UML diagrams.
- Keep diagrams simple. The aim is to make diagrams comprehensible, not necessarily comprehensive.
Ways to simplify diagrams:- Omit less important details. Examples:
- a class diagram can omit minor utility classes, private/unimportant members; some less-important associations can be shown as attributes instead.
- a sequence diagram can omit less important interactions, self-calls.
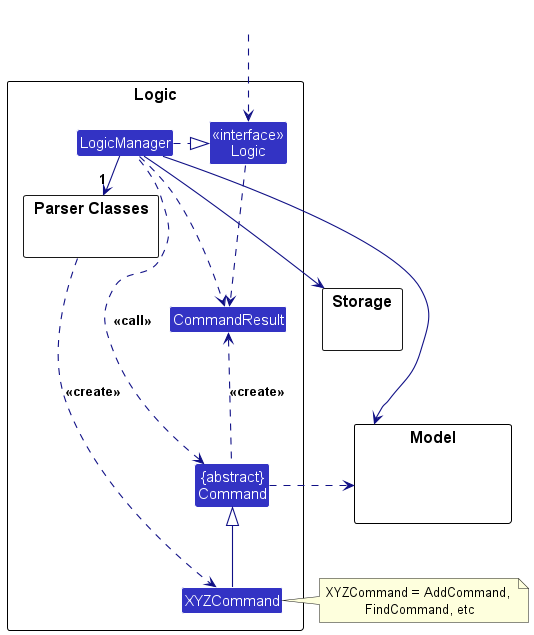
- Omit repetitive details e.g., a class diagram can show only a few representative ones in place of many similar classes (note how the AB3 Logic class diagram shows concrete
*Commandclasses). - Limit the scope of a diagram. Decide the purpose of the diagram (i.e., what does it help to explain?) and omit details not relevant to that purpose.
- Break diagrams into smaller fragments when possible.
- If a component has a lot of classes, consider further dividing into sub-components (e.g., a Parser sub-component inside the Logic component). After that, sub-components can be shown as black-boxes in the main diagram and their details can be shown as separate diagrams.
- You can use
refframes to break sequence diagrams to multiple diagrams.
- Omit less important details. Examples:
- Integrate diagrams into the description. Place the diagram close to where it is being described.
- Use code snippets sparingly. The more you use code snippets in the DG, and longer the code snippet, the higher the risk of it getting outdated quickly. Instead, use code snippets only when necessary and cite only the strictly relevant parts only.
- Resize diagrams so that the text size in the diagram matches the the text size of the main text of the diagram. See example.
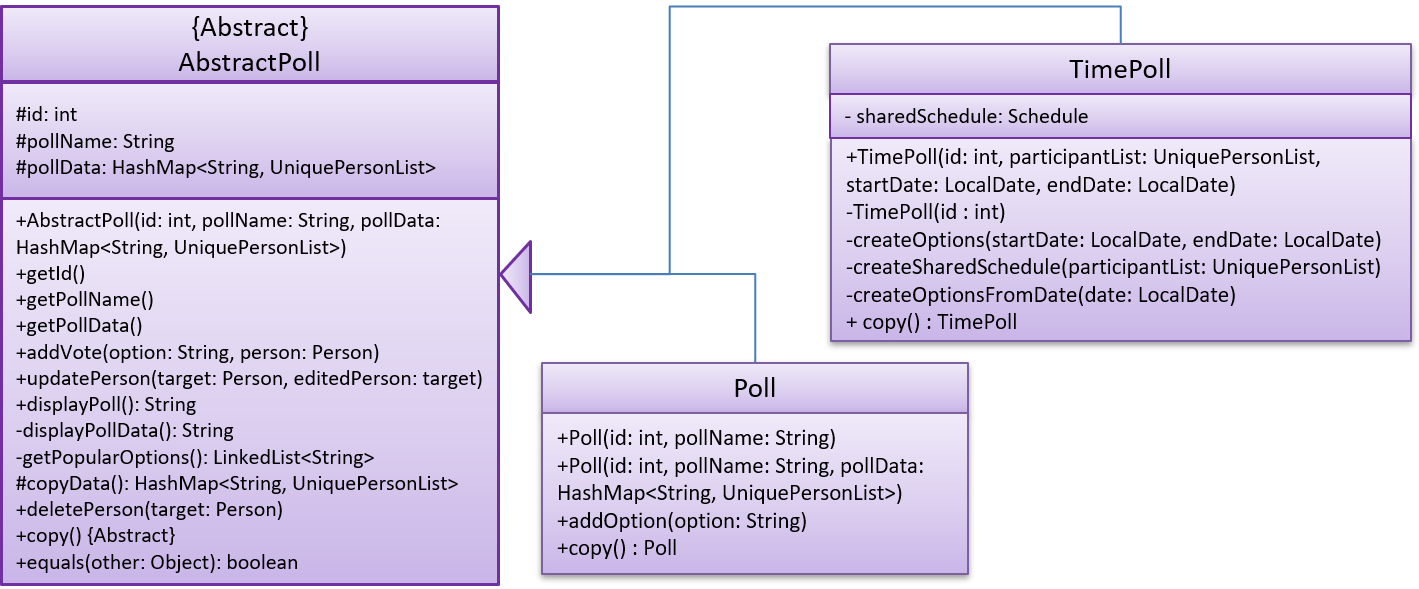
These class diagrams seem to have lot of member details, which can get outdated pretty quickly:
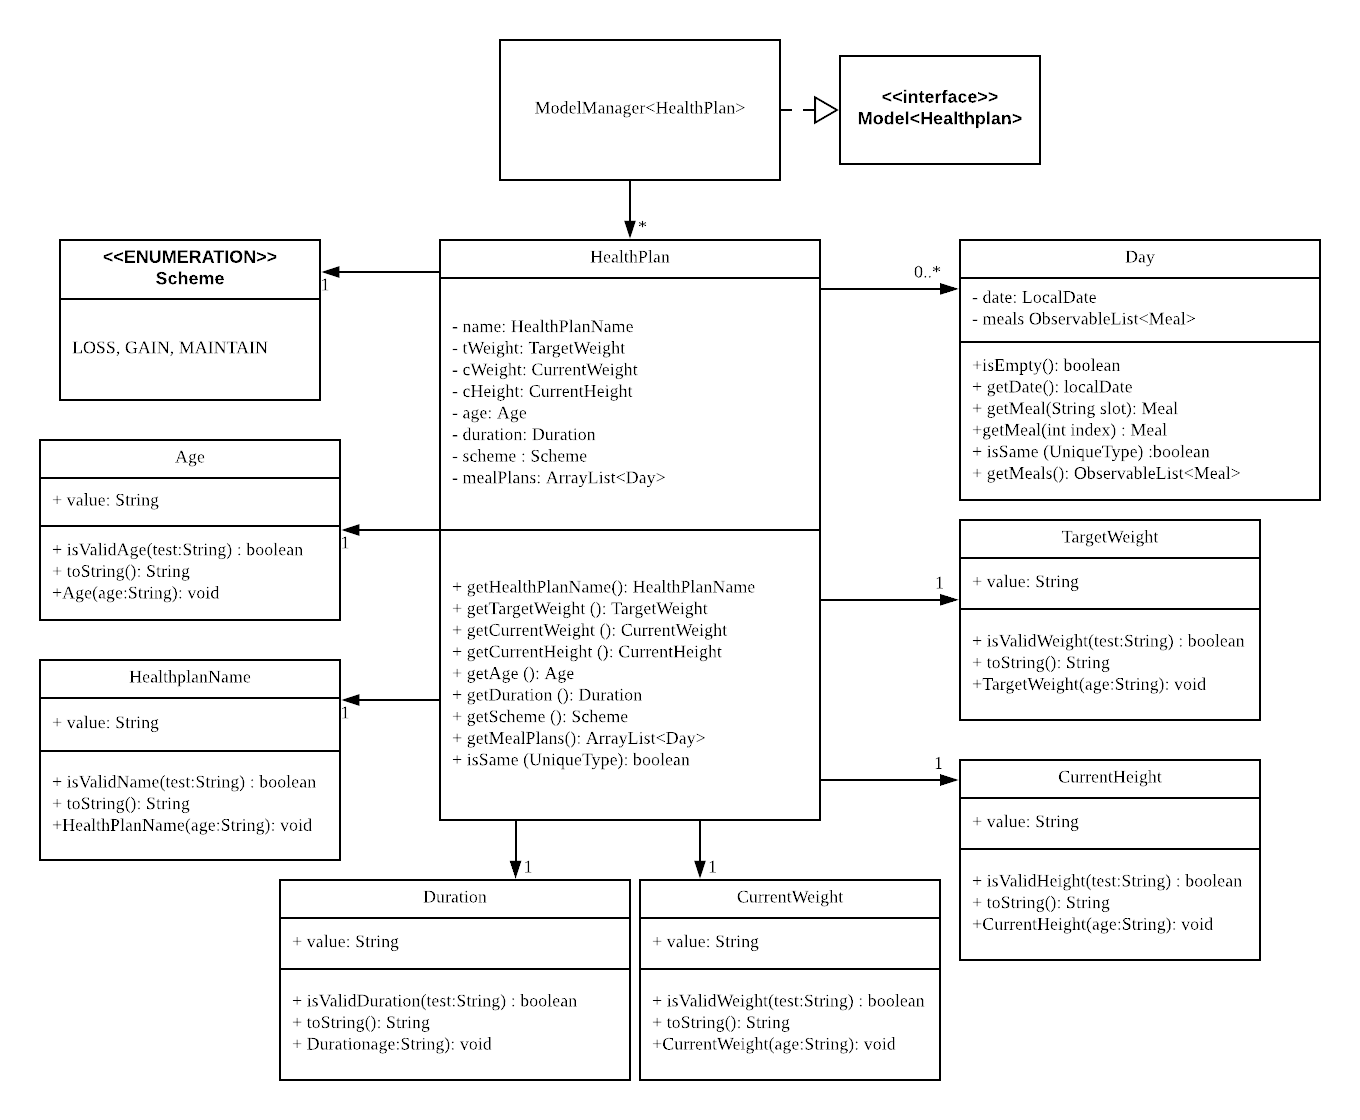
This class diagram seems to have too many classes:

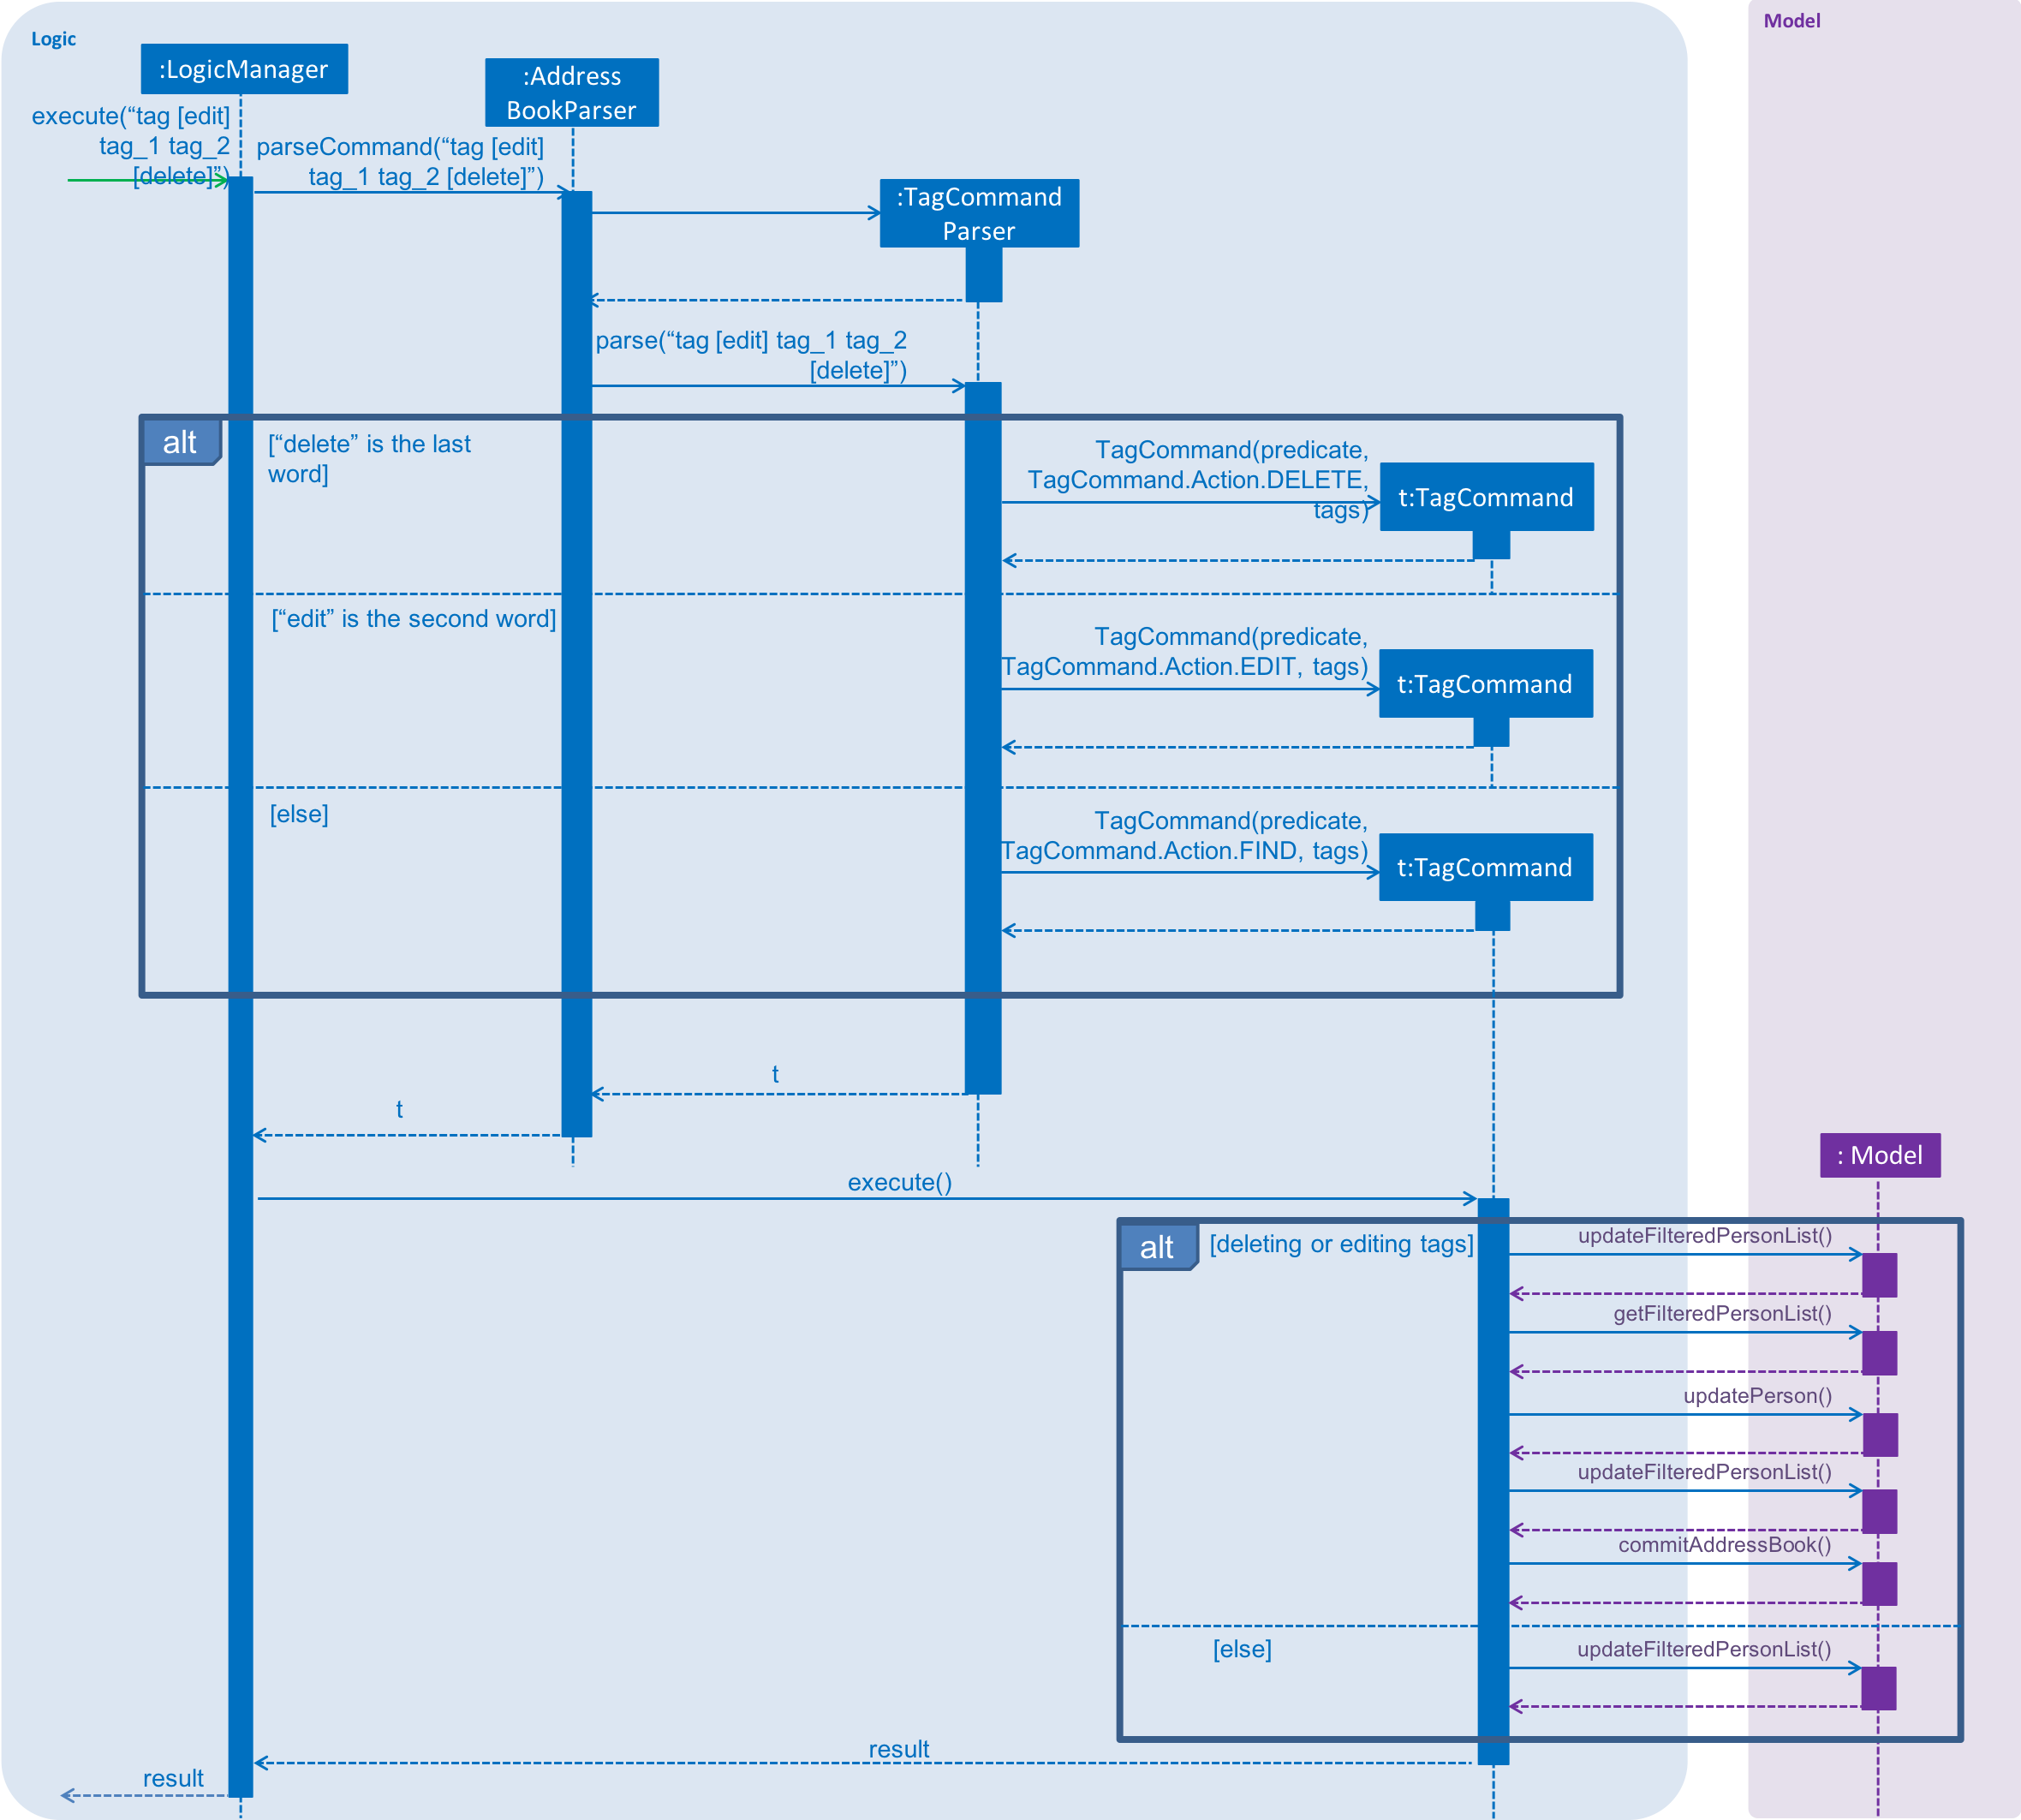
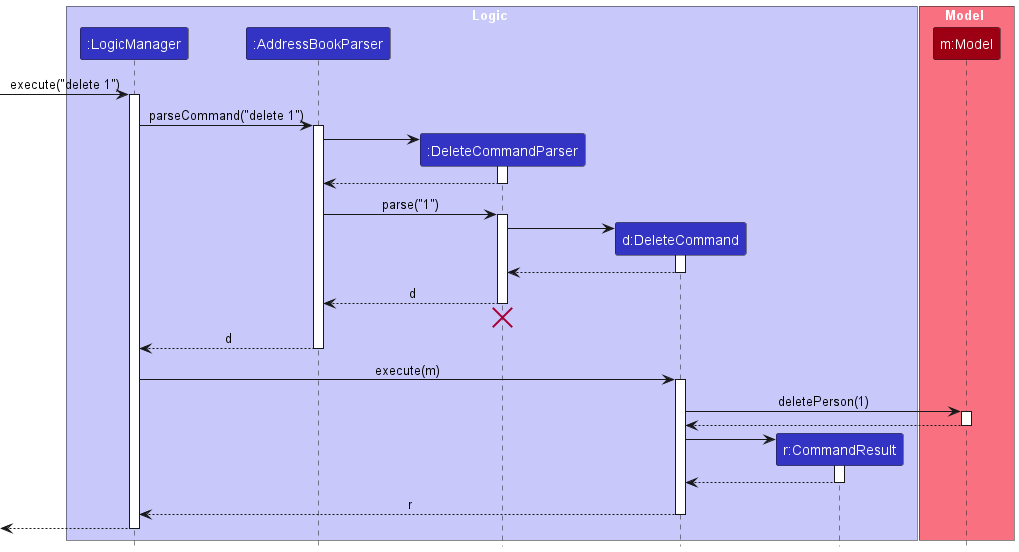
These sequence diagrams are bordering on 'too complicated':
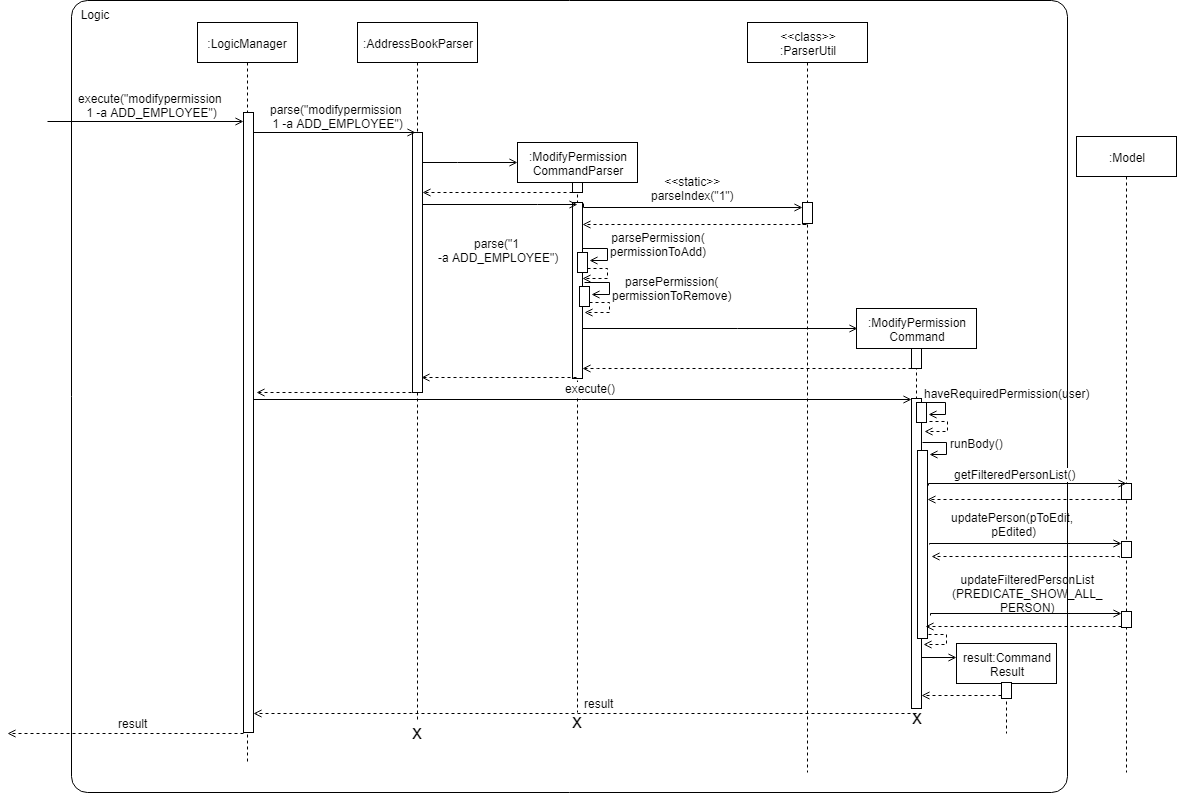
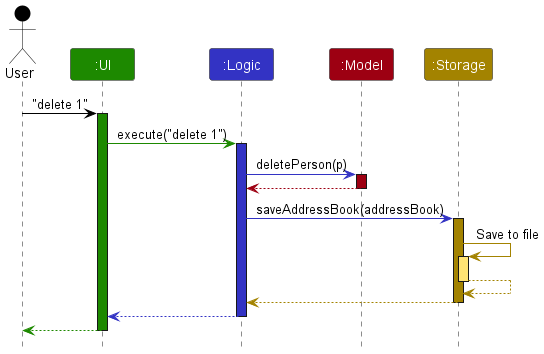
In this negative example, the text size in the diagram is much bigger than the text size used by the document:
It will look more 'polished' if the two text sizes match.
delete command
3 Make the code RepoSense-compatible
-
Ensure your code is i.e., RepoSense can detect your code as yoursRepoSense-compatible and the code it attributes to you is indeed the code written by you, as explained below:
- Go to the tp Code Dashboard. Click on the
</>icon against your name and verify that the lines attributed to you (i.e., lines marked as green) reflects your code contribution correctly. This is important because some aspects of your project grade (e.g., code quality) will be graded based on those lines.
- More info on how to make the code RepoSense compatible:
- Go to the tp Code Dashboard. Click on the
Admin Tools → RepoSense
Tool Used: RepoSense (for Analyzing Code Authorship)
We will be using a tool called RepoSense to make it easier for you to see (and learn from) code written by others, and to help us see who wrote which part of the code.
Viewing the current status of code authorship data:
- The reports generated by the tool for the individual and team projects will be made available in the module website at some point in the semester. The feature that is most relevant to you is the Code Panel (shown on the right side of the screenshot above). It shows the code attributed to a given author.
- Click on your name to load the code attributed to you (based on Git blame/log data) onto the code panel on the right.
- If the code shown roughly matches the code you wrote, all is fine and there is nothing for you to do.
2. If the code does not match the actual authorship:
-
Here are the possible reasons for the code shown not to match the code you wrote:
- the git username in some of your commits does not match your GitHub username.
- the actual authorship does not match the authorship determined by git blame/log e.g., another student touched your code after you wrote it, and Git log attributed the code to that student instead
-
In those cases, you can provide more information to RepoSense to rectify the situation, in the following way:
For simple cases such as the following, you can create a PR to update our config files here. The meaning of the config files are given in the RepoSense user guide.
- missing some commits due to using multiple git
user.names - some commits/files need to be omitted from the analysis
For more complicated needs, follow the instructions below this box. If you are not sure which option to use, please post in the forum to ask.
- Install RepoSense (see the Getting Started section of the RepoSense User Guide)
- Use the two methods described in the RepoSense User Guide section Configuring a Repo to Provide Additional Data to RepoSense to provide additional data to the authorship analysis to make it more accurate.
- If you add a
config.jsonfile to your repo (as specified by one of the two methods),- Please use the exact partial name from here as the display name.
e.g.,"displayName": "CS2113-T11-4 ABDUL ... JAVID", - If your commits have multiple author names, specify all of them
e.g.,"authorNames": ["theMyth", "theLegend", "The Gary"] - Update the line
config.jsonin the.gitignorefile of your repo as/config.jsonso that it ignores theconfig.jsonproduced by the app but not the_reposense/config.json.
- Please use the exact partial name from here as the display name.
- If you add
@@authorannotations, please follow the guidelines below:
Adding @@author tags to indicate authorship
Adding @@author tags indicate authorship
-
Mark your code with a
//@@author {yourGithubUsername}. Note the double@.
The//@@authortag should indicates the beginning of the code you wrote. The code up to the next//@@authortag or the end of the file (whichever comes first) will be considered as was written by that author. Here is a sample code file://@@author johndoe
method 1 ...
method 2 ...
//@@author sarahkhoo
method 3 ...
//@@author johndoe
method 4 ... -
If you don't know who wrote the code segment below yours, you may put an empty
//@@author(i.e. no GitHub username) to indicate the end of the code segment you wrote. The author of code below yours can add the GitHub username to the empty tag later. Here is a sample code with an emptyauthortag:method 0 ...
//@@author johndoe
method 1 ...
method 2 ...
//@@author
method 3 ...
method 4 ... -
The author tag syntax varies based on file type e.g. for java, css, fxml. Use the corresponding comment syntax for non-Java files.
Here is an example code from an xml/fxml file.<!-- @@author sereneWong -->
<textbox>
<label>...</label>
<input>...</input>
</textbox>
... -
Do not put the
//@@authorinside java header comments.
👎/**
* Returns true if ...
* @@author johndoe
*/👍
//@@author johndoe
/**
  * Returns true if ...
  */
What to and what not to annotate
-
Annotate both functional and test code There is no need to annotate documentation files.
-
Annotate only significant size code blocks that can be reviewed on its own e.g., a class, a sequence of methods, a method.
Claiming credit for code blocks smaller than a method is discouraged but allowed. If you do, do it sparingly and only claim meaningful blocks of code such as a block of statements, a loop, or an if-else statement.- If an enhancement required you to do tiny changes in many places, there is no need to annotate all those tiny changes; you can describe those changes in the Project Portfolio page instead.
- If a code block was touched by more than one person, either let the person who wrote most of it (e.g. more than 80%) take credit for the entire block, or leave it as 'unclaimed' (i.e., no author tags).
- Related to the above point, if you claim a code block as your own, more than 80% of the code in that block should have been written by yourself. For example, no more than 20% of it can be code you reused from somewhere.
- GitHub has a blame feature and a history feature that can help you determine who wrote a piece of code.
-
Do not try to boost the quantity of your contribution using unethical means such as duplicating the same code in multiple places. In particular, do not copy-paste test cases to create redundant tests. Even repetitive code blocks within test methods should be extracted out as utility methods to reduce code duplication. Individual members are responsible for making sure code attributed to them are correct. If you notice a team member claiming credit for code that he/she did not write or use other questionable tactics, you can email us (after the final submission) to let us know.
-
If you wrote a significant amount of code that was not used in the final product,
- Create a folder called
{project root}/unused - Move unused files (or copies of files containing unused code) to that folder
- use
//@@author {yourGithubUsername}-unusedto mark unused code in those files (note the suffixunused) e.g.
//@@author johndoe-unused
method 1 ...
method 2 ...
Please put a comment in the code to explain why it was not used.
- Create a folder called
-
If you reused code from elsewhere, mark such code as
//@@author {yourGithubUsername}-reused(note the suffixreused) e.g.//@@author johndoe-reused
method 1 ...
method 2 ... -
You can use empty
@@authortags to mark code as not yours when RepoSense attribute the to you incorrectly.-
Code generated by the IDE/framework, should not be annotated as your own.
-
Code you modified in minor ways e.g. adding a parameter. These should not be claimed as yours but you can mention these additional contributions in the Project Portfolio page if you want to claim credit for them.
-
- After you are satisfied with the new results (i.e., results produced by running RepoSense locally), push the
config.jsonfile you added and/or the annotated code to your repo. We'll use that information the next time we run RepoSense (we run it at least once a week). - If you choose to annotate code, minimize annotating code chunks smaller than a method. We do not grade code snippets too small to be read meaningfully.
- If you encounter any problem when doing the above or if you have questions, please post in the forum.
We recommend you ensure your code is RepoSense-compatible by v2.0