repl.it linkIndividual Project (iP):
Team Project (tP):
Week 3 [from Wed Jan 22 noon] - Topics
Detailed Table of Contents
- [W3.1] OOP: Classes and Objects
- [W3.2] Java: Objects
- [W3.3] Java: Classes
- [W3.4] OOP, Java: Class-Level Members
- [W3.5] Java: Useful Classes
-
[W3.5a] Implementation → Reuse → APIs → What
-
[W3.5b] C++ to Java → Some Useful Classes → Java API
-
[W3.5c] C++ to Java → Some Useful Classes → The
Stringclass -
[W3.5d] C++ to Java → Some Useful Classes → Wrapper Classes for primitive types
-
[W3.5e] C++ to Java → Some Useful Classes → The
Arraysclass -
[W3.5f] C++ to Java → Some Useful Classes → The
Scannerclass
- [W3.6] Code Quality: Naming
-
[W3.6a] Implementation → Code Quality → Naming → Introduction
-
[W3.6b] Implementation → Code Quality → Naming → Basic → Use nouns for things and verbs for actions
-
[W3.6c] Implementation → Code Quality → Naming → Basic → Use standard words
-
[W3.6d] Implementation → Code Quality → Naming → Intermediate → Use name to explain
-
[W3.6e] Implementation → Code Quality → Naming → Intermediate → Not too long, not too short
-
[W3.6f] Implementation → Code Quality → Naming → Intermediate → Avoid misleading names
- [W3.7] RCS: Using History
- [W3.8] RCS: Pull, Push
Paradigms → OOP → Introduction → What
Can describe OOP at a higher level
Object-Oriented Programming (OOP) is a programming paradigm. A programming paradigm guides programmers to analyze programming problems, and structure programming solutions, in a specific way.
Programming languages have traditionally divided the world into two parts—data and operations on data. Data is static and immutable, except as the operations may change it. The procedures and functions that operate on data have no lasting state of their own; they’re useful only in their ability to affect data.
This division is, of course, grounded in the way computers work, so it’s not one that you can easily ignore or push aside. Like the equally pervasive distinctions between matter and energy and between nouns and verbs, it forms the background against which you work. At some point, all programmers—even object-oriented programmers—must lay out the data structures that their programs will use and define the functions that will act on the data.
With a procedural programming language like C, that’s about all there is to it. The language may offer various kinds of support for organizing data and functions, but it won’t divide the world any differently. Functions and data structures are the basic elements of design.
Object-oriented programming doesn’t so much dispute this view of the world as restructure it at a higher level. It groups operations and data into modular units called objects and lets you combine objects into structured networks to form a complete program. In an object-oriented programming language, objects and object interactions are the basic elements of design.
Some other examples of programming paradigms are:
| Paradigm | Programming Languages |
|---|---|
| Procedural Programming paradigm | C |
| Functional Programming paradigm | F#, Haskel, Scala |
| Logic Programming paradigm | Prolog |
Some programming languages support multiple paradigms.
Java is primarily an OOP language but it supports limited forms of functional programming and it can be used to (although not recommended) write procedural code. e.g. se-edu/addressbook-level1
JavaScript and Python support functional, procedural, and OOP programming.
Exercises
statements about OOP
A) Choose the correct statements
- a. OO is a programming paradigm
- b. OO guides us in how to structure the solution
- c. OO is mainly an abstraction mechanism
- d. OO is a programming language
- e. OO is modeled after how the objects in real world work
B) Choose the correct statements
- a. Java and C++ are OO languages
- b. C language follows the Functional Programming paradigm
- c. Java can be used to write procedural code
- d. Prolog follows the Logic Programming paradigm
A) (a)(b)(c)(e)
Explanation: While many languages support the OO paradigm, OO is not a language itself.
B) Choose the correct statement
(a)(b)(c)(d)
Explanation: C follows the procedural paradigm. Yes, we can write procedural code using OO languages e.g., AddressBook-level1.
procedural vs OOP
OO is a higher level mechanism than the procedural paradigm.
True.
Explanation: Procedural languages work at simple data structures (e.g., integers, arrays) and functions level. Because an object is an abstraction over data+related functions, OO works at a higher level.
Paradigms → OOP → Objects → What
Can describe how OOP relates to the real world
Every object has both state (data) and behavior (operations on data). In that, they’re not much different from ordinary physical objects. It’s easy to see how a mechanical device, such as a pocket watch or a piano, embodies both state and behavior. But almost anything that’s designed to do a job does, too. Even simple things with no moving parts such as an ordinary bottle combine state (how full the bottle is, whether or not it’s open, how warm its contents are) with behavior (the ability to dispense its contents at various flow rates, to be opened or closed, to withstand high or low temperatures).
It’s this resemblance to real things that gives objects much of their power and appeal. They can not only model components of real systems, but equally as well fulfill assigned roles as components in software systems.
Object Oriented Programming (OOP) views the world as a network of interacting objects.
A real world scenario viewed as a network of interacting objects:
You are asked to find out the average age of a group of people Adam, Beth, Charlie, and Daisy. You take a piece of paper and pen, go to each person, ask for their age, and note it down. After collecting the age of all four, you enter it into a calculator to find the total. And then, use the same calculator to divide the total by four, to get the average age. This can be viewed as the objects You, Pen, Paper, Calculator, Adam, Beth, Charlie, and Daisy interacting to accomplish the end result of calculating the average age of the four persons. These objects can be considered as connected in a certain network of certain structure.
OOP solutions try to create a similar object network inside the computer’s memory – a sort of a virtual simulation of the corresponding real world scenario – so that a similar result can be achieved programmatically.
OOP does not demand that the virtual world object network follow the real world exactly.
Our previous example can be tweaked a bit as follows:
- Use an object called
Mainto represent your role in the scenario. - As there is no physical writing involved, you can replace the
PenandPaperwith an object calledAgeListthat is able to keep a list of ages.
Every object has both state (data) and behavior (operations on data).
| Object | Real World? | Virtual World? | Example of State (i.e. Data) | Examples of Behavior (i.e. Operations) |
|---|---|---|---|---|
| Adam | Name, Date of Birth | Calculate age based on birthday | ||
| Pen | - | Ink color, Amount of ink remaining | Write | |
| AgeList | - | Recorded ages | Give the number of entries, Accept an entry to record | |
| Calculator | Numbers already entered | Calculate the sum, divide | ||
| You/Main | Average age, Sum of ages | Use other objects to calculate |
Every object has an interface and an implementation.
Every real world object has:
- an interface through which other objects can interact with it
- an implementation that supports the interface but may not be accessible to the other object
The interface and implementation of some real-world objects in our example:
- Calculator: the buttons and the display are part of the interface; circuits are part of the implementation.
- Adam: In the context of our 'calculate average age' example, the interface of Adam consists of requests that adam will respond to, e.g. "Give age to the nearest year, as at Jan 1st of this year" "State your name"; the implementation includes the mental calculation Adam uses to calculate the age which is not visible to other objects.
Similarly, every object in the virtual world has an interface and an implementation.
The interface and implementation of some virtual-world objects in our example:
Adam: the interface might have a methodgetAge(Date asAt); the implementation of that method is not visible to other objects.
Objects interact by sending messages. Both real world and virtual world object interactions can be viewed as objects sending message to each other. The message can result in the sender object receiving a response and/or the receiver object’s state being changed. Furthermore, the result can vary based on which object received the message, even if the message is identical (see rows 1 and 2 in the example below).
Examples:
| World | Sender | Receiver | Message | Response | State Change |
|---|---|---|---|---|---|
| Real | You | Adam | "What is your name?" | "Adam" | - |
| Real | as above | Beth | as above | "Beth" | - |
| Real | You | Pen | Put nib on paper and apply pressure | Makes a mark on your paper | Ink level goes down |
| Virtual | Main | Calculator (current total is 50) | add(int i): int i = 23 | 73 | total = total + 23 |
Exercises
Describe objects in the given scenario
Consider the following real-world scenario.
Tom read a Software Engineering textbook (he has been assigned to read the book) and highlighted some of the text in it.
Explain the following statements about OOP using the above scenario as an example.
- Object Oriented Programming (OOP) views the world as a network of interacting objects.
- Every object has both state (data) and behavior (operations on data).
- Every object has an interface and an implementation.
- Objects interact by sending messages.
- OOP does not demand that the virtual world object network follow the real world exactly.
[1] Object Oriented Programming (OOP) views the world as a network of interacting objects.
Interacting objects in the scenario: Tom, SE Textbook (Book for short), Text, (possibly) Highlighter
objects usually match nouns in the description
[2]Every object has both state (data) and behavior (operations on data).
| Object | Examples of state | Examples of behavior |
|---|---|---|
Tom |
memory of the text read | read |
Book |
title | show text |
Text |
font size | get highlighted |
[3] Every object has an interface and an implementation.
- Interface of an object consists of how other objects interact with it i.e., what other objects can do to that object
- Implementation consist of internals of the object that facilitate the interactions but not visible to other objects.
| Object | Examples of interface | Examples of implementation |
|---|---|---|
Tom |
receive reading assignment | understand/memorize the text read, remember the reading assignment |
Book |
show text, turn page | how pages are bound to the spine |
Text |
read | how characters/words are connected together or fixed to the book |
[4] Objects interact by sending messages.
Examples:
Tomsends messageturn pageto theBookTomsends messageshow textto theBook. When theBookshows theText,Tomsends the messagereadto theTextwhich returns the text content toTom.Tomsends messagehighlightto theHighlighterwhile specifying whichTextto highlight. Then theHighlightersends the messagehighlightto the specifiedText.
[5] OOP does not demand that the virtual world object network follow the real world exactly.
Examples:
- A virtual world simulation of the above scenario can omit the
Highlighterobject. Instead, we can teachTextto highlight themselves when requested.
Paradigms → OOP → Classes → What
Can explain the relationship between classes and objects
Writing an OOP program is essentially writing instructions that the computer will use to,
- create the virtual world of the object network, and
- provide it the inputs to produce the outcome you want.
A class contains instructions for creating a specific kind of objects. It turns out sometimes multiple objects keep the same type of data and have the same behavior because they are of the same kind. Instructions for creating a 'kind' (or ‘class’) of objects can be done once and that same instructions can be used to i.e. create instances ofinstantiate objects of that kind. You call such instructions a Class.
Classes and objects in an example scenario
Consider the example of writing an OOP program to calculate the average age of Adam, Beth, Charlie, and Daisy.
Instructions for creating objects Adam, Beth, Charlie, and Daisy will be very similar because they are all of the same kind: they all represent ‘persons’ with the same interface, the same kind of data (i.e. name, dateOfBrith, etc.), and the same kind of behavior (i.e. getAge(Date), getName(), etc.). Therefore, you can have a class called Person containing instructions on how to create Person objects and use that class to instantiate objects Adam, Beth, Charlie, and Daisy.
Similarly, you need classes AgeList, Calculator, and Main classes to instantiate one each of AgeList, Calculator, and Main objects.
| Class | Objects |
|---|---|
Person |
objects representing Adam, Beth, Charlie, Daisy |
AgeList |
an object to represent the age list |
Calculator |
an object to do the calculations |
Main |
an object to represent you (i.e., the one who manages the whole operation) |
Exercises
Identify Classes and Objects
Consider the following scenario. If you were to simulate this in an OOP program, what are the classes and the objects you would use?
A customer (name: John) gave a cheque to the Cashier (name: Peter) to pay for the LoTR and GoT books he bought.
| Class | Objects |
|---|---|
Customer |
john |
Book |
LoTR, GoT |
Cheque |
checqueJohnGave |
Cashier |
peter |
Classes for CityConnect app
Assume you are writing a CLI program called CityConnect for storing and querying distances between cities. The behavior is as follows:
Welcome to CityConnect!

Enter command: addroute Clementi BuonaVista 12
Route from Clementi to BuonaVista with distance 12km added

Enter command: getdistance Clementi BuonaVista
Distance from Clementi to BuonaVista is 12

Enter command: getdistance Clementi JurongWest
No route exists from Clementi to JurongWest!

Enter command: addroute Clementi JurongWest 24
Route from Clementi to JurongWest with distance 24km added

Enter command: getdistance Clementi JurongWest
Distance from Clementi to JurongWest is 24

Enter command: exit
What classes would you have in your code if you write your program based on the OOP paradigm?
One class you can have is Route
Paradigms → OOP → Objects → Objects as abstractions
Can explain the abstraction aspect of OOP
The concept of Objects in OOP is an abstraction mechanism because it allows us to abstract away the lower level details and work with bigger granularity entities i.e. ignore details of data formats and the method implementation details and work at the level of objects.
Abstraction is a technique for dealing with complexity. It works by establishing a level of complexity we are interested in, and suppressing the more complex details below that level.
You can deal with a Person object that represents the person Adam and query the object for Adam's age instead of dealing with details such as Adam’s date of birth (DoB), in what format the DoB is stored, the algorithm used to calculate the age from the DoB, etc.
Paradigms → OOP → Objects → Encapsulation of objects
Can explain the encapsulation aspect of OOP
Encapsulation protects an implementation from unintended actions and from inadvertent access.
-- Object-Oriented Programming with Objective-C, Apple
An object is an encapsulation of some data and related behavior in terms of two aspects:
1. The packaging aspect: An object packages data and related behavior together into one self-contained unit.
2. The information hiding aspect: The data in an object is hidden from the outside world and are only accessible using the object's interface.
Exercises
Choose the correct statement.
Choose the correct statements
- a. An object is an encapsulation because it packages data and behavior into one bundle.
- b. An object is an encapsulation because it lets us think in terms of higher level concepts such as Students rather than student-related functions and data separately.
Don't confuse encapsulation with abstraction.
Choose the correct statement
(a)
Explanation: The second statement should be: An object is an abstraction encapsulation because it lets ...
C++ to Java → Objects → Using Java objects
Can use in-built Java objects
Java is an "object-oriented" language, which means that it uses objects to represent data and provide methods related to them. Object types are called classes e.g., you can use String objects in Java and those objects belong to the String class.
importing
Java comes with many inbuilt classes which are organized into packages. Here are some examples:
| package | Some example classes in the package |
|---|---|
java.lang |
String, Math, System |
Before using a class in your code, you need to import the class. import statements appear at the top of the code.
This example imports the java.awt.Point class (i.e., the Point class in the java.awt package) -- which can be used to represent the coordinates of a location in a Cartesian plane -- and use it in the main method.
In mathematical notation, points are often written in parentheses with a comma separating the coordinates. For example, (0,0) indicates the origin, and (x,y) indicates the point x units to the right and y units up from the origin.
import java.awt.Point;

public class Main{
    public static void main(String[] args) {
        Point spot = new Point(3, 4);
        int x = spot.x;
        System.out.println(x);
   }
}
You might wonder why we can use the System class without importing it. System belongs to the java.lang package, which is imported automatically.
new operator
To create a new object, you have to use the new operator
This line shows how to create a new Point object using the new operator:
Point spot = new Point(3, 4);
Exercises
[Key Exercise] create Rectangle objects
Update the code below to create a new Rectangle object as described in the code comments, to produce the given output.
- The
Rectangleclass is found in thejava.awtpackage. - The parameters you need to supply when creating new
Rectangleobjects are(int x, int y, int width, int height).
public class Main {
    public static void main(String[] args) {
        Rectangle r;

        // TODO create a Rectangle object that has the properties x=0, y=0, width=5, height=10
        // assign it to r

        System.out.println(r);
    }
}
java.awt.Rectangle[x=0,y=0,width=5,height=10]
- Import the
java.awt.Rectangleclass - This is how you create the required object
new Rectangle(0, 0, 5, 10)
C++ to Java → Objects → Instance members
Can use instance members of objects
Variables that belong to an object are called attributes (or fields).
To access an attribute of an object, Java uses dot notation.
The code below uses spot.x which means "go to the object spot refers to, and get the value of the attribute x."
Point spot = new Point(3, 4);
int sum = spot.x * spot.x + spot.y * spot.y;
System.out.println(spot.x + ", " + spot.y + ", " + sum);
3, 4, 25
You can i.e., change/modifymutate an object by assigning a different values to its attributes.
This example changes the x value of the Point object to 5.
Point spot = new Point(3, 4);
spot.x = 5;
System.out.println(spot.x + ", " + spot.y);
5, 4
Java uses the dot notation to invoke methods on an object too.
This example invokes the translate method on a Point object so that it moves to a different location.
Point spot = new Point(3, 4);
System.out.println(spot.x + ", " + spot.y);
spot.translate(5,5);
System.out.println(spot.x + ", " + spot.y);
3, 4
8, 9
Exercises
[Key Exercise] use Rectangle objects
Update the code below as described in code comments, to produce the given output.
import java.awt.Rectangle;

public class Main {
    public static void main(String[] args) {
        Rectangle r = new Rectangle(0, 0, 4, 6);
        System.out.println(r);

        int area;
        //TODO: add a line below to calculate the area using width and height properties of r
        // and assign it to the variable area

        System.out.println("Area: " + area);

        //TODO: add a line here to set the size of r to 8x10 (width x height)
        //Recommended: use the setSize(int width, int height) method of the Rectangle object

        System.out.println(r);
    }

}
java.awt.Rectangle[x=0,y=0,width=4,height=6]
Area: 24
java.awt.Rectangle[x=0,y=0,width=8,height=10]
- Area can be calculated as
r.width * r.height - Setting the size can be done as
r.setSize(8, 10)
C++ to Java → Objects → Passing objects around
Can pass objects between methods
You can pass objects as parameters to a method in the usual way.
The printPoint method below takes a Point object as an argument and displays its attributes in (x,y) format.
public static void printPoint(Point p) {
    System.out.println("(" + p.x + ", " + p.y + ")");
}

public static void main(String[] args) {
    Point spot = new Point(3, 4);
    printPoint(spot);
}
3, 4
You can return an object from a method too.
The java.awt package also provides a class called Rectangle. Rectangle objects are similar to points, but they have four attributes: x, y, width, and height. The findCenter method below takes a Rectangle as an argument and returns a Point that corresponds to the center of the rectangle:
public static Point findCenter(Rectangle box) {
    int x = box.x + box.width / 2;
    int y = box.y + box.height / 2;
    return new Point(x, y);
}
The return type of this method is Point. The last line creates a new Point object and returns a reference to it.
null and NullPointerException
null is a special value that means "no object". You can assign null to a variable to indicate that the variable is 'empty' at the moment. However, if you try to use a null value, either by accessing an attribute or invoking a method, Java throws a NullPointerException.
In this example, the variable spot is assigned a null value. As a result, trying to access spot.x attribute or invoking the spot.translate method results in a NullPointerException.
Point spot = null;
int x = spot.x;          // NullPointerException
spot.translate(50, 50);  // NullPointerException
On the other hand, it is legal to return null from a method or to pass a null reference as an argument to a method.
Returning null from a method.
public static Point createCopy(Point p) {
    if (p == null) {
        return null; // return null if p is null
    }

    // create a new object with same x,y values
    return new Point(p.x, p.y);
}
Passing null as the argument.
Point result = createCopy(null);
System.out.println(result);
null
It is possible to have multiple variables that refer to the same object.
Notice how p1 and p2 are aliases for the same object. When the object is changed using the variable p1, the changes are visible via p2 as well (and vice versa), because they both point to the same Point object.
Point p1 = new Point(0,0);
Point p2 = p1;
System.out.println("p1: " + p1.x + ", " + p1.y);
System.out.println("p2: " + p2.x + ", " + p2.y);
p1.x = 1;
p2.y = 2;
System.out.println("p1: " + p1.x + ", " + p1.y);
System.out.println("p2: " + p2.x + ", " + p2.y);
p1: 0, 0
p2: 0, 0
p1: 1, 2
p2: 1, 2
Java does not have explicit pointers (and other related things such as pointer de-referencing and pointer arithmetic). When an object is passed into a method as an argument, the method gains access to the original object. If the method changes the object it received, the changes are retained in the object even after the method has completed.
Note how p3 retains changes done to it by the method swapCoordinates even after the method has completed executing.
public static void swapCoordinates(Point p){
    int temp = p.x;
    p.x = p.y;
    p.y = temp;
}

public static void main(String[] args) {
    Point p3 = new Point(2,3);
    System.out.println("p3: " + p3.x + ", " + p3.y);
    swapCoordinates(p3);
    System.out.println("p3: " + p3.x + ", " + p3.y);
}
p3: 2, 3
p3: 3, 2
Exercises
[Key Exercise] pass objects to move method
Add a method move(Point p, Rectangle r) to the code below, to produce the given output. The behavior of the method is as follows:
- Returns
nulland does nothing if eitherporris null - Returns a new
Pointobject that has attributesxandythat match those ofr - Does not modify
p - Updates
rso that its attributesxandymatch those ofp
import java.awt.Point;
import java.awt.Rectangle;

public class Main {

    //TODO add your method here

    public static void main(String[] args) {
        Point p1 = new Point(0, 0);
        Rectangle r1 = new Rectangle(2, 3, 5, 6);
        System.out.println("arguments: " + p1 + ", " + r1);

        Point p2 = move(p1, r1);
        System.out.println("argument point after method call: " + p1);
        System.out.println("argument rectangle after method call: " + r1);
        System.out.println("returned point: " + p2);

        System.out.println(move(null, null));
    }
}
arguments: java.awt.Point[x=0,y=0], java.awt.Rectangle[x=2,y=3,width=5,height=6]
argument point after method call: java.awt.Point[x=0,y=0]
argument rectangle after method call: java.awt.Rectangle[x=0,y=0,width=5,height=6]
returned point: java.awt.Point[x=2,y=3]
null
Partial solution:
public static Point move(Point p, Rectangle r){
    if (p == null || r == null){
        // ...
    }
    Point newPoint = new Point(r.x, r.y);
    r.x = p.x;
    // ...
    return newPoint;
}
C++ to Java → Objects → Garbage collection
Can explain Java garbage collection
What happens when no variables refer to an object?
Point spot = new Point(3, 4);
spot = null;
The first line creates a new Point object and makes spot refer to it. The second line changes spot so that instead of referring to the object, it refers to nothing. If there are no references to an object, there is no way to access its attributes or invoke a method on it. From the programmer’s view, it ceases to exist. However it’s still present in the computer’s memory, taking up space.
In Java, you don’t have to delete objects you create when they are no longer needed. As your program runs, the system automatically looks for stranded objects and reclaims them; then the space can be reused for new objects. This process is called garbage collection. You don’t have to do anything to make garbage collection happen, and in general don’t have to be aware of it. But in high-performance applications, you may notice a slight delay every now and then when Java reclaims space from discarded objects.
C++ to Java → Classes → Defining classes
Can define Java classes
As you know,
- Defining a class introduces a new object type.
- Every object belongs to some object type; that is, it is an instance of some class.
- A class definition is like a template for objects: it specifies what attributes the objects have and what methods can operate on them.
- The
newoperator instantiates objects, that is, it creates new instances of a class. - The methods that operate on an object type are defined in the class for that object.
Here's a class called Time, intended to represent a moment in time. It has three attributes and no methods.
public class Time {
    private int hour;
    private int minute;
    private int second;
}
You can give a class any name you like. The Java convention is to use e.g., MyHelloWord rather than myHelloWorld or myhelloword or my_hello_worldPascalCase format for class names.
The code is there are exceptions to this ruleusually placed in a file whose name matches the class e.g., the Time class should be in a file named Time.java.
When a class is public (e.g., the Time class in the above example) it can be used in other classes. But the Attributes are also called instance variables, because each instance has its own variables.instance variables that are private (e.g., the hour, minute and second attributes of the Time class) can only be accessed from inside the Time class.
Constructors
The syntax for special methods that construct the object and initialize the instance variablesconstructors is similar to that of other methods, except:
- The name of the constructor is the same as the name of the class.
- The keyword
staticis omitted. - Does not return anything. A constructor returns the created object by default.
When you invoke new, Java creates the object and calls your constructor to initialize the instance variables. When the constructor is done, it returns a reference to the new object.
Here is an example constructor for the Time class:
public Time() {
    hour = 0;
    minute = 0;
    second = 0;
}
This constructor does not take any arguments. Each line initializes an instance variable to 0 (which in this example means midnight).
Now you can create Time objects.
Time time = new Time();
Like other methods, constructors can be i.e., you can provide multiple constructors with different parametersoverloaded.
You can add another constructor to the Time class to allow creating Time objects that are initialized to a specific time:
public Time(int h, int m, int s) {
    hour = h;
    minute = m;
    second = s;
}
Here's how you can invoke the new constructor:
Time justBeforeMidnight = new Time(11, 59, 59);
this keyword
The this keyword is a reference variable in Java that refers to the i.e., the enclosing object, or myselfcurrent object. You can use this the same way you use the name of any other object. For example, you can read and write the instance variables of this, and you can pass this as an argument to other methods. But you do not declare this, and you can’t make an assignment to it.
In the following version of the constructor, the names and types of the parameters are the same as the instance variables (parameters don’t have to use the same names, but that’s a common style). As a result, the parameters shadow (or hide) the instance variables, so the keyword this is necessary to tell them apart.
public Time(int hour, int minute, int second) {
    this.hour = hour;
    this.minute = minute;
    this.second = second;
}
this can be used to refer to a constructor of a class within the same class too.
In this example the constructor Time() uses the this keyword to call its own overloaded constructor Time(int, int, int)
public Time() {
    this(0, 0, 0); // call the overloaded constructor
}

public Time(int hour, int minute, int second) {
    // ...
}
Instance methods
You can add methods to a class which can then be used from the objects of that class. These instance methods do not have the static keyword in the method signature. Instance methods can access attributes of the class.
Here's how you can add a method to the Time class to get the number of seconds passed till midnight.
public int secondsSinceMidnight() {
    return hour*60*60 + minute*60 + second;
}
Here's how you can use that method.
Time t = new Time(0, 2, 5);
System.out.println(t.secondsSinceMidnight() + " seconds since midnight!");
Exercises
[Key Exercise] define a Circle class
Define a Circle class so that the code given below produces the given output. The nature of the class is a follows:
- Attributes(all
private):int x,int y: represents the location of the circledouble radius: the radius of the circle
- Constructors:
Circle(): initializesx,y,radiusto 0Circle(int x, int y, double radius): initializes the attributes to the given values
- Methods:
getArea():int
Returns the area of the circle as anintvalue (notdouble). Calculated as Pi * (radius)2
You can convert adoubleto anintusing(int)e.g.,x = (int)2.25givesxthe value2.
You can useMath.PIto get the value of Pi
You can useMath.pow()to raise a number to a specific power e.g.,Math.pow(3, 2)calculates32
public class Main {
    public static void main(String[] args) {
        Circle c = new Circle();

        System.out.println(c.getArea());
        c = new Circle(1, 2, 5);
        System.out.println(c.getArea());

    }
}
0
78
- Put the
Circleclass in a file calledCircle.java
Partial solution:
public class Circle {
    private int x;
    // ...

    public Circle(){
        this(0, 0, 0);
    }

    public Circle(int x, int y, double radius){
        this.x = x;
        // ...
    }

    public int getArea(){
        double area = Math.PI * Math.pow(radius, 2);
        return (int)area;
    }

}
C++ to Java → Classes → Getters and setters
Can define getters and setters
As the instance variables of Time are private, you can access them from within the Time class only. To compensate, you can provide methods to access attributes:
public int getHour() {
    return hour;
}

public int getMinute() {
    return minute;
}

public int getSecond() {
    return second;
}
Methods like these are formally called “accessors”, but more commonly referred to as getters. By convention, the method that gets a variable named something is called getSomething.
Similarly, you can provide setter methods to modify attributes of a Time object:
public void setHour(int hour) {
    this.hour = hour;
}

public void setMinute(int minute) {
    this.minute = minute;
}

public void setSecond(int second) {
    this.second = second;
}
Exercises
[Key Exercise] add getters/setters to the Circle class
Consider the Circle class below:
public class Circle {
    private int x;
    private int y;
    private double radius;

    public Circle(){
        this(0, 0, 0);
    }

    public Circle(int x, int y, double radius){
        this.x = x;
        this.y = y;
        this.radius = radius;
    }

    public int getArea(){
        double area = Math.PI * Math.pow(radius, 2);
        return (int)area;
    }

}
Update it as follows so that code given below produces the given output.
- Add getter/setter methods for all three attributes
- Update the setters and constructors such that if the radius supplied is negative, the code automatically set the radius to 0 instead.
public class Main {
    public static void main(String[] args) {
        Circle c = new Circle(1,2, 5);

        c.setX(4);
        c.setY(5);
        c.setRadius(6);
        System.out.println("x      : " + c.getX());
        System.out.println("y      : " + c.getY());
        System.out.println("radius : " + c.getRadius());
        System.out.println("area   : " + c.getArea());

        c.setRadius(-5);
        System.out.println("radius : " + c.getRadius());
        c = new Circle(1, 1, -4);
        System.out.println("radius : " + c.getRadius());

    }
}
x      : 4
y      : 5
radius : 6.0
area   : 113
radius : 0.0
radius : 0.0
Partial solution:
public Circle(int x, int y, double radius){
    setX(x);
    setY(y);
    setRadius(radius);
}

public void setRadius(double radius) {
    this.radius = Math.max(radius, 0);
}
Paradigms → OOP → Classes → Class-level members
Can explain class-level members
While all objects of a class has the same attributes, each object has its own copy of the attribute value.
All Person objects have the Name attribute but the value of that attribute varies between Person objects.
However, some attributes are not suitable to be maintained by individual objects. Instead, they should be maintained centrally, shared by all objects of the class. They are like ‘global variables’ but attached to a specific class. Such variables whose value is shared by all instances of a class are called class-level attributes.
The attribute totalPersons should be maintained centrally and shared by all Person objects rather than copied at each Person object.
Similarly, when a normal method is being called, a message is being sent to the receiving object and the result may depend on the receiving object.
Sending the getName() message to the Adam object results in the response "Adam" while sending the same message to the Beth object results in the response "Beth".
However, there can be methods related to a specific class but not suitable for sending message to a specific object of that class. Such methods that are called using the class instead of a specific instance are called class-level methods.
The method getTotalPersons() is not suitable to send to a specific Person object because a specific object of the Person class should not have to know about the total number of Person objects.
Class-level attributes and methods are collectively called class-level members (also called static members sometimes because some programming languages use the keyword static to identify class-level members). They are to be accessed using the class name rather than an instance of the class.
Exercises
Suitable as a class-level variables
Which of these are suitable as class-level variables?
- a. system: multi-player Pac Man game, Class:
Player, variable:totalScore - b. system: eLearning system, class:
Course, variable:totalStudents - c. system: ToDo manager, class:
Task, variable:totalPendingTasks - d. system: any, class:
ArrayList, variable:total(i.e., total items in a givenArrayListobject)
(c)
Explanation: totalPendingTasks should not be managed by individual Task objects and therefore suitable to be maintained as a class-level variable. The other variables should be managed at instance level as their value varies from instance to instance. e.g., totalStudents for one Course object will differ from totalStudents of another.
C++ to Java → Classes → Class-level members
Can use class-level members
The content below is an extract from -- Java Tutorial, with slight adaptations.
When a number of objects are created from the same class blueprint, they each have their own distinct copies of instance variables. In the case of a Bicycle class, the instance variables are gear, and speed. Each Bicycle object has its own values for these variables, stored in different memory locations.
Sometimes, you want to have variables that are common to all objects. This is accomplished with the static modifier. Fields that have the static modifier in their declaration are called static fields or class variables. They are associated with the class, rather than with any object. Every instance of the class shares a class variable, which is in one fixed location in memory. Any object can change the value of a class variable, but class variables can also be manipulated without creating an instance of the class.
Suppose you want to create a number of Bicycle objects and assign each a serial number, beginning with 1 for the first object. This ID number is unique to each object and is therefore an instance variable. At the same time, you need a field to keep track of how many Bicycle objects have been created so that you know what ID to assign to the next one. Such a field is not related to any individual object, but to the class as a whole. For this you need a class variable, numberOfBicycles, as follows:
public class Bicycle {

    private int gear;
    private int speed;

    // an instance variable for the object ID
    private int id;

    // a class variable for the number of Bicycle objects instantiated
    private static int numberOfBicycles = 0;
        ...
}
Class variables are referenced by the class name itself, as in Bicycle.numberOfBicycles This makes it clear that they are class variables.
The Java programming language supports static methods as well as static variables. Static methods, which have the static modifier in their declarations, should be invoked with the class name, without the need for creating an instance of the class, as in ClassName.methodName(args)
The static modifier, in combination with the final modifier, is also used to define constants. The final modifier indicates that the value of this field cannot change. For example, the following variable declaration defines a constant named PI, whose value is an approximation of pi (the ratio of the circumference of a circle to its diameter):
static final double PI = 3.141592653589793;
Here is an example with class-level variables and class-level methods:
public class Bicycle {

    private int gear;
    private int speed;

    private int id;

    private static int numberOfBicycles = 0;


    public Bicycle(int startSpeed, int startGear) {
        gear = startGear;
        speed = startSpeed;

        numberOfBicycles++;
        id = numberOfBicycles;
    }

    public int getID() {
        return id;
    }

    public static int getNumberOfBicycles() {
        return numberOfBicycles;
    }

    public int getGear(){
        return gear;
    }

    public void setGear(int newValue) {
        gear = newValue;
    }

    public int getSpeed() {
        return speed;
    }

    // ...

}
Explanation of System.out.println(...):
outis a class-level public attribute of theSystemclass.printlnis a instance level method of theoutobject.
Exercises
[Key Exercise] add getMaxRadius to the Circle class
Consider the Circle class below:
public class Circle {
    private int x;
    private int y;
    private double radius;

    public Circle(){
        this(0, 0, 0);
    }

    public Circle(int x, int y, double radius){
        setX(x);
        setY(y);
        setRadius(radius);
    }

    public int getX() {
        return x;
    }

    public void setX(int x) {
        this.x = x;
    }

    public int getY() {
        return y;
    }

    public void setY(int y) {
        this.y = y;
    }

    public double getRadius() {
        return radius;
    }

    public void setRadius(double radius) {
        this.radius = Math.max(radius, 0);
    }

    public int getArea(){
        double area = Math.PI * Math.pow(radius, 2);
        return (int)area;
    }
}
Update it as follows so that code given below produces the given output.
- Add a class-level
getMaxRadiusmethod that returns the maximum radius that has been used in allCircleobjects created thus far.
public class Main {
    public static void main(String[] args) {
        Circle c = new Circle();
        System.out.println("max radius used so far : " + Circle.getMaxRadius());
        c = new Circle(0, 0, 10);
        System.out.println("max radius used so far : " + Circle.getMaxRadius());
        c = new Circle(0, 0, -15);
        System.out.println("max radius used so far : " + Circle.getMaxRadius());
        c.setRadius(12);
        System.out.println("max radius used so far : " + Circle.getMaxRadius());
    }
}
max radius used so far : 0.0
max radius used so far : 10.0
max radius used so far : 10.0
max radius used so far : 12.0
You can use a static variable maxRadius to track the maximum value used for the radius attribute so far.
Partial solution:
public void setRadius(double radius) {
    this.radius = Math.max(radius, 0);
    if (maxRadius < this.radius){
        // ...
    }
}
Implementation → Reuse → APIs → What
Can explain APIs
An Application Programming Interface (API) specifies the interface through which other programs can interact with a software component. It is a contract between the component and its clients.
A class has an API (e.g., API of the Java String class, API of the Python str class) which is a collection of public methods that you can invoke to make use of the class.
The GitHub API is a collection of Web request formats GitHub server accepts and the corresponding responses. You can write a program that interacts with GitHub through that API.
When developing large systems, if you define the API of each components early, the development team can develop the components in parallel because the future behavior of the other components are now more predictable.
Exercises
Statements about APIs
Choose the correct statements
- a. A software component can have an API.
- b. Any method of a class is part of its API.
- c. Private methods of a class are not part of its API.
- d. The API forms the contract between the component developer and the component user.
- e. Sequence diagrams can be used to show how components interact with each other via APIs.
(a) (c) (d) (e)
Explanation: (b) is incorrect because private methods cannot be a part of the API
True or False?
Defining component APIs early is useful for developing components in parallel.
True
Explanation: Yes, once you know the precise behavior expected of each component, you can start developing them in parallel.
C++ to Java → Some Useful Classes → Java API
Can use Java API documentation about classes
Java comes with a rich collection of classes that you can use. They form what is known as the Java API (Application Programming Interface). Each class in the API comes with documentation in a standard format.
C++ to Java → Some Useful Classes → The String class
Can use the String class
String is a built-in Java class that you can use without importing. Given below are some useful String methods:
java.lang classes can be used without importing
Any class in the java.lang package can be used without importing.
Find characters of a string
Strings provide a method named charAt, which extracts a character. It returns a char, a primitive type that stores an individual character (as opposed to strings of them).
String fruit = "banana";
char letter = fruit.charAt(0);
The argument 0 means that we want the letter at position 0. Like array indexes, string indexes start at 0, so the character assigned to letter is 'b'.
You can convert a string to an array of characters using the toCharArray method.
char[] fruitChars = fruit.toCharArray()
Change a string to upper/lower case
Strings provide methods, toUpperCase and toLowerCase, that convert from uppercase to lowercase and back.
After these statements run, upperName refers to the string "ALAN TURING" but name still refers to "Alan Turing".
String name = "Alan Turing";
String upperName = name.toUpperCase();
System.out.println(name);
System.out.println(upperName);
Alan Turing
ALAN TURING
Note that a string method cannot change the string object on which the method is invoked, because strings are once created, cannot be modifiedimmutable. For example, when you invoke toUpperCase on a string "abc", you get a new string object "ABC" as the return value rather than the string "abc" being changed to "ABC". As a result, for such string methods that seemingly modify the string but actually return a new string instead e.g., toLowerCase, invoking the method has no effect if you don’t assign the return value to a variable.
String s = "Ada";
s.toUpperCase(); // no effect
s = s.toUpperCase(); // the correct way
Replacing parts of a string
Another useful method is replace, which finds and replaces instances of one string within another.
This example replaces "Computer Science" with "CS".
String text = "Computer Science is fun!";
text = text.replace("Computer Science", "CS");
System.out.println(text);
CS is fun!
Accessing substrings
The substring method returns a new string that copies letters from an existing string, starting at the given index.
"banana".substring(0)"banana""banana".substring(2)"nana""banana".substring(6)""
If it’s invoked with two arguments, they are treated as a start and end index:
"banana".substring(0, 3)"ban""banana".substring(2, 5)"nan""banana".substring(6, 6)""
Searching within strings
The indexOf method searches for a single character (or a substring) in a string and returns the index of the first occurrence. The method returns -1 if there are no occurrences.
"banana".indexOf('a')1"banana".indexOf('a', 2)3searches for'a', starting from position 2"banana".indexOf('x')-1"banana".indexOf("nan")2searches for the substring"nan"
Comparing strings
To compare two strings, it is tempting to use the == and != operators.
String name1 = "Alan Turing";
String name2 = "Alan Turing";
System.out.println(name1 == name2);
This code compiles and runs, and most of the time it shows true. But it is not correct. The problem is, i.e., as opposed to comparing primitive values e.g., 2 == 2when used for comparing objects, the == operator checks whether the two variables refer to the same object (by comparing the references). If you give it two different string objects that contain the same letters, it is supposed to yield true because they are two distinct objects even if they contain the same text. However, because Java strings are immutable, in some cases (but not always) Java reuses existing string objects instead of creating multiple objects, which can cause the above code to yield true. Therefore, it is not safe to use == to compare strings if your intention is to check if they contain the same text.
The right way to compare strings is with the equals method.
This example invokes equals on name1 and passes name2 as an argument. The equals method returns true if the strings contain the same characters; otherwise it returns false.
if (name1.equals(name2)) {
    System.out.println("The names are the same.");
}
If the strings differ, you can use compareTo to see which comes first in alphabetical order. The return value from compareTo is the difference between the first characters in the strings that differ. If the strings are equal, their difference is zero. If the first string (the one on which the method is invoked) comes first in the alphabet, the difference is negative. Otherwise, the difference is positive.
In this example, compareTo returns positive 8, because the second letter of "Alan" comes 8 letters after the second letter of "Ada".
String name1 = "Alan";
String name2 = "Ada";
int diff = name1.compareTo(name2);
if (diff == 0) {
    System.out.println("The names are the same.");
} else if (diff < 0) {
    System.out.println("name1 comes before name2.");
} else if (diff > 0) {
    System.out.println("name2 comes before name1.");
}
Both equals and compareTo are case-sensitive. The uppercase letters come before the lowercase letters, so "Ada" comes before "ada". To check if two strings are similar irrespective of the differences in case, you can use the equalsIgnoreCase method.
String s1 = "Apple";
String s2 = "apple";
System.out.println(s1.equals(s2)); //false
System.out.println(s1.equalsIgnoreCase(s2)); //true
Some more comparison-related String methods:
contains: checks if one string is a sub-string of the other e.g.,SnappleandappstartsWith: checks if one string has the other as a substring at the beginning e.g.,AppleandAppendsWith: checks if one string has the other as a substring at the end e.g.,Crabandab
Printing special characters (line breaks, tabs, ...)
You can embed a special character e.g., line break, tab, backspace, etc. in a string using an escape sequence.
| Escape sequence | meaning |
|---|---|
\n |
newline character |
\t |
tab character |
\b |
backspace character |
\f |
form feed character |
\r |
carriage return character |
\" |
" (double quote) character |
\' |
' (single quote) character |
\\ |
\ (back slash) character |
\uDDDD |
character from the Unicode character set, by specifying the Unicode as four hex digits in the place of DDDD |
An example of using escape sequences to print some special characters.
System.out.println("First line\nSecond \"line\"");
First line
Second "line"
As the behavior of the \n e.g., behavior differs between Windows and OS-Xdepends on the platform, the recommended way to print a line break is using the System.lineSeparator() as it works the same in all platforms.
Using System.lineSeparator() to print a line break.
System.out.println("First line" + System.lineSeparator() + "Second line");
First line
Second line
String formatting
Sometimes programs need to create strings that are formatted in a certain way. String.format takes a format specifier followed by a sequence of values and returns a new string formatted as specified.
The following method returns a time string in 12-hour format. The format specifier \%02d means “two digit integer padded with zeros”, so timeString(19, 5) returns the string "07:05 PM".
public static String timeString(int hour, int minute) {
    String ampm;
    if (hour < 12) {
        ampm = "AM";
        if (hour == 0) {
            hour = 12;  // midnight
        }
    } else {
        ampm = "PM";
        hour = hour - 12;
    }
    return String.format("%02d:%02d %s", hour, minute, ampm); // returns "07:05 PM"
}
Exercises
[Key Exercise] printPrice method
Implement the printPrice method in the code below to produce the given output. Its behavior:
- The parameter
itemis a string in the formatname--$pricei.e., a name and a price of an item separated using a--e.g.,banana--$3/50 - It prints the
NAME: pricewhere the name is in upper case. The price does not have a$sign and has.in place of the/
e.g.,banana--$3/50BANANA: 3.50 - The
namepart of the input can have trailing/leading spaces which should be omitted from the output.
e.g.,banana --$3/50BANANA: 3.50
Do a Web search to find how to remove leading/trailing spaces. Suggested search terms java string remove leading trailing spaces
public class Main {

    public static void printPrice(String item) {
        // TODO: add your code here

    }

    public static void main(String[] args) {
        printPrice("sandwich  --$4/50");
        printPrice("  soda --$10/00");
        printPrice("  fries --$0/50");
    }
}
SANDWICH: 4.50
SODA: 10.00
FRIES: 0.50
Partial solution:
public static void printPrice(String item) {
    int dividerPosition = item.indexOf("--");
    String itemName = item.substring(0, dividerPosition);
    //...
    System.out.println(itemName.trim().toUpperCase() + ...);

}
C++ to Java → Some Useful Classes → Wrapper Classes for primitive types
Can use wrapper classes for primitive
Primitive values (like int, double, and char) do not provide methods.
For example, you can’t call equals on an int:
int i = 5;
System.out.println(i.equals(5));  // compiler error
But for each primitive type, there is a corresponding class in the Java library, called a wrapper class, as given in the table below. They are in the java.lang package i.e., no need to import.
| Primitive type | Wrapper class |
|---|---|
byte |
Byte |
short |
Short |
int |
Integer |
long |
Long |
float |
Float |
double |
Double |
char |
Character |
boolean |
Boolean |
Double d = new Double(2.5);
int i = d.intValue();
System.out.println(d);
System.out.println(i);
2.5
2
Each wrapper class defines constants MIN_VALUE and MAX_VALUE.
Accessing max and min values for integers:
System.out.println(Integer.MIN_VALUE + " : " + Integer.MAX_VALUE);
-2147483648 : 2147483647
Wrapper classes provide methods for In this context, parse means something like “read and translate”parsing strings to other types e.g., Integer.parseInt converts a string to (you guessed it) an integer. The other wrapper classes provide similar methods, like Double.parseDouble and Boolean.parseBoolean.
Integer.parseInt("1234") 1234
Wrapper classes also provide toString, which returns a string representation of a value.
Integer.toString(1234) "1234"
Exercises
[Key Exercise] printTotalScore method
Implement the printTotalScore method in the code below to produce the given output. Its behavior:
valuesis an array of strings, each string representing an integer e.g.,["5", "-1"]- The method prints the total of the numbers represented by the strings in the array
["5", "-1"]4
public class Main {

    public static void printTotalScore(String[] values){
        // TODO: add your code here
    }

    public static void main(String[] args) {
        printTotalScore(new String[]{});
        printTotalScore(new String[]{"0", "124", "-15"});
    }
}
0
109
You can use the Integer.parseInt() method to convert a String to the equivalent int value.
Partial solution:
public static void printTotalScore(String[] values){
    int total = 0;
    for (String value: values){
        // convert the value to an int and add to the total
    }
    System.out.println(total);
}
C++ to Java → Some Useful Classes → The Arrays class
Can use the Arrays class
java.util.Arrays provides methods for working with arrays. One of them, toString, returns a string representation of an array. It also provides a copyOf that copies an array.
Using Arrays.copyOf and Arrays.toString:
int[] a = new int[]{1,2,3,4};

int[] b = Arrays.copyOf(a, 3); // copy first three elements
System.out.println(Arrays.toString(b));

int[] c = Arrays.copyOf(a, a.length); // copy all elements
System.out.println(Arrays.toString(c));
[1, 2, 3]
[1, 2, 3, 4]
Exercises
[Key Exercise] filterEmails method
Implement the following two methods in the code below to produce the given output.
filterEmailsfilterEmails(String[] items): String[]itemsis an array of strings each of which may be an email address or some other random string- Returns a
String[]containing email addresses that were initems. Any string containing@is considered as an email.
["aaa@bbb", "xyz"]["aaa@bbb"]
printItems(String[] items)- Prints
itemsin the standard array format. e.g.,["aaa", "bbb"][aaa, bbb]
- Prints
import java.util.Arrays;

public class Main {
    public static String[] filterEmails(String[] items){
        // TODO: add your code here
    }

    public static void printItems(String[] items){
        // TODO: add your code here
    }

    public static void main(String[] args) {
        printItems(filterEmails(new String[]{}));
        printItems(filterEmails(new String[]{"abc"}));
        printItems(filterEmails(new String[]{"adam@example.com", "aab", "john@example.com", "some@"}));
        printItems(filterEmails(new String[]{"xyz", "@bee.com", "aab"}));
    }
}
[]
[]
[adam@example.com, john@example.com, some@]
[@bee.com]
filterEmailsfilterEmails(String[] items): String[]- create a new array (say
emails) of the same size asitems - go through the elements in the
itemsand add toemailsif the element contains@(you can use thecontainsmethod of theStringclass here) - Use
Arrays.copyOfmethod to return the filled part ofemails.
- create a new array (say
printItems(String[] items)- You can use the
Arrays.toString()method for this.
- You can use the
Partial solution
public static String[] filterEmails(String[] items){
    String[] results = new String[items.length];
    int matchCount = 0;
    for(String item: items){
        if (item.contains("@")){
           //...
        }
    }
    return Arrays.copyOf(results, matchCount);
}

public static void printItems(String[] items){
    System.out.println(Arrays.toString(items));
}
C++ to Java → Some Useful Classes → The Scanner class
Can use the Scanner class
Scanner is a class that provides methods for inputting words, numbers, and other data. Scanner provides a method called nextLine that reads a line of input from the keyboard and returns a String. The following example reads two lines and repeats them back to the user:
import java.util.Scanner;

public class Echo {

    public static void main(String[] args) {
        String line;
        Scanner in = new Scanner(System.in);

        System.out.print("Type something: ");
        line = in.nextLine();
        System.out.println("You said: " + line);

        System.out.print("Type something else: ");
        line = in.nextLine();
        System.out.println("You also said: " + line);
    }
}
Scanner class normally reads inputs as strings but it can read in a specific type of input too.
The code below uses the nextInt method of the Scanner class to read an input as an integer.
Scanner in = new Scanner(System.in);

System.out.print("What is your age? ");
int age = in.nextInt();
in.nextLine();  // read the newline character the user enters following the integer
System.out.print("What is your name? ");
String name = in.nextLine();
System.out.printf("Hello %s, age %d\n", name, age);
Exercises
[Key Exercise] find total expenditure
Write a program to ask the user for a description of overseas expenses (presumably, the user has just returned from an overseas trip) and calculate the total in local currency.
- The conversion rate from overseas currency to local currency : overseas
$1.0= local$1.70 - The user can describe expenses is in free form text, as one line. The program takes all amounts mentioned in the format
$amounte.g.,$1.50
Here is one example output:
Your expenses while overseas?beer $4.50 books $3.00 $5.00 for food, that's all
Expenses in overseas currency:[$4.50, $3.00, $5.00]
Total in local currency: $21.25
Here is another:
Your expenses while overseas?nothing. I lived off my friends all the time.
Expenses in overseas currency:[]
Total in local currency: $0.00
One more:
Your expenses while overseas? Just $10
Expenses in overseas currency:[$10]
Total in local currency: $17.00
Here's the skeleton code to use as the starting point:
public class Main {

    // You can add more methods here

    public static void main(String[] args) {
        String line;
        Scanner in = new Scanner(System.in);

        System.out.print("Your expenses while overseas?");
       // TODO: add your code here
    }
}
You can use the split method of the String class to convert a sentence into an array of words. e.g.,
String sentence = "hello my dear";
String[] words = sentence.split(" "); // split using the space as the delimiter
System.out.println(Arrays.toString(words));
[hello, my, dear]
You can use String.format("%.2f", doubleValue) to format doubleValue to two decimal points.
e.g., String.format("%.2f", 1.3334) 1.33
Partial solution
import java.util.Arrays;
import java.util.Scanner;

public class Main {

    public static String[] filterAmounts(String sentence) {
        String[] words = sentence.split(" ");
        String[] result = new String[words.length];
        int wordCount = 0;
        for (String word : words) {
            if (word.startsWith("$")) {
                result[wordCount] = word;
                wordCount++;
            }
        }
        return Arrays.copyOf(result, wordCount);
    }

    public static void main(String[] args) {
        String line;
        Scanner in = new Scanner(System.in);

        System.out.print("Your expenses while overseas?");
        line = in.nextLine();

        String[] amounts = filterAmounts(line);
        System.out.println("Expenses in overseas currency:" + Arrays.toString(amounts));
        double total = 0;
        for (String amount : amounts) {
            // convert amount to double, multiply by currency conversion rate, and add to total
        }
        System.out.println("Total in local currency: $" + String.format("%.2f", total));

    }
}
Implementation → Code Quality → Naming → Introduction
Can explain the need for good names in code
Proper naming improves the readability. It also reduces bugs caused by ambiguities regarding the intent of a variable or a method.
There are only two hard things in Computer Science: cache invalidation and naming things. -- Phil Karlton
Implementation → Code Quality → Naming → Basic → Use nouns for things and verbs for actions
Can improve code quality using technique: use nouns for things and verbs for actions
Every system is built from a domain-specific language designed by the programmers to describe that system. Functions are the verbs of that language, and classes are the nouns.
― Robert C. Martin, Clean Code: A Handbook of Agile Software Craftsmanship
Use nouns for classes/variables and verbs for methods/functions.
Examples:
| Name for a | Bad | Good |
|---|---|---|
| Class | CheckLimit |
LimitChecker |
| method | result() |
calculate() |
Distinguish clearly between single-valued and multivalued variables.
Examples:
Good
Person student;
ArrayList<Person> students;
Good
name = 'Jim'
names = ['Jim', 'Alice']
Implementation → Code Quality → Naming → Basic → Use standard words
Can improve code quality using technique: use standard words
Use correct spelling in names. Avoid 'texting-style' spelling. Avoid foreign language words, slang, and names that are only meaningful within specific contexts/times e.g. terms from private jokes, a TV show currently popular in your country
Implementation → Code Quality → Naming → Intermediate → Use name to explain
Can improve code quality using technique: use name to explain
A name is not just for differentiation; it should explain the named entity to the reader accurately and at a sufficient level of detail.
Examples:
| Bad | Good |
|---|---|
processInput() (what 'process'?) |
removeWhiteSpaceFromInput() |
flag |
isValidInput |
temp |
If the name has multiple words, they should be in a sensible order.
Examples:
| Bad | Good |
|---|---|
bySizeOrder() |
orderBySize() |
Imagine going to the doctor's and saying "My eye1 is swollen"! Don’t use numbers or case to distinguish names.
Examples:
| Bad | Bad | Good |
|---|---|---|
value1, value2 |
value, Value |
originalValue, finalValue |
Implementation → Code Quality → Naming → Intermediate → Not too long, not too short
Can improve code quality using technique: not too long, not too short
While it is preferable not to have lengthy names, names that are 'too short' are even worse. If you must abbreviate or use acronyms, do it consistently. Explain their full meaning at an obvious location.
Implementation → Code Quality → Naming → Intermediate → Avoid misleading names
Can improve code quality using technique: avoid misleading names
Related things should be named similarly, while unrelated things should NOT.
Example: Consider these variables
colorBlack: hex value for color blackcolorWhite: hex value for color whitecolorBlue: number of times blue is usedhexForRed: hex value for color red
This is misleading because colorBlue is named similar to colorWhite and colorBlack but has a different purpose while hexForRed is named differently but has very similar purpose to the first two variables. The following is better:
hexForBlackhexForWhitehexForRedblueColorCount
Avoid misleading or ambiguous names (e.g. those with multiple meanings), similar sounding names, hard-to-pronounce ones (e.g. avoid ambiguities like "is that a lowercase L, capital I or number 1?", or "is that number 0 or letter O?"), almost similar names.
Examples:
| Bad | Good | Reason |
|---|---|---|
phase0 |
phaseZero |
Is that zero or letter O? |
rwrLgtDirn |
rowerLegitDirection |
Hard to pronounce |
right left wrong |
rightDirection leftDirection wrongResponse |
right is for 'correct' or 'opposite of 'left'? |
redBooks readBooks |
redColorBooks booksRead |
red and read (past tense) sounds the same |
FiletMignon |
egg |
If the requirement is just a name of a food, egg is a much easier to type/say choice than FiletMignon |
Project Management → Revision Control → Using history
Can explain using history
RCS tools store the history of the working directory as a series of commits. This means you should commit after each change that you want the RCS to 'remember' for us.
To see what changed between two points of the history, you can ask the RCS tool to diff the two commits in concern.
To restore the state of the working directory at a point in the past, you can checkout the commit in concern. i.e., you can traverse the history of the working directory simply by checking out the commits you are interested in.
RCS: Revision control software are the software tools that automate the process of Revision Control i.e. managing revisions of software artifacts.
Tools → Git and GitHub → Checkout
Project Management → Revision Control → Using History
Can load a specific version of a Git repo
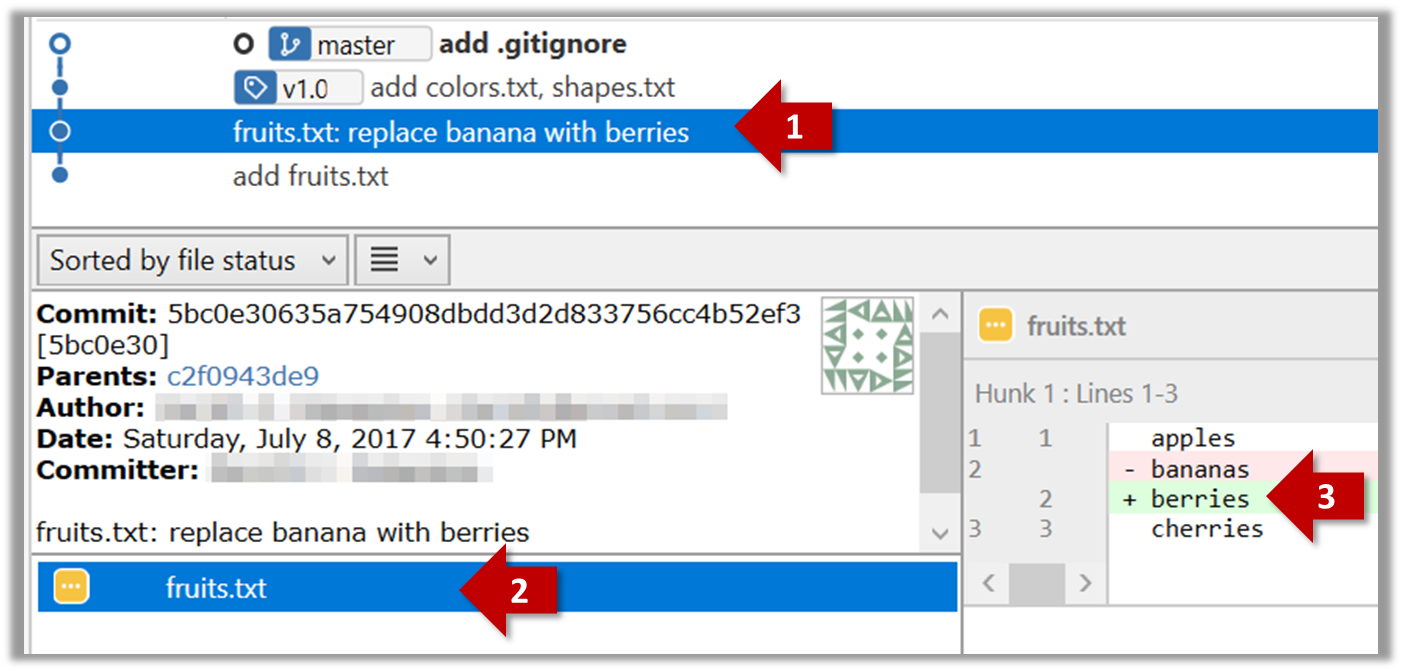
Git can show you what changed in each commit.
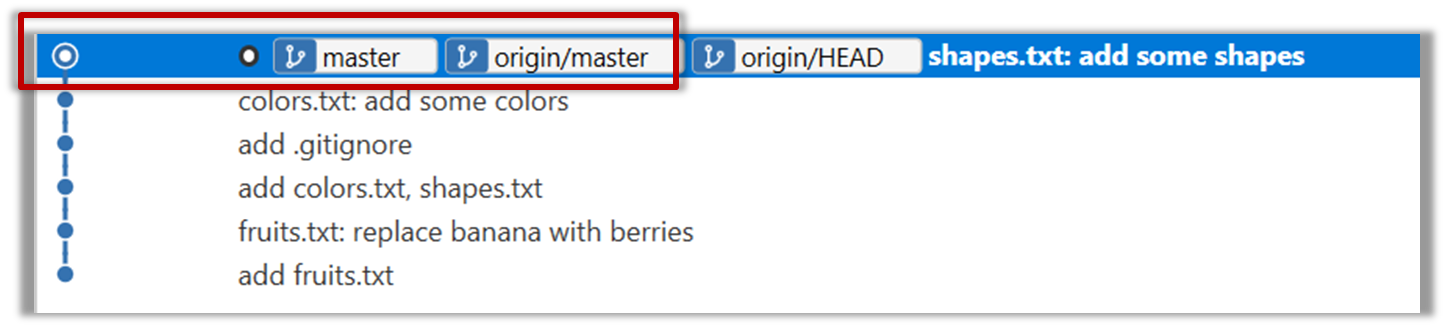
To see which files changed in a commit, click on the commit. To see what changed in a specific file in that commit, click on the file name.
git show < part-of-commit-hash >
Example:
git show 251b4cf
commit 5bc0e30635a754908dbdd3d2d833756cc4b52ef3
Author: … < … >
Date:   Sat Jul 8 16:50:27 2017 +0800

    fruits.txt: replace banana with berries

diff --git a/fruits.txt b/fruits.txt
index 15b57f7..17f4528 100644
--- a/fruits.txt
+++ b/fruits.txt
@@ -1,3 +1,3 @@
 apples
-bananas
+berries
 cherries
Git can also show you the difference between two points in the history of the repo.
Select the two points you want to compare using Ctrl+Click.
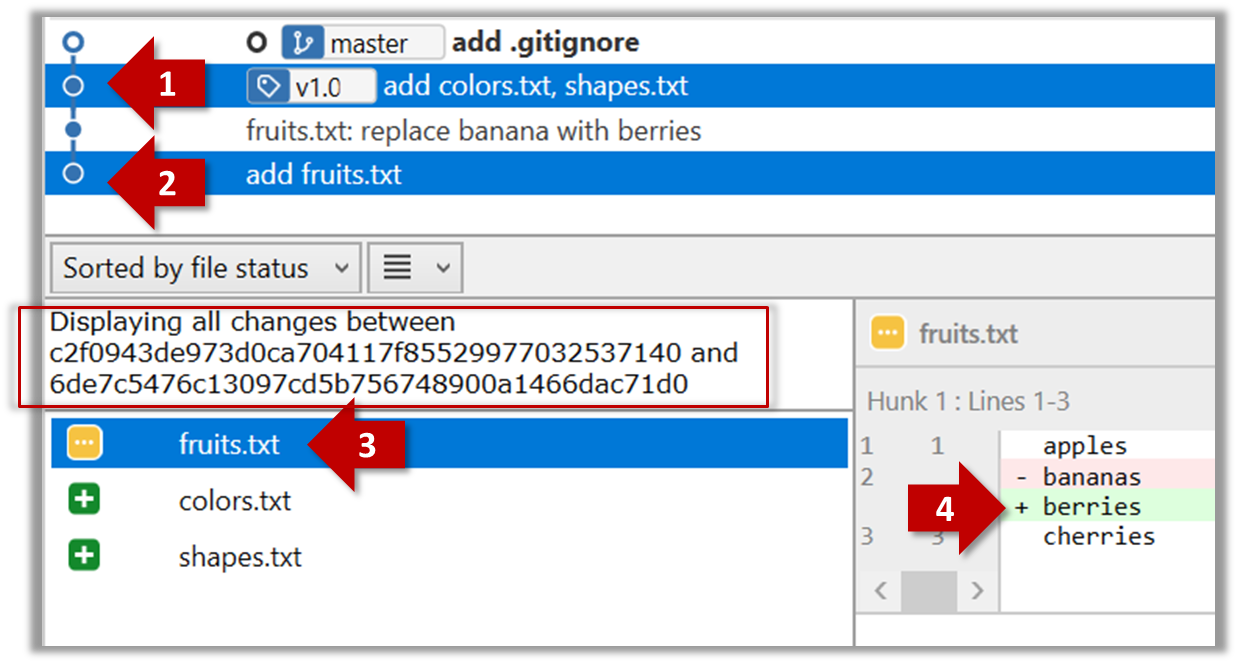
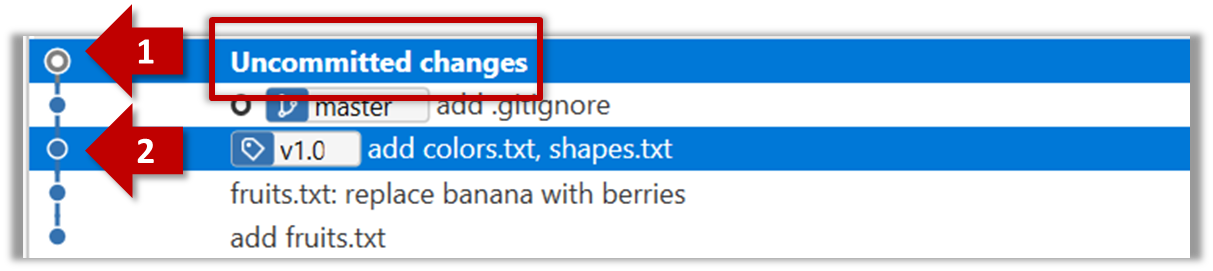
The same method can be used to compare the current state of the working directory (which might have uncommitted changes) to a point in the history.
The diff command can be used to view the differences between two points of the history.
git diff: shows the changes (uncommitted) since the last commitgit diff 0023cdd..fcd6199: shows the changes between the points indicated by by commit hashesgit diff v1.0..HEAD: shows changes that happened from the commit tagged asv1.0to the most recent commit.
Resources
Git can load a specific version of the history to the working directory. Note that if you have uncommitted changes in the working directory, you need to stash them first to prevent them from being overwritten.
Can use Git to stash files
You can use the git's stash feature to temporarily shelve (or stash) changes you've made to your working copy so that you can work on something else, and then come back and re-apply the stashed changes later on. -- adapted from this
Follow this article from SourceTree creators. Note the GUI shown in the article is slightly outdated but you should be able to map it to the current GUI.
Follow this article from Atlassian.
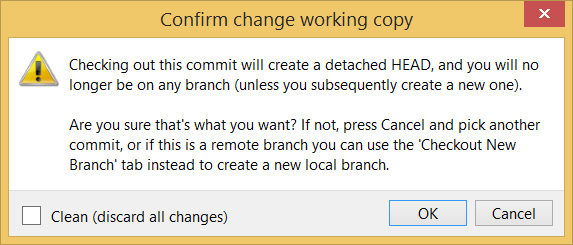
Double-click the commit you want to load to the working directory, or right-click on that commit and choose Checkout....
Click OK to the warning about ‘detached HEAD’ (similar to below).
The specified version is now loaded to the working folder, as indicated by the HEAD label. HEAD is a reference to the currently checked out commit.
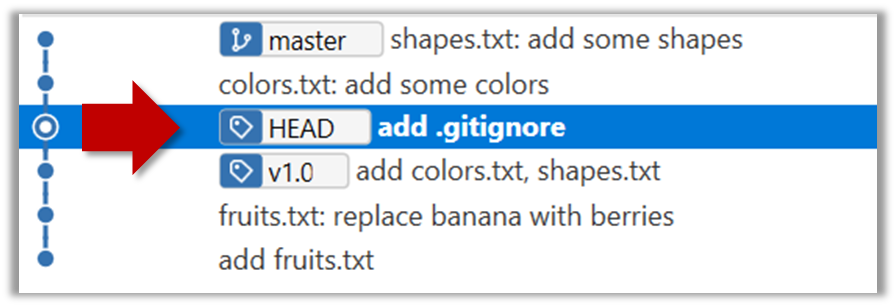
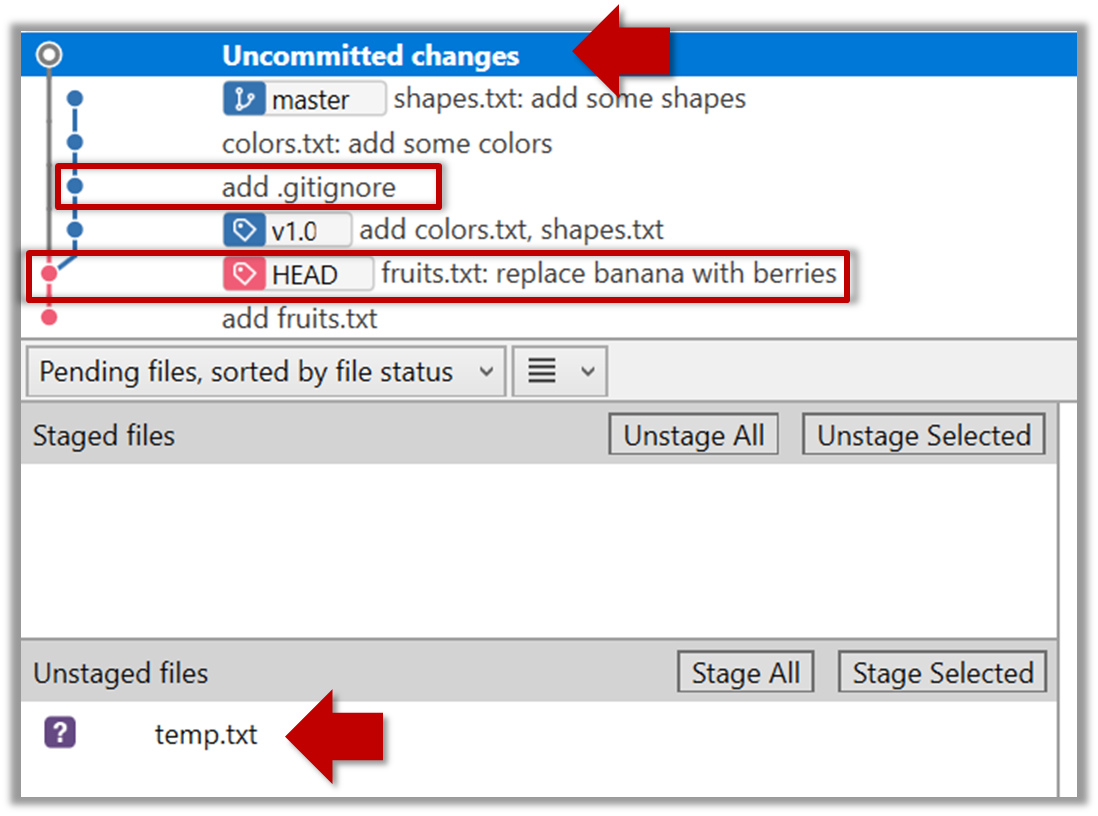
If you checkout a commit that come before the commit in which you added the .gitignore file, Git will now show ignored files as ‘unstaged modifications’ because at that stage Git hasn’t been told to ignore those files.
To go back to the latest commit, double-click it.
Use the checkout <commit-identifier> command to change the working directory to the state it was in at a specific past commit.
git checkout v1.0: loads the state as at commit taggedv1.0git checkout 0023cdd: loads the state as at commit with the hash0023cddgit checkout HEAD~2: loads the state that is 2 commits behind the most recent commit
For now, you can ignore the warning about ‘detached HEAD’.
Use the checkout <branch-name> to go back to the most recent commit of the current branch (the default branch in git is named master)
git checkout master
Tools → Git and GitHub → Tag
Project Management → Revision Control → Saving History
Can tag commits using Git
Let's tag a commit in a local repo you have (e.g. the sampelrepo-things repo)
Right-click on the commit (in the graphical revision graph) you want to tag and choose Tag…
Specify the tag name e.g. v1.0 and click Add Tag.
The added tag will appear in the revision graph view.
To add a tag to the current commit as v1.0,
git tag –a v1.0
To view tags
git tag
To learn how to add a tag to a past commit, go to the ‘Git Basics – Tagging’ page of the git-scm book and refer the ‘Tagging Later’ section.
Remember to push tags to the repo. A normal push does not include tags.
# push a specific tag
git push origin v1.0b

# push all tags
git push origin --tags
Tools → Git and GitHub → Stash
Can use Git to stash files
You can use the git's stash feature to temporarily shelve (or stash) changes you've made to your working copy so that you can work on something else, and then come back and re-apply the stashed changes later on. -- adapted from this
Follow this article from SourceTree creators. Note the GUI shown in the article is slightly outdated but you should be able to map it to the current GUI.
Follow this article from Atlassian.
Tools → Git and GitHub → Pull
Tools → Git & GitHub → Clone
Can pull changes from a repo
Clone the sample repo as explained in [Textbook Tools → Git & GitHub → Clone].
Delete the last two commits to simulate cloning the repo 2 commits ago.
Clone
Can clone a remote repo
Clone the sample repo samplerepo-things to your computer.
Note that the URL of the Github project is different from the URL you need to clone a repo in that Github project. e.g.
Github project URL: https://github.com/se-edu/samplerepo-things
Git repo URL: https://github.com/se-edu/samplerepo-things.git (note the .git at the end)
File → Clone / New… and provide the URL of the repo and the destination directory.
You can use the clone command to clone a repo.
Follow instructions given here.
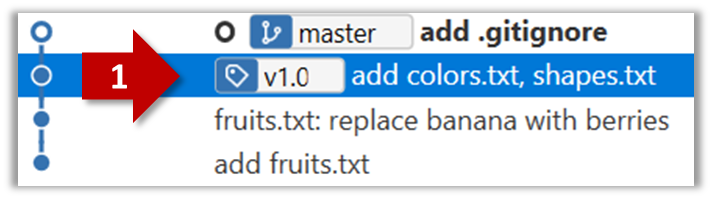
Right-click the target commit (i.e. the commit that is 2 commits behind the tip) and choose Reset current branch to this commit.

Choose the Hard - … option and click OK.
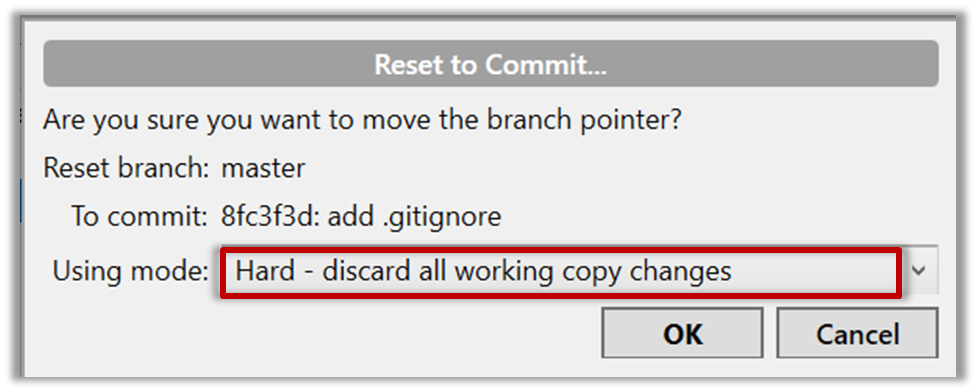
This is what you will see.

Note the following (cross refer the screenshot above):
Arrow marked as a: The local repo is now at this commit, marked by the master label.
Arrow marked as b: origin/master label shows what is the latest commit in the master branch in the remote repo.
Use the reset command to delete commits at the tip of the revision history.
git reset --hard HEAD~2
Now, your local repo state is exactly how it would be if you had cloned the repo 2 commits ago, as if somebody has added two more commits to the remote repo since you cloned it. To get those commits to your local repo (i.e. to sync your local repo with upstream repo) you can do a pull.
Click the Pull button in the main menu, choose origin and master in the next dialog, and click OK.

Now you should see something like this where master and origin/master are both pointing the same commit.
git pull origin
Tools → Git and GitHub → Push
Tools → Git & GitHub → Pull
Can push to a remote repo
-
Create a GitHub account if you don't have one yet.
-
Fork the samplerepo-things to your GitHub account:
How to fork a repo?
Navigate to the on GitHub and click on the
 button on the top-right corner.
 -
Clone the fork (not the original) to your computer.
-
Create some commits in your repo.
-
Push the new commits to your fork on GitHub
Click the Push button on the main menu, ensure the settings are as follows in the next dialog, and click the Push button on the dialog.
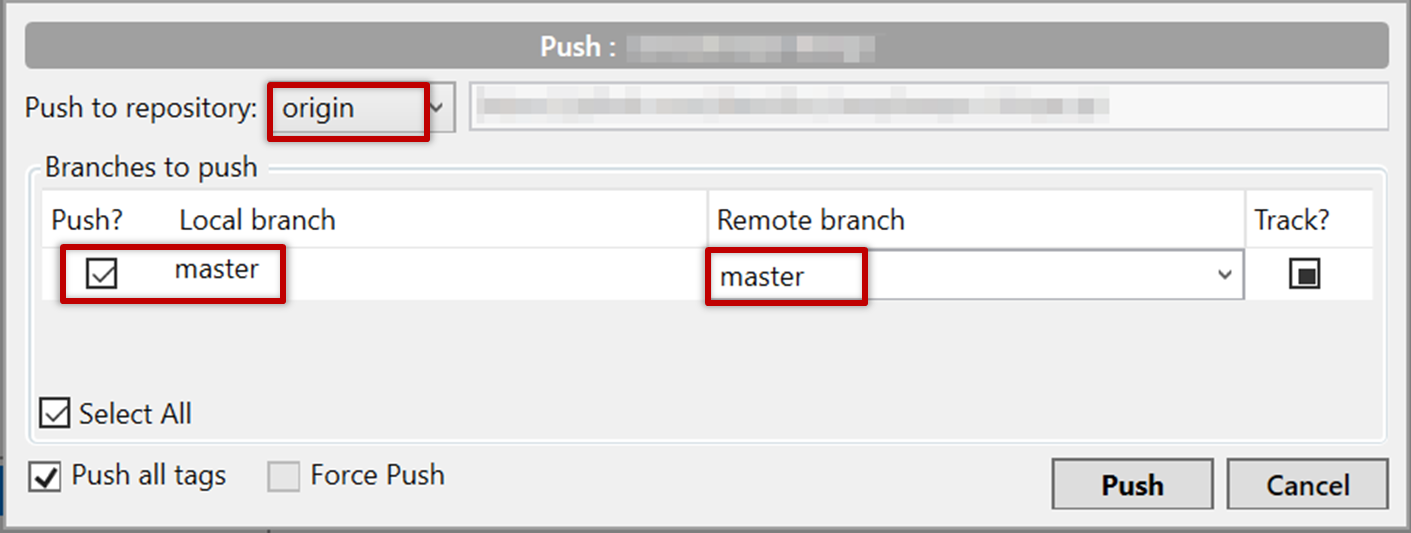
Tags are not included in a normal push. Remember to tick Push all tags when pushing to the remote repo if you want them to be pushed to the repo.
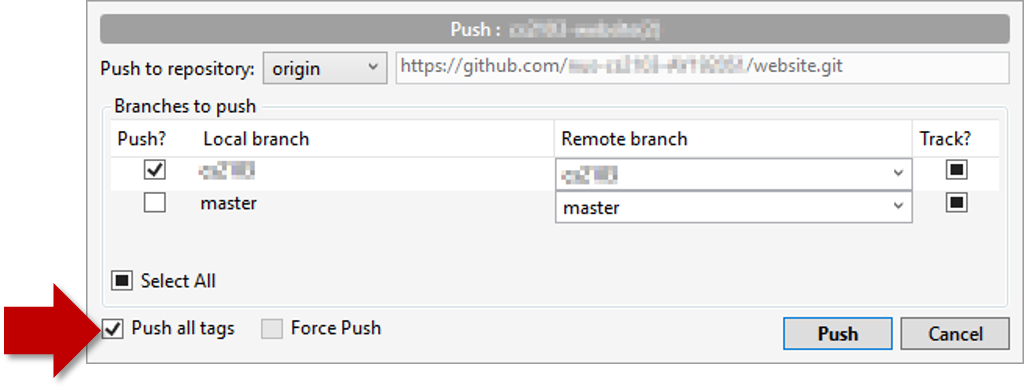
Use the command git push origin master. Enter Github username and password when prompted.
Tags are not included in a normal push. To push a tag, use this command: git push origin <tag_name> e.g.. git push origin v1.0
First, you need to create an empty remote repo on GitHub.
-
Login to your GitHub account and choose to create a new Repo.
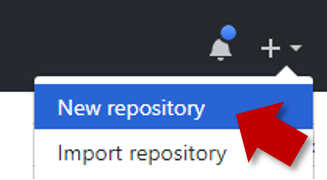
-
In the next screen, provide a name for your repo but keep the
Initialize this repo ...tick box unchecked.
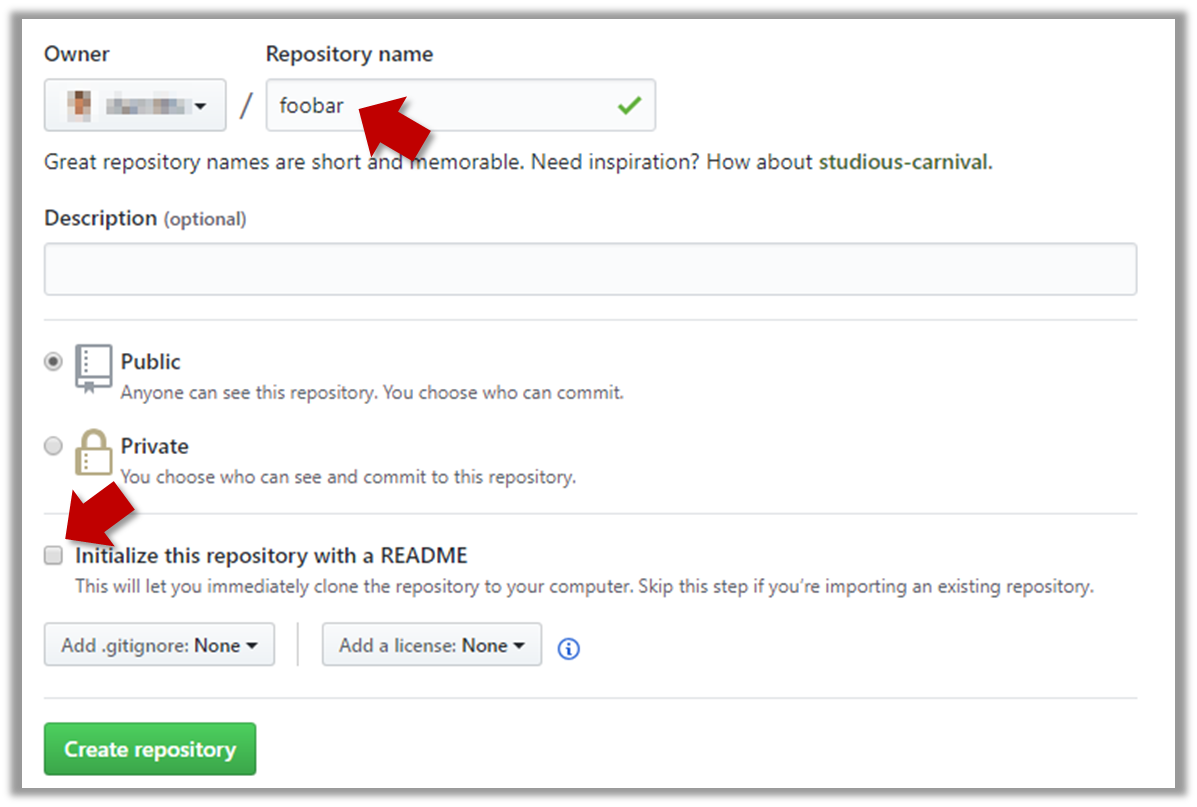
-
Note the URL of the repo. It will be of the form
https://github.com/{your_user_name}/{repo_name}.git
e.g.,https://github.com/johndoe/foobar.git
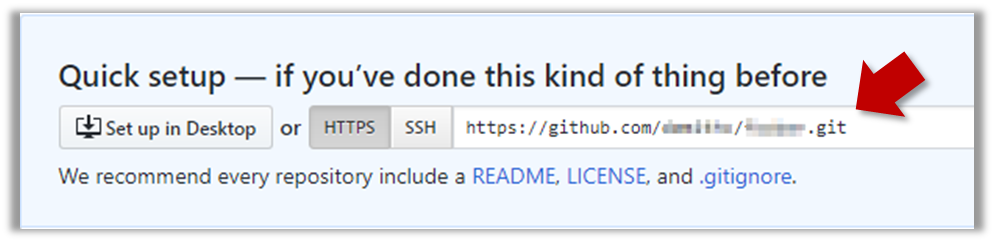
Next, you can push the existing local repo to the new remote repo as follows:
- Open the local repo in SourceTree.
- Choose
Repository→Repository Settingsmenu option. - Add a new remote to the repo with the following values.
Remote name: the name you want to assign to the remote repo. RecommendedoriginURL/path: the URL of your repo (ending in.git) that you collected earlier.Username: your GitHub username
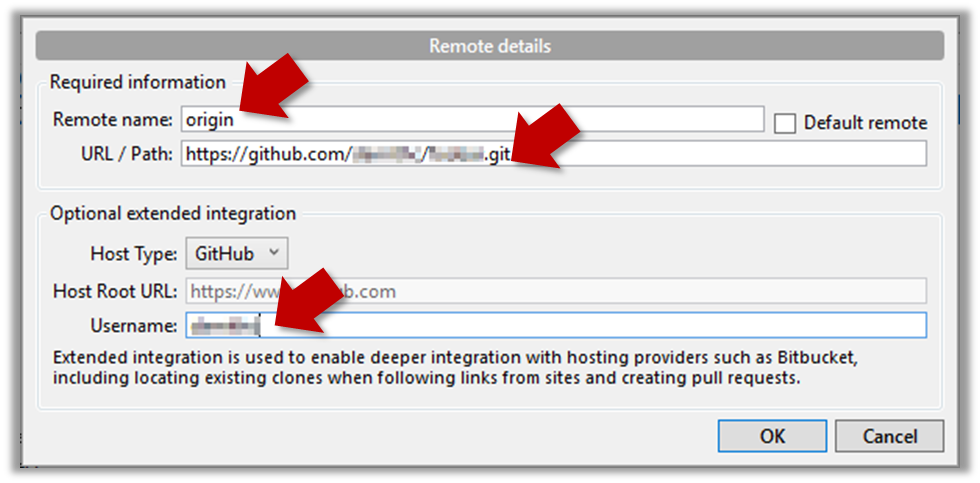
- Now you can push your repo to the new remote the usual way.
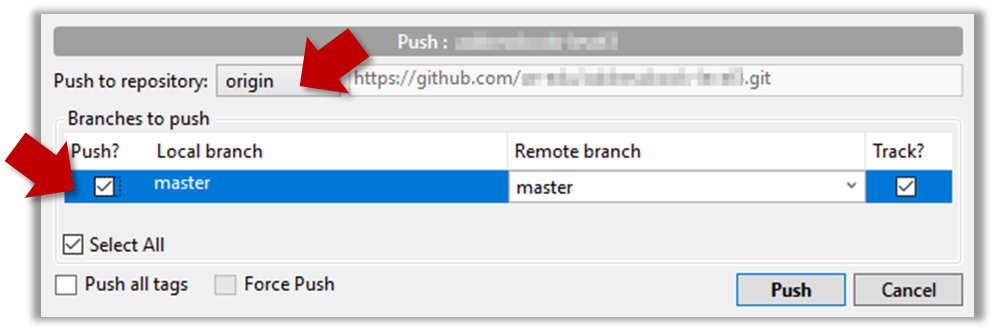
- Navigate to the folder containing the local repo.
- Set the new remote repo as a remote of the local repo.
command:git remote add {remote_name} {remote_repo_url}
e.g.,git remote add origin https://github.com/johndoe/foobar.git - Push to the new remote the usual way. You can use the
-uflag to inform Git that you wish to i.e., remember which branch in the remote repo corresponds to which branch in the local repotrack the branch.
e.g.,git push -u origin master