repl.it linkIndividual Project (iP):
Team Project (tP):
Week 4 [from Wed Jan 29 noon] - Project
iP:
- Create a PR to the upstream repo by Friday before the tutorial
- Add Increments:
Level-4,A-TextUiTesting,A-CodeQuality - Get ready to review PRs before the tutorial
tP:
- Start weekly project meetings
- Decide on an overall project direction (user profile, problem addressed)
- Start a collaborative doc to take project notes before the tutorial
iP
1 Create a PR to the upstream repo by Friday before the tutorial
- Create a pull request (PR) from the
masterbranch of your fork to the upstream repo. Here are the steps:- Go to your Duke fork on GitHub
- Click on the button in that page.
- In the next page, click on the green button.
- Set the PR name as
[{Your name}] iPe.g.,[John Doe] iPIf you are reluctant to give full name, you may give the first half of your name only.
You may leave the description as empty. - Click the button to create the PR.
- As an additional precaution, you can go to the upstream Duke repo to double-check that your PR is in the list of PRs.
The PR will update automatically to reflect your latest code every time you push code to your fork.
Pull Requests is a mechanism for offering code to a repository e.g., a bug fix or a new feature. PRs allow developers to review, discuss, and refine proposed code changes before incorporating (i.e., merging) the new code to the repository.
Resources:
2 Add Increments: Level-4, A-TextUiTesting, A-CodeQuality
Level-4: ToDo, Event, Deadline
Level 4. ToDos, Events, Deadlines
Add support for tracking three types of tasks:
- ToDos: tasks without any date/time attached to it e.g., visit new theme park
- Deadlines: tasks that need to be done before a specific date/time e.g., submit report by 11/10/2019 5pm
- Events: tasks that start at a specific time and ends at a specific time e.g., team project meeting on 2/10/2019 2-4pm
Example:
todo borrow book
    ____________________________________________________________
     Got it. I've added this task:
       [T][✗] borrow book
     Now you have 5 tasks in the list.
    ____________________________________________________________

list
    ____________________________________________________________
     Here are the tasks in your list:
     1.[T][✓] read book
     2.[D][✗] return book (by: June 6th)
     3.[E][✗] project meeting (at: Aug 6th 2-4pm)
     4.[T][✓] join sports club
     5.[T][✗] borrow book
    ____________________________________________________________

deadline return book /by Sunday
    ____________________________________________________________
     Got it. I've added this task:
       [D][✗] return book (by: Sunday)
     Now you have 6 tasks in the list.
    ____________________________________________________________

event project meeting /at Mon 2-4pm
    ____________________________________________________________
     Got it. I've added this task:
       [E][✗] project meeting (at: Mon 2-4pm)
     Now you have 7 tasks in the list.
    ____________________________________________________________
At this point, dates/times can be treated as strings; there is no need to convert them to actual dates/times.
Example:
deadline do homework /by no idea :-p
    ____________________________________________________________
     Got it. I've added this task:
       [D][✗] do homework (by: no idea :-p)
     Now you have 6 tasks in the list.
    ____________________________________________________________
When implementing this feature, you are also recommended to implement the following extension:
Extension: A-Inheritance
As there are multiple types of tasks that have some similarity between them, you can implement classes Todo, Deadline and Event classes to inherit from a Task class.
Furthermore, use polymorphism to store all tasks in a data structure containing Task objects e.g., Task[100].
Partial solution
public class Deadline extends Task {

    protected String by;

    public Deadline(String description, String by) {
        super(description);
        this.by = by;
    }

    @Override
    public String toString() {
        return "[D]" + super.toString() + " (by: " + by + ")";
    }
}
Task[] tasks = new Task[100];
task[0] = new Deadline("return book", "Monday");
A-CodeQuality: Improve Code Quality 3 Get ready to review PRs before the tutorial
- Do the following to prepare for the PR review exercise you will be doing in the coming tutorial. for that exercise. In particular, read the given blog post about code review best practices.
- Read up the following guidelines:
Admin Using GitHub → Guidelines for Reviewing PRs
We expect the PR peer-review to be mutually beneficial to the reviewer and the author. i.e., you receive suggestions on how to improve your code, and get to learn alternative designs by reading others' code.
- If you are new to GitHub PRs, see GitHub help on how to review PRs.
- Read the blog post 10 tips for reviewing code you don’t like - by David Lloyd (a Red Hat developer). In particular, follow the tip about phrasing objections as questions.
- Rather than give one overall comment for the entire PR, add specific comments at relevant places of the code.
- Feel free to ask for more info from the author, to help you understand the code/design. For example, you can ask why the author chose to write the code in a specific way.
- Feel free to compliment the author when appropriate e.g., hey, I like how clean this bit of code is 👍
- You can also suggest alternatives for the author to consider. Feel free to refer back to your own PR if you think a comparison would benefit the author. You are very welcome to offer to help the author with the project (in your PR review, or outside of it) if you think the author needs such help i.e., as an informal mentor. Such mentoring will help both the author and you to become stronger programmers.
- You can use Markdown (specifically, GitHub-Flavored Markdown) in your comments.
Guidelines for authors:
- Don't get into arguments with reviewers. If you disagree with the reviewer, you can explain your own view in a non-confrontational way without trying to prove your way is better.
- Thank reviewers for their inputs.
- Additional guidelines:
- Comment on coding standard violations.
- At the end of the review, we recommend you to choose
Comment(i.e., notApproveorRequest changes)
- Use the iP Code Dashboard to view others' code: We'll let you know when you can start using the iP Code Dashboard (also available via
Links → iP Code Dashboarditem in the top navigation menu of the module website) to easily view iP code written by classmates. Click on the </> icon corresponding to a student name to see the code written by that person. We encourage you to read others’ code and learn from them. If you adopt solutions from others (also encouraged), please follow our reuse policy.
Admin Module Policies → Policy on Reuse
Policy on reuse
Reuse is encouraged. However, note that reuse has its own costs (such as the learning curve, additional complexity, usage restrictions, and unknown bugs). Furthermore, you will not be given credit for work done by others. Rather, you will be given credit for reusing work done by others.
- You are allowed to reuse work from your classmates, subject to following conditions:
- The work has been shared publicly by us or the authors.
- You clearly give credit to the original author(s).
- You are allowed to reuse work from external sources, subject to following conditions:
- The work comes from a source of 'good standing' (such as an established open source project). This means you cannot reuse code written by an outside 'friend'.
- You clearly give credit to the original author. Acknowledge use of third party resources clearly e.g. in the welcome message, splash screen (if any) or under the 'about' menu. If you are open about reuse, you are less likely to get into trouble if you unintentionally reused something copyrighted.
- You do not violate the license under which the work has been released. Please do not use 3rd-party images/audio in your software unless they have been specifically released to be used freely. Just because you found it in the Internet does not mean it is free for reuse.
- Always get permission from us before you reuse third-party libraries. Please post your 'request to use 3rd party library' in our forum. That way, the whole class get to see what libraries are being used by others.
Giving credit for reused work
Given below are how to give credit for things you reuse from elsewhere. These requirements are specific to this module i.e., not applicable outside the module (outside the module you should follow the rules specified by your employer and the license of the reused work)
If you used a third party library:
- iP/tP: Mention in the
READMEfile (under the Acknowledgements section) - tP: Mention in the Project Portfolio Page if the library has a significant relevance to the features you implemented
If you reused code snippets found on the Internet e.g. from StackOverflow answers or
referred code in another software or
referred project code by current/past student:
- If you read the code to understand the approach and implemented it yourself, mention it as a comment
Example://Solution below adapted from https://stackoverflow.com/a/16252290
{Your implmentation of the reused solution here ...} - If you copy-pasted a non-trivial code block (possibly with minor modifications renaming, layout changes, changes to comments, etc.), also mark the code block as reused code (using
@@authortags)
Format://@@author {yourGithubUsername}-reused
//{Info about the source...}
{Reused code (possibly with minor modifications) here ...}
//@@authorpersons = getList()
//@@author johndoe-reused
//Reused from https://stackoverflow.com/a/34646172 with minor modifications
Collections.sort(persons, new Comparator<CustomData>() {
@Override
public int compare(CustomData lhs, CustomData rhs) {
return lhs.customInt > rhs.customInt ? -1 : 0;
}
});
//@@author
return persons;
Adding @@author tags indicate authorship
-
Mark your code with a
//@@author {yourGithubUsername}. Note the double@.
The//@@authortag should indicates the beginning of the code you wrote. The code up to the next//@@authortag or the end of the file (whichever comes first) will be considered as was written by that author. Here is a sample code file://@@author johndoe
method 1 ...
method 2 ...
//@@author sarahkhoo
method 3 ...
//@@author johndoe
method 4 ... -
If you don't know who wrote the code segment below yours, you may put an empty
//@@author(i.e. no GitHub username) to indicate the end of the code segment you wrote. The author of code below yours can add the GitHub username to the empty tag later. Here is a sample code with an emptyauthortag:method 0 ...
//@@author johndoe
method 1 ...
method 2 ...
//@@author
method 3 ...
method 4 ... -
The author tag syntax varies based on file type e.g. for java, css, fxml. Use the corresponding comment syntax for non-Java files.
Here is an example code from an xml/fxml file.<!-- @@author sereneWong -->
<textbox>
<label>...</label>
<input>...</input>
</textbox>
... -
Do not put the
//@@authorinside java header comments.
👎/**
* Returns true if ...
* @@author johndoe
*/👍
//@@author johndoe
/**
  * Returns true if ...
  */
What to and what not to annotate
-
Annotate both functional and test code There is no need to annotate documentation files.
-
Annotate only significant size code blocks that can be reviewed on its own e.g., a class, a sequence of methods, a method.
Claiming credit for code blocks smaller than a method is discouraged but allowed. If you do, do it sparingly and only claim meaningful blocks of code such as a block of statements, a loop, or an if-else statement.- If an enhancement required you to do tiny changes in many places, there is no need to annotate all those tiny changes; you can describe those changes in the Project Portfolio page instead.
- If a code block was touched by more than one person, either let the person who wrote most of it (e.g. more than 80%) take credit for the entire block, or leave it as 'unclaimed' (i.e., no author tags).
- Related to the above point, if you claim a code block as your own, more than 80% of the code in that block should have been written by yourself. For example, no more than 20% of it can be code you reused from somewhere.
- GitHub has a blame feature and a history feature that can help you determine who wrote a piece of code.
-
Do not try to boost the quantity of your contribution using unethical means such as duplicating the same code in multiple places. In particular, do not copy-paste test cases to create redundant tests. Even repetitive code blocks within test methods should be extracted out as utility methods to reduce code duplication. Individual members are responsible for making sure code attributed to them are correct. If you notice a team member claiming credit for code that he/she did not write or use other questionable tactics, you can email us (after the final submission) to let us know.
-
If you wrote a significant amount of code that was not used in the final product,
- Create a folder called
{project root}/unused - Move unused files (or copies of files containing unused code) to that folder
- use
//@@author {yourGithubUsername}-unusedto mark unused code in those files (note the suffixunused) e.g.
//@@author johndoe-unused
method 1 ...
method 2 ...
Please put a comment in the code to explain why it was not used.
- Create a folder called
-
If you reused code from elsewhere, mark such code as
//@@author {yourGithubUsername}-reused(note the suffixreused) e.g.//@@author johndoe-reused
method 1 ...
method 2 ... -
You can use empty
@@authortags to mark code as not yours when RepoSense attribute the to you incorrectly.-
Code generated by the IDE/framework, should not be annotated as your own.
-
Code you modified in minor ways e.g. adding a parameter. These should not be claimed as yours but you can mention these additional contributions in the Project Portfolio page if you want to claim credit for them.
-
At the end of the project each student is required to submit a Project Portfolio Page.
PPP Objectives
- For you to use (e.g. in your resume) as a well-documented data point of your SE experience
- For evaluators to use as a data point to evaluate your project contributions
PPP Sections to include
- Overview: A short overview of your product to provide some context to the reader. The opening 1-2 sentences may be reused by all team members. If your product overview extends beyond 1-2 sentences, the remainder should be written by yourself.
- Summary of Contributions --Suggested items to include:
- Code contributed: Give a link to your code on tP Code Dashboard. The link is available in the Project List Page -- linked to the icon under your photo.
- Enhancements implemented: A summary of the enhancements you implemented.
- Contributions to documentation: Which sections did you contribute to the UG?
- Contributions to the DG: Which sections did you contribute to the DG? Which UML diagrams did you add/updated?
- Contributions to team-based tasks :
- Review/mentoring contributions: Links to PRs reviewed, instances of helping team members in other ways
- Contributions beyond the project team:
- Evidence of helping others e.g. responses you posted in our forum, bugs you reported in other team's products,
- Evidence of technical leadership e.g. sharing useful information in the forum
Team-tasks are the tasks that someone in the team has to do. Marks allocated to team-tasks will be divided among team members based on how much each member contributed to those tasks.
Examples of team-tasks
Here is a non-exhaustive list of team-tasks:
- Necessary general code enhancements
- Setting up tools e.g., GitHub, Gradle
- Maintaining the issue tracker
- Release management
- Updating user/developer docs that are not specific to a feature e.g. documenting the target user profile
- Incorporating more useful tools/libraries/frameworks into the product or the project workflow (e.g. automate more aspects of the project workflow using a GitHub plugin)
Keep in mind that evaluators will use the PPP to estimate your project effort. We recommend that you mention things that will earn you a fair score e.g., explain how deep the enhancement is, why it is complete, how hard it was to implement etc..
-
[Optional] Contributions to the User Guide (Extracts): Reproduce the parts in the User Guide that you wrote. This can include features you implemented as well as features you propose to implement.
The purpose of allowing you to include proposed features is to provide you more flexibility to show your documentation skills. e.g. you can bring in a proposed feature just to give you an opportunity to use a UML diagram type not used by the actual features. -
[Optional] Contributions to the Developer Guide (Extracts): Reproduce the parts in the Developer Guide that you wrote. Ensure there is enough content to evaluate your technical documentation skills and UML modelling skills. You can include descriptions of your design/implementations, possible alternatives, pros and cons of alternatives, etc.
-
[Optional] If you plan to use the PPP in your Resume, you can also include your SE work outside of the module (will not be graded).
PPP Format
- File name (i.e., in the repo):
docs/team/githbub_username_in_lower_case.mde.g.,docs/team/goodcoder123.md - Follow the example in the AddressBook-Level3
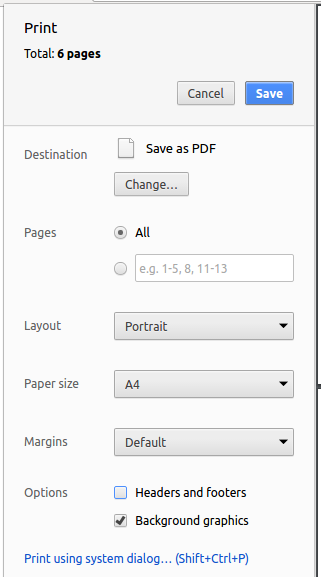
- To convert the UG/DG/PPP into PDF format, go to the generated page in your project's github.io site and use this technique to save as a pdf file. Using other techniques can result in poor quality resolution (will be considered a bug) and unnecessarily large files. You may un-tick the
background graphicsoption as well if you wish.
Admin Using This Webiste → Saving as PDF Files
- Ensure hyperlinks in the pdf files work. Your UG/DG/PPP will be evaluated using PDF files during the PE. Broken/non-working hyperlinks in the PDF files will be reported as bugs and will count against your project score. Again, use the conversion technique given above to ensure links in the PDF files work.
PPP Page Limit
| Content | Recommended | Hard Limit |
|---|---|---|
| Overview + Summary of contributions | 0.5-1 | 2 |
| [Optional] Contributions to the User Guide | 1-3 | |
| [Optional] Contributions to the Developer Guide | 3-6 |
- The page limits given above are after converting to PDF format. The actual amount of content you require is actually less than what these numbers suggest because the HTML → PDF conversion adds a lot of spacing around content.
tP: Inception
Timely completion of the weekly tP tasks can improve the project management component of your tP grade.
Admin tP → Grading → Project Management
5A. Process:
Evaluates: How well you did in project management related aspects of the project, as an individual and as a team
Based on: tutor/bot observations of project milestones and GitHub data
Grading criteria:
- No e.g., the product is not working at all by the milestone deadlinemajor mishaps at v1.0 and v2.0.
- Good attempt to use of at least some Git and GitHub features (e.g., milestones, releases, issue tracker, PRs)
- Project done iteratively and incrementally (opposite: doing most of the work in one big burst)
5B. Team-tasks:
Evaluates: How much you contributed to team-tasks
Admin tP → Expectations: Examples of team-tasks
Here is a non-exhaustive list of team-tasks:
- Necessary general code enhancements
- Setting up tools e.g., GitHub, Gradle
- Maintaining the issue tracker
- Release management
- Updating user/developer docs that are not specific to a feature e.g. documenting the target user profile
- Incorporating more useful tools/libraries/frameworks into the product or the project workflow (e.g. automate more aspects of the project workflow using a GitHub plugin)
Based on: peer evaluations, tutor observations
Grading criteria: To earn full marks,
- you have done close to a fair share of the team tasks. You can earn bonus marks by doing more than your fair share.
- you have merged code in at least four of weeks 7, 8, 9, 10, 11, 12
1 Start weekly project meetings
- We recommend you start weekly project meetings now. You can use the meeting to do tP tasks, but also help each other do iP tasks. On a related note, it is also acceptable to discuss weekly post-lecture quiz (if any) together with team members as you do the quiz i.e., discuss and decide the answer collectively, but you should not give away your answers to someone who was not part of that discussion.
2 Decide on an overall project direction (user profile, problem addressed)
- Decide project direction, target user profile, and problem addressed: Use your first project meeting to discuss with your team members and decide your project direction, target user profile, and the value proposition of the product, as described in the panels below:
Admin tP: Expectations
project expectations
Outcomes
The high-level learning outcome of the team project (tP):
Accordingly, the tP is structured to resemble an early stage of a small software project in which you will,
- conceptualize and implement a product, and,
- have it ready to be continued by future developers
The focus of the tP is to learn the following aspects:
coding- working in a team
- process/workflow
- documentation
- scheduling and tracking project progress, meeting delivery deadline
- quality assurance
Direction
You may develop any product provided it is meant for users who can type fast, and prefer typing over mouse/voice commands. Therefore, Command Line Interface (CLI) is the primary mode of input.
Admin tP Contstraints → Constraint-Typing-Preferred
Admin tP Contstraints → Recommendation-CLI-First
Recommendation-CLI-First
Following from the Constraint-Typing-Preferred, if the app is optimized for the target user (graded under the product design criterion), a user who can type fast should be able to accomplish most tasks faster via CLI, compared to a hypothetical GUI-only version of the app. For example, adding a new entity via the CLI should be faster than entering the same data through a GUI form.
Therefore, the input to the app needs to be primarily CLI. If you do implement a GUI, that GUI should primarily be used to give visual feedback to the user. While we don't prohibit non-CLI inputs, note that such inputs will reduce the suitability of the product to target users. Therefore, give CLI alternatives to mouse/GUI inputs, if applicable.
Also keep in mind:
- Regular typing is usually faster than using key combinations.
- typing the full command and hitting ENTER will complete the taskOne-shot commands are faster over prompting the user to input one parameter at a timemulti-step commands. If you provide a multi-step command to help new users, you can also provide a one-shot equivalent for regular/expert users.
For example, an app to manage one of these:
- Contact details
- Bookmarks of websites
- Tasks/Schedule
- Location info
- Thing to memorize i.e. flash cards, trivia
- Forum posts, news feeds, Social media feeds
- Online projects or issue trackers that the user is interested in
- Emails, possibly from different accounts
- Multiple types of related things e.g. Contacts and Tasks (if Tasks are allocated to Contacts)
- ...
You are strongly discouraged from developing a GUI application as it can increase the workload unnecessarily.
Admin tP Contstraints → Recommendation-No-GUI
Recommendation-No-GUI
Creating a good Java GUI takes a lot of extra effort, which can easily push the tP effort beyond the expected range. In addition, good GUI design is not a learning outcome of this module. Therefore, you are strongly discouraged from creating a GUI application. Choose the GUI path only if you are willing to take the extra workload on top of the module's normal load.
Target User & Value Proposition
You are expected to:
- Define a very specific target user profile.
We require you to narrow down the target user profile as opposed to trying to make it as general as possible. Here is an example direction of narrowing down target user: anybody → teachers → university teachers → tech savvy university teachers → CS2113/T instructors.
Be careful not to contradict given project constraints when defining the user profile e.g. the target user should still prefer typing over mouse actions.
Why the need to narrow down the user profile?
- It is an opportunity to exercise your product design skills because optimizing the product to a very specific target user requires good product design skills.
- It minimizes the overlap between features of different teams which can cause plagiarism issues. Furthermore, higher the number of other teams having the same features, less impressive your work becomes especially if others have done a better job of implementing that feature.
- Define a clear value proposition that matches the target user profile i.e., what problem does the product solve? how does it make the the user's life easier?
- Optimize the product to the chosen target users i.e., add features that are especially/only applicable for target users (to make the app especially attractive to them).
-
Example 1: If the product targets CS2113/T instructors, there can be features that are applicable to them only, such as the ability to navigate to a student's project on GitHub
-
Example 2: If your app manages contacts, you can optimize its features based on,
- the profession of the target user e.g. doctors, salesmen, teachers, etc.
- the nature/scale of contacts e.g. huge number of contacts (for HR admins, user group admins), mostly incomplete contacts, highly volatile contact details, contacts become inactive after a specific period (e.g. contract employees)
- what users do with the contacts e.g. organize group events, share info, do business, do analytics
Your project will be graded based on how well the features match the target user profile and how well the features fit-together.
-
Functionality Expectations
The expected level of functionality from a team is roughly what you can achieve if each member contribute about the same amount of functional code as required by a i.e., if all requirements were met at the minimal level specifiedtypical iP.
Note that we have reduced the tP functionality expectations for this semester by about 40-50% compared to the previous semester, in order to reduce your workload. Adding more functionality than the expected level will not increase your marks. You are better off spending that effort in improving other aspects of the project. In fact, here is the grading criterion for the individual project effort:
Admin tP Deliverables → PE → Evaluating the Implementation Effort
Consider implementation work only (i.e., exclude testing, documentation, project management etc.)
The typical iP refers to an iP where all the requirements are met at the minimal expectations given.
Use the person's PPP and RepoSense page to evaluate the effort.
Team Expectations
- Expectation Preserve product integrity i.e. ensure,
- features fit together to form a cohesive product,
- documentation follows a consistent style and presents a cohesive picture to the reader, and
- final project demo presents a cohesive picture to the audience.
- Expectation Maintain product quality i.e. prevent breaking other parts of the product as it evolves. Note that bugs local to a specific feature will be counted against the author of that feature. However, if a new enhancement breaks the entire product, the whole team will have to share the penalty.
- Expectation Manage the project i.e. ensure workflow, code maintenance, integration, releases, etc. are done smoothly.
Individual Expectations
Individual Expectations on Implementation
-
Expectation Contribute to the functional code of the product.
- User-visible features are preferred, but it is not a strict requirement.:
- The enhancement(s) should fit with the rest of the software (and the target user profile) and should have the consent of the team members. You will lose marks if you go 'rogue' and add things that don't fit with the product.
-
Tip: Contribute to all aspects of the project e.g. write backend code, frontend code, test code, user documentation, and developer documentation. Reason: If you limit yourself to certain aspects only, you could lose marks allocated for the aspects you did not do. In addition, the final exam assumes that you are familiar with all aspects of the project.
-
Tip: Do all the work related to your enhancement yourself. Reason:If there is no clear division of who did which enhancement, it will be difficult to divide project credit (or assign responsibility for bugs detected by testers) later.
Individual Expectations on Documentation
- Objective: showcase your ability to write both user-facing documentation and developer-facing documentation.
- Expectation Update the User Guide (UG) and the Developer Guide (DG) parts that are related to the enhancements you added. The minimum requirement is given below. (Reason: Evaluators will not be able to give you marks unless there is sufficient evidence of your documentation skills.)
- UG: at least 1 page
- DG: at least 1 page
- Tip: If the UG/DG updates for your enhancements are not enough to reach the above requirements, you can make up the shortfall by documenting 'proposed' features and alternative designs/implementations.
- Expectation Use at least some of the UML diagrams in your DG updates i.e., diagrams you added yourself or those you modified significantly.
Individual Expectations on Testing
- Expectation Write some automated tests so that we can evaluate your ability to write tests.
🤔 How much testings is enough? We expect you to decide. You learned different types of testing and what they try to achieve. Based on that, you should decide how much of each type is required. Similarly, you can decide to what extent you want to automate tests, depending on the benefits and the effort required.
There is no requirement for a minimum coverage level. Note that in a production environment you are often required to have at least 90% of the code covered by tests. In this project, it can be less. The weaker your tests are, the higher the risk of bugs, which will cost marks if not fixed before the final submission.
Individual Expectations on Teamwork
- Expectation Do a fair share of the team-tasks.
Team-tasks are the tasks that someone in the team has to do. Marks allocated to team-tasks will be divided among team members based on how much each member contributed to those tasks.
Examples of team-tasks
Here is a non-exhaustive list of team-tasks:
- Necessary general code enhancements
- Setting up tools e.g., GitHub, Gradle
- Maintaining the issue tracker
- Release management
- Updating user/developer docs that are not specific to a feature e.g. documenting the target user profile
- Incorporating more useful tools/libraries/frameworks into the product or the project workflow (e.g. automate more aspects of the project workflow using a GitHub plugin)
- Expectation Assume a fair share of project roles and responsibilities.
Roles indicate aspects you are in charge of and responsible for. E.g., if you are in charge of documentation, you are the person who should allocate which parts of the documentation is to be done by who, ensure the document is in right format, ensure consistency etc.
Recommended roles and responsibilities
This is a non-exhaustive list; you may define additional roles.
- Team lead: Responsible for overall project coordination.
- Documentation (short for ‘in charge of documentation’): Responsible for the quality of various project documents.
- Testing: Ensures the testing of the project is done properly and on time.
- Code quality: Looks after code quality, ensures adherence to coding standards, etc.
- Deliverables and deadlines: Ensure project deliverables are done on time and in the right format.
- Integration: In charge of versioning of the code, maintaining the code repository, integrating various parts of the software to create a whole.
- Scheduling and tracking: In charge of defining, assigning, and tracking project tasks.
- [Tool ABC] expert: e.g. Intellij expert, Git expert, etc. Helps other team member with matters related to the specific tool.
- In charge of[Area XYZ] of the code: e.g. In charge of the code that deals with storage, etc. If you are in charge of an area, you are expected to know that area well, and review changes done to that code.
Ensure each of the important roles are assigned to one person in the team. It is OK to have a 'backup' for each role, but for each aspect there should be one person who is unequivocally the person responsible for it. Reason: when everyone is responsible for everything, no one is.
- Expectation Review each others work. Reason: reviewing skills is a learning outcome, and it is mutually beneficial.
Admin tP: Constraints
Your project should comply with the following constraints. Reason: to increase comparability among projects and to maximize applicability of module learning outcomes in the project.
Constraint-Typing-Preferred
The product should be targeting users who can type fast and prefer typing over other means of input.
Reason: to increase comparability of products, and to make feature evaluation easier for peer evaluators.
Constraint-Single-User
The product should be for a single user i.e. (not a multi-user product).
Reason: multi-user systems are hard to test, which is unfair for peer testers who will be graded based on the number of bugs they find.
Constraint-Incremental
The product needs to be developed incrementally over the project duration. While it is fine to do less in some weeks and more in other weeks, a reasonably consistent delivery rate is expected. For example, it is not acceptable to do the entire project over the recess week and do almost nothing for the remainder of the semester.
Reasons: 1. To simulate a real project where you have to work on a code base over a long period, possibly with breaks in the middle. 2. To learn how to deliver big features in small increments.
Constraint-Human-Editable-File
The data should be stored locally and should be in a human editable text file.
Reason: To allow advanced users to manipulate the data by editing the data file.
Constraint-No-DBMS
Do not use a Database Management System e.g., MySQLDBMS to store data.
Reason: Using a DBMS to store data will reduce the room to apply OOP techniques to manage data. It is true that most real world systems use a DBMS, but given the small size of this project, we
need to optimize it for CS2113/T
module learning outcomes; covering DBMS-related topics will have to be left to database modules or level 3 project modules.
Constraint-OO
The software should follow the Object-oriented paradigm primarily (but you are allowed to mix in a bit other styles when justifiable).
Reason: For you to practice using OOP in a non-trivial project.
Constraint-Platform-Independent
The software should work on the Windows, Linux, and OS-X platforms. Even if you are unable to manually test the app on all three platforms, consciously avoid using OS-dependent libraries and OS-specific features.
Reason: Peer testers should be able to use any of these platforms.
Constraint-Java-Version
The software should work on a computer that has version 11 of Java i.e., no other Java version installed.
Constraint-Portable
The software should work without requiring an installer.
Reason: Testers may not want to install your product on their computer.
Constraint-No-Remote-Server
The software should not depend on your own remote server.
Reason: Anyone should be able to use/test your app any time, even after the semester is over.
Constraint-External-Software
The use of third-party frameworks/libraries is allowed but only if they,
- are free, open-source, and have permissive license terms (E.g., trial version of libraries that require purchase after N days are not allowed).
- do not require any installation by the user of your software.
- do not violate other constraints.
and is subjected to prior approval by the teaching team.
Reason: We will not allow third-party software that can interfere with the learning objectives of the module.
Please post in the forum your request to use a third-party libraries before you start using the library. Once a specific library has been approved for one team, other teams may use it without requesting permission again.
Reason: The whole class should know which external software are used by others so that they can do the same if they wish to.
Constraint-File-Size
The file sizes of the deliverables should not exceed the limits given below.
Reason: It is hard to download big files during the practical exam due to limited WiFi bandwidth at the venue:
- JAR file: 100Mb (Some third-party software -- e.g., Stanford NLP library, certain graphics libraries -- can cause you to exceed this limit)
- PDF files: 15Mb/file (Not following the recommended method of converting to PDF can cause big PDF files. Another cause is using unnecessarily high resolution images for screenshots).
In addition, you are strongly encouraged to follow these recommendations as they can help increase your project score.
Recommendation-Minimal-Network
It is OK to use a reliable public API e.g., Google search but we recommend that you have a fallback mechanism (e.g., able to load data using a data file if the network is down).
Reason: During the mass peer-testing session, the network access can be intermittent due to high load. If your feature cannot be tested due to lack of Internet, that will have to be counted as a major bug, to be fair to those whose app is being tested and bugs found being penalized.
If you use NUS data (e.g., scrape data from an NUS website), please work with NUS IT directly to get their approval first. Even well-intentioned use of NUS data without approval can get you into serious trouble (has happened before). The teaching team will not be able to get approval for you as the use of NUS data is not a module requirement.
Recommendation-Testability
Avoid implementing hard-to-test (both for manual testing as well as automated testing) features or features that make your product hard-to-test.
Reason: testability is a grading criterion. If you choose to implement such a feature, you will need to spend an extra effort to reach an acceptable level of testability.
Here are some examples of features that are hard-to-test:
- Features that depend heavily on remote APIs: Those APIs can block your access if they mistake your automated tests as a bot attack. Some remote APIs require setting up accounts, keys, login etc, that will irritate the testers of your product and give a low rating to the testability of your work.
- Audio-related features: The peer testing of your product is done under exam conditions where it is not appropriate to play audio.
- Features that require creating user accounts.
Recommendation-No-GUI
Creating a good Java GUI takes a lot of extra effort, which can easily push the tP effort beyond the expected range. In addition, good GUI design is not a learning outcome of this module. Therefore, you are strongly discouraged from creating a GUI application. Choose the GUI path only if you are willing to take the extra workload on top of the module's normal load.
Recommendation-CLI-First
Following from the Constraint-Typing-Preferred, if the app is optimized for the target user (graded under the product design criterion), a user who can type fast should be able to accomplish most tasks faster via CLI, compared to a hypothetical GUI-only version of the app. For example, adding a new entity via the CLI should be faster than entering the same data through a GUI form.
Therefore, the input to the app needs to be primarily CLI. If you do implement a GUI, that GUI should primarily be used to give visual feedback to the user. While we don't prohibit non-CLI inputs, note that such inputs will reduce the suitability of the product to target users. Therefore, give CLI alternatives to mouse/GUI inputs, if applicable.
Also keep in mind:
- Regular typing is usually faster than using key combinations.
- typing the full command and hitting ENTER will complete the taskOne-shot commands are faster over prompting the user to input one parameter at a timemulti-step commands. If you provide a multi-step command to help new users, you can also provide a one-shot equivalent for regular/expert users.
If you are not sure if your product complies with a certain constraint/recommendation, please seek clarification by posting in the forum (preferred) or emailing the supervisor.
Admin tP: Grading → Criteria Used for Grading the Product Design
1. Project Grading: Product Design [/ 5 marks]
Evaluates: how well your features fit together to form a cohesive product (not how many features or how big the features are) and how well does it match the target user
Evaluated by:
- tutors (based on product demo and user guide)
- peers from other teams (based on peer testing and user guide)
Admin tP Deliverables → PE → Grading Instructions for Product Design
Evaluate based on the User Guide and the actual product behavior.
| Criterion | Unable to judge | Low | Medium | High |
|---|---|---|---|---|
target user |
not specified | clearly specified and narrowed down appropriately | ||
value proposition |
not specified | The value to target user is low. App is not worth using | Some small group of target users might find the app worth using | Most of the target users are likely to find the app worth using |
optimized for target user |
Not enough focus for CLI users | Mostly CLI-based, but cumbersome to use most of the time | feels like a fast typist can be more productive with the app, compared to an equivalent GUI app without a CLI |
In addition, feature flaws reported in the PE will be considered when grading this aspect.
These are considered feature flaws:
The feature does not solve the stated problem of the intended user i.e., the feature is 'incomplete'
Hard-to-test features
Features that don't fit well with the product
Features that are not optimized enough for fast-typists or target users
Note that 'product design' or 'functionality' are not critical learning outcomes of the tP. Therefore, the bar you need to reach to get full 5 marks will be quite low. For example, the Medium level in the rubric given in the panel above should be enough to achieve full marks. Similarly, only cases of excessive 'feature flaw' bugs will affect the score.
3 Start a collaborative doc to take project notes before the tutorial
- Keep project notes in easy-to-use collaborative docs such as GoogleDocs/sheets. Document the decisions taken above in one of those docs. This document will be checked by the tutor at the next tutorial.