This site is from a past semester! The current version will be here when the new semester starts.
CS2113/T 2020 Jan-Apr
  • Full Timeline
  • Week 1 [from Mon Jan 13]
  • Week 2 [from Wed Jan 15 noon]
  • Week 3 [from Wed Jan 22 noon]
  • Week 4 [from Wed Jan 29 noon]
  • Week 5 [from Wed Feb 5 noon]
  • Week 6 [from Wed Feb 12 noon]
  • Week 7 [from Wed Feb 19 noon]
  • Week 8 [from Wed Mar 4 noon]
  • Week 9 [from Wed Mar 11 noon]
  • Week 10 [from Wed Mar 18 noon]
  • Week 11 [from Wed Mar 25 noon]
  • Week 12 [from Wed Apr 1 noon]
  • Week 13 [from Wed Apr 8 noon]
  • Textbook
  • Admin Info
  • Report Bugs
  • Forum
  • Instructors
  • Announcements
  • File Submissions
  • Tutorial Schedule
  • repl.it link
  • Java Coding Standard
  • Forum Activities Dashboard
  • Participation Dashboard

  •  Individual Project (iP):
  • Individual Project Info
  • Duke Upstream Repo
  • iP Code Dashboard
  • iP Progress Dashboard

  •  Team Project (tP):
  • Team Project Info
  • Team List
  • tP Code Dashboard
  • tP Progress Dashboard
  • Week 7 [from Wed Feb 19 noon] - Tutorial

    Guidance for the item(s) below:

    By the end of this tutorial, we want to confirm that you are able to apply Git and GitHub techniques you learned so far to follow a systematic workflow when updating the code.

    1 Set up tP org/repo

    • Set up the team org, team fork, individual forks as described below.

    Organization Setup

    Please follow the organization/repo name format precisely because we use scripts to download your code or else our scripts will not be able to detect your work.

    After receiving your team ID, one team member should do the following steps:

    • Create a GitHub organization with the following details:
      • Organization name (all UPPER CASE) : AY1920S2-TEAM_ID. e.g.  AY1920S2-CS2113T-W12-1, AY1920S2-CS2113-F09-3
      • Plan:  Open Source ($0/month)
      • This organization belongs to: My personal account
    • Add members to the organization:
      • Create a team called developers to your organization.
      • Add your team members to the developers team.

    Repo Setup

    The tP project template given to you is a variation of the Duke repo you used for the iP, but with some important differences. Please follow instructions carefully, rather than follow what you remember from the iP.

    Only one team member:

    1. Fork the tP project template nus-cs2113-AY1920S2/tP repo to your team org.
      This repo (let's call it the team repo) is to be used as the repo for your project.
      Please do not rename the fork Reason: it will make it difficult for our bots to find your fork if you rename it.
    2. Enable the issue tracker of the team repo Reason: our bots will be posting your weekly progress reports on the issue tracker of your team repo.
    3. Enable GitHub actions: Go to the Actions tab and enable workflows by clicking the button. That will enable the GitHub Actions that come with the project template.
    4. Enable GitHub Pages: Go to the Settings tab and enable GitHub Pages for the master branch /docs folder (similar to how you did it in the iP).
      Remember to choose a theme too by clicking the button (that will create a commit in your repo that is needed in a later step.
      After a few minutes, confirm your tP website is available in the corresponding github.io URL.
    5. Give access to team members: Ensure your team members have the desired level of access to your team repo.
    6. Create a team PR for us to track your project progress: i.e., create a PR from your team repo master branch to [nus-cs2113-AY1920S2/tP] master branch. PR name: [Team ID] Product Name e.g., [CS2113T-T09-2] Contact List Pro. As you merge code to your team repo's master branch, this PR will auto-update to reflect how much your team's product has progressed. In the PR description use @githubUserName@mention the other team members so that they get notified when the tutor adds comments to the PR.

    All team members:

    1. Watch the tP repo (created above) i.e., go to the repo and click on the button to subscribe to activities of the repo
    2. Fork the tP repo to your personal GitHub account.
      Please do not rename the fork Reason: it will make it difficult for our bots to find your fork if you rename it.
    3. Clone the fork to your computer.
    4. Set up the developer environment in your computer.
      Recommended: Set it up as an Intellij project (follow the instructions in the README carefully as the steps are different from the iP).

    Note that some of our bot scripts depend on the following folder paths. Please do not alter those paths in your project.

    • /src/main/java
    • /src/test/java
    • /docs

    Follow up notes for the item(s) above:

    After this activity, verify that you know,

    • how to run the code in your IDE
    • how to run I/O redirection tests
    • how to verify compliance with the coding standard automatically using Gradle

    Guidance for the item(s) below:

    Before you start the next activity, ensure that you know covered in this week's topicshow the forking workflow works.

    2 Update the code using the forking workflow

    • Use the recommended workflow to do some simple updates to the code base while working in parallel (e.g., each person can add their details to the docs/AboutUs.md page).

    Read our reuse policy (in Admin: Appendix B), in particular, how to give credit when you reuse code from the Internet or classmates:


    Set Git user.name: We use various tools to analyze your code. For us to be able to identify your commits, we encourage you to set your Git user.name in all computers you use to a sensible string that uniquely identifies you. For example, you can set it to your GitHub username or your full name. If this user name is not set properly or if you use multiple user names for Git, our tools might miss some of your work and as a result you might not get credit for some of your work.

    After installing Git in a computer, you can set the Git username as follows:

    1. Open a command window that can run Git commands (e.g., Git bash window)
    2. Run the command git config --global user.name YOUR_GITHUB_USERNAME (omit the --global flag to limit the setting to the current repo only)
      e.g., git config --global user.name JohnDoe

    More info about setting Git username is here.


    Policy on reuse

    Reuse is encouraged. However, note that reuse has its own costs (such as the learning curve, additional complexity, usage restrictions, and unknown bugs). Furthermore, you will not be given credit for work done by others. Rather, you will be given credit for reusing work done by others.

    • You are allowed to reuse work from your classmates, subject to following conditions:
      • The work has been shared publicly by us or the authors.
      • You clearly give credit to the original author(s).
    • You are allowed to reuse work from external sources, subject to following conditions:
      • The work comes from a source of 'good standing' (such as an established open source project). This means you cannot reuse code written by an outside 'friend'.
      • You clearly give credit to the original author. Acknowledge use of third party resources clearly e.g. in the welcome message, splash screen (if any) or under the 'about' menu. If you are open about reuse, you are less likely to get into trouble if you unintentionally reused something copyrighted.
      • You do not violate the license under which the work has been released. Please  do not use 3rd-party images/audio in your software unless they have been specifically released to be used freely. Just because you found it in the Internet does not mean it is free for reuse.
      • Always get permission from us before you reuse third-party libraries. Please post your 'request to use 3rd party library' in our forum. That way, the whole class get to see what libraries are being used by others.

    Giving credit for reused work

    Given below are how to give credit for things you reuse from elsewhere. These requirements are specific to this module i.e., not applicable outside the module (outside the module you should follow the rules specified by your employer and the license of the reused work)

    If you used a third party library:

    • iP/tP: Mention in the README file (under the Acknowledgements section)
    • tP: Mention in the Project Portfolio Page if the library has a significant relevance to the features you implemented

    If you reused code snippets found on the Internet e.g. from StackOverflow answers or
    referred code in another software or
    referred project code by current/past student:

    • If you read the code to understand the approach and implemented it yourself, mention it as a comment
      Example:
      //Solution below adapted from https://stackoverflow.com/a/16252290
      {Your implmentation of the reused solution here ...}
    • If you copy-pasted a non-trivial code block (possibly with minor modifications renaming, layout changes, changes to comments, etc.), also mark the code block as reused code (using @@author tags)
      Format:
      //@@author {yourGithubUsername}-reused
      //{Info about the source...}

      {Reused code (possibly with minor modifications) here ...}

      //@@author
      Example of reusing a code snippet (with minor modifications):
      persons = getList()
      //@@author johndoe-reused
      //Reused from https://stackoverflow.com/a/34646172 with minor modifications
      Collections.sort(persons, new Comparator<CustomData>() {
      @Override
      public int compare(CustomData lhs, CustomData rhs) {
      return lhs.customInt > rhs.customInt ? -1 : 0;
      }
      });
      //@@author
      return persons;
     

    Adding @@author tags indicate authorship

    • Mark your code with a //@@author {yourGithubUsername}. Note the double @.
      The //@@author tag should indicates the beginning of the code you wrote. The code up to the next //@@author tag or the end of the file (whichever comes first) will be considered as was written by that author. Here is a sample code file:

      //@@author johndoe
      method 1 ...
      method 2 ...
      //@@author sarahkhoo
      method 3 ...
      //@@author johndoe
      method 4 ...
    • If you don't know who wrote the code segment below yours, you may put an empty //@@author (i.e. no GitHub username) to indicate the end of the code segment you wrote. The author of code below yours can add the GitHub username to the empty tag later. Here is a sample code with an empty author tag:

      method 0 ...
      //@@author johndoe
      method 1 ...
      method 2 ...
      //@@author
      method 3 ...
      method 4 ...
    • The author tag syntax varies based on file type e.g. for java, css, fxml. Use the corresponding comment syntax for non-Java files.
      Here is an example code from an xml/fxml file.

      <!-- @@author sereneWong -->
      <textbox>
      <label>...</label>
      <input>...</input>
      </textbox>
      ...
    • Do not put the //@@author inside java header comments.
      👎

      /**
      * Returns true if ...
      * @@author johndoe
      */

      👍

      //@@author johndoe
      /**
      * Returns true if ...
      */

    What to and what not to annotate

    • Annotate both functional and test code There is no need to annotate documentation files.

    • Annotate only significant size code blocks that can be reviewed on its own e.g., a class, a sequence of methods, a method.
      Claiming credit for code blocks smaller than a method is discouraged but allowed. If you do, do it sparingly and only claim meaningful blocks of code such as a block of statements, a loop, or an if-else statement.

      • If an enhancement required you to do tiny changes in many places, there is no need to annotate all those tiny changes; you can describe those changes in the Project Portfolio page instead.
      • If a code block was touched by more than one person, either let the person who wrote most of it (e.g. more than 80%) take credit for the entire block, or leave it as 'unclaimed' (i.e., no author tags).
      • Related to the above point, if you claim a code block as your own, more than 80% of the code in that block should have been written by yourself. For example, no more than 20% of it can be code you reused from somewhere.
      • GitHub has a blame feature and a history feature that can help you determine who wrote a piece of code.
    • Do not try to boost the quantity of your contribution using unethical means such as duplicating the same code in multiple places. In particular, do not copy-paste test cases to create redundant tests. Even repetitive code blocks within test methods should be extracted out as utility methods to reduce code duplication. Individual members are responsible for making sure code attributed to them are correct. If you notice a team member claiming credit for code that he/she did not write or use other questionable tactics, you can email us (after the final submission) to let us know.

    • If you wrote a significant amount of code that was not used in the final product,

      • Create a folder called {project root}/unused
      • Move unused files (or copies of files containing unused code) to that folder
      • use //@@author {yourGithubUsername}-unused to mark unused code in those files (note the suffix unused) e.g.
      //@@author johndoe-unused
      method 1 ...
      method 2 ...

      Please put a comment in the code to explain why it was not used.

    • If you reused code from elsewhere, mark such code as //@@author {yourGithubUsername}-reused (note the suffix reused) e.g.

      //@@author johndoe-reused
      method 1 ...
      method 2 ...
    • You can use empty @@author tags to mark code as not yours when RepoSense attribute the to you incorrectly.

      • Code generated by the IDE/framework, should not be annotated as your own.

      • Code you modified in minor ways e.g. adding a parameter. These should not be claimed as yours but you can mention these additional contributions in the Project Portfolio page if you want to claim credit for them.


    At the end of the project each student is required to submit a Project Portfolio Page.

    PPP Objectives

    • For you to use (e.g. in your resume) as a well-documented data point of your SE experience
    • For evaluators to use as a data point to evaluate your project contributions

    PPP Sections to include

    • Overview: A short overview of your product to provide some context to the reader. The opening 1-2 sentences may be reused by all team members. If your product overview extends beyond 1-2 sentences, the remainder should be written by yourself.
    • Summary of Contributions --Suggested items to include:
      • Code contributed: Give a link to your code on tP Code Dashboard. The link is available in the Project List Page -- linked to the icon under your photo.
      • Enhancements implemented: A summary of the enhancements you implemented.
      • Contributions to documentation: Which sections did you contribute to the UG?
      • Contributions to the DG: Which sections did you contribute to the DG? Which UML diagrams did you add/updated?
      • Contributions to team-based tasks :
      • Review/mentoring contributions: Links to PRs reviewed, instances of helping team members in other ways
      • Contributions beyond the project team:
        • Evidence of helping others e.g. responses you posted in our forum, bugs you reported in other team's products,
        • Evidence of technical leadership e.g. sharing useful information in the forum

    Team-tasks are the tasks that someone in the team has to do. Marks allocated to team-tasks will be divided among team members based on how much each member contributed to those tasks.

    Here is a non-exhaustive list of team-tasks:

    1. Necessary general code enhancements
    2. Setting up tools e.g., GitHub, Gradle
    3. Maintaining the issue tracker
    4. Release management
    5. Updating user/developer docs that are not specific to a feature e.g. documenting the target user profile
    6. Incorporating more useful tools/libraries/frameworks into the product or the project workflow (e.g. automate more aspects of the project workflow using a GitHub plugin)

    Keep in mind that evaluators will use the PPP to estimate your project effort. We recommend that you mention things that will earn you a fair score e.g., explain how deep the enhancement is, why it is complete, how hard it was to implement etc..

    • [Optional] Contributions to the User Guide (Extracts): Reproduce the parts in the User Guide that you wrote. This can include features you implemented as well as features you propose to implement.
      The purpose of allowing you to include proposed features is to provide you more flexibility to show your documentation skills. e.g. you can bring in a proposed feature just to give you an opportunity to use a UML diagram type not used by the actual features.

    • [Optional] Contributions to the Developer Guide (Extracts): Reproduce the parts in the Developer Guide that you wrote. Ensure there is enough content to evaluate your technical documentation skills and UML modelling skills. You can include descriptions of your design/implementations, possible alternatives, pros and cons of alternatives, etc.

    • [Optional] If you plan to use the PPP in your Resume, you can also include your SE work outside of the module (will not be graded).

    PPP Format

    • To convert the UG/DG/PPP into PDF format, go to the generated page in your project's github.io site and use this technique to save as a pdf file. Using other techniques can result in poor quality resolution (will be considered a bug) and unnecessarily large files. You may un-tick the background graphics option as well if you wish.

    Saving as PDF files

    1. Use Chrome to load the page you want to save as pdf.

    2. Click on the Print option in Chrome’s menu.

    3. Set the destination to Save as PDF, then click Save to save a copy of the file in PDF format. For best results, use the settings indicated in the screenshot below.

    • Ensure hyperlinks in the pdf files work. Your UG/DG/PPP will be evaluated using PDF files during the PE. Broken/non-working hyperlinks in the PDF files will be reported as bugs and will count against your project score. Again, use the conversion technique given above to ensure links in the PDF files work.

    PPP Page Limit

    Content Recommended Hard Limit
    Overview + Summary of contributions 0.5-1 2
    [Optional] Contributions to the User Guide 1-3
    [Optional] Contributions to the Developer Guide 3-6
    • The page limits given above are after converting to PDF format. The actual amount of content you require is actually less than what these numbers suggest because the HTML → PDF conversion adds a lot of spacing around content.

    We recommend the forking workflow for your project. In particular,

    • Protect the master branch: You can use GitHub's Protected Branches feature to protect your master branch against rogue PRs. We suggest the following:
      • Go the the settings of your team repo.
      • Click on the Branches option on the navigation menu on the left.
      • Click the button. In the Branch protection rule page,
        • Specify the Branch name pattern to be master
        • Tick the option Require status checks to pass before merging to ensure that code has to pass CI before then can be merged to the master branch
        • If you think all PRs should be reviewed before they are merged, also tick the Require pull request reviews before merging option.
    • Create issues to represent project tasks so that they can be tracked using the issue tracker features.
    • Create a PR when you implement a project task that updates the code.
      You can use GitHub's draft PRs feature to indicate that a PR is not yet ready for merging.
      PRO TIP LGTM is common abbreviation you can use in the review comments to mean Looks Good To Merge.
    • Get team members to review PRs. A workflow without PR reviews is a risky workflow.
    • Don't merge code that fails CI. Ensure the PRs you merge have CI before you merge them. If your CI breaks, a will show up in your team PR here (the shame!).
    • After merging a PR, close the corresponding issue.
      PRO TIP You can use GitHub's Fixes #123 trick to get the issue to close automatically when the PR is merged.
    • As you add functionality, update the input.txt and EXPECTED.txt as well so that the functionality you add gets regression tested automatically every time the code is updated from that point onwards.
     

    Project Management → Revision Control →

    Forking flow

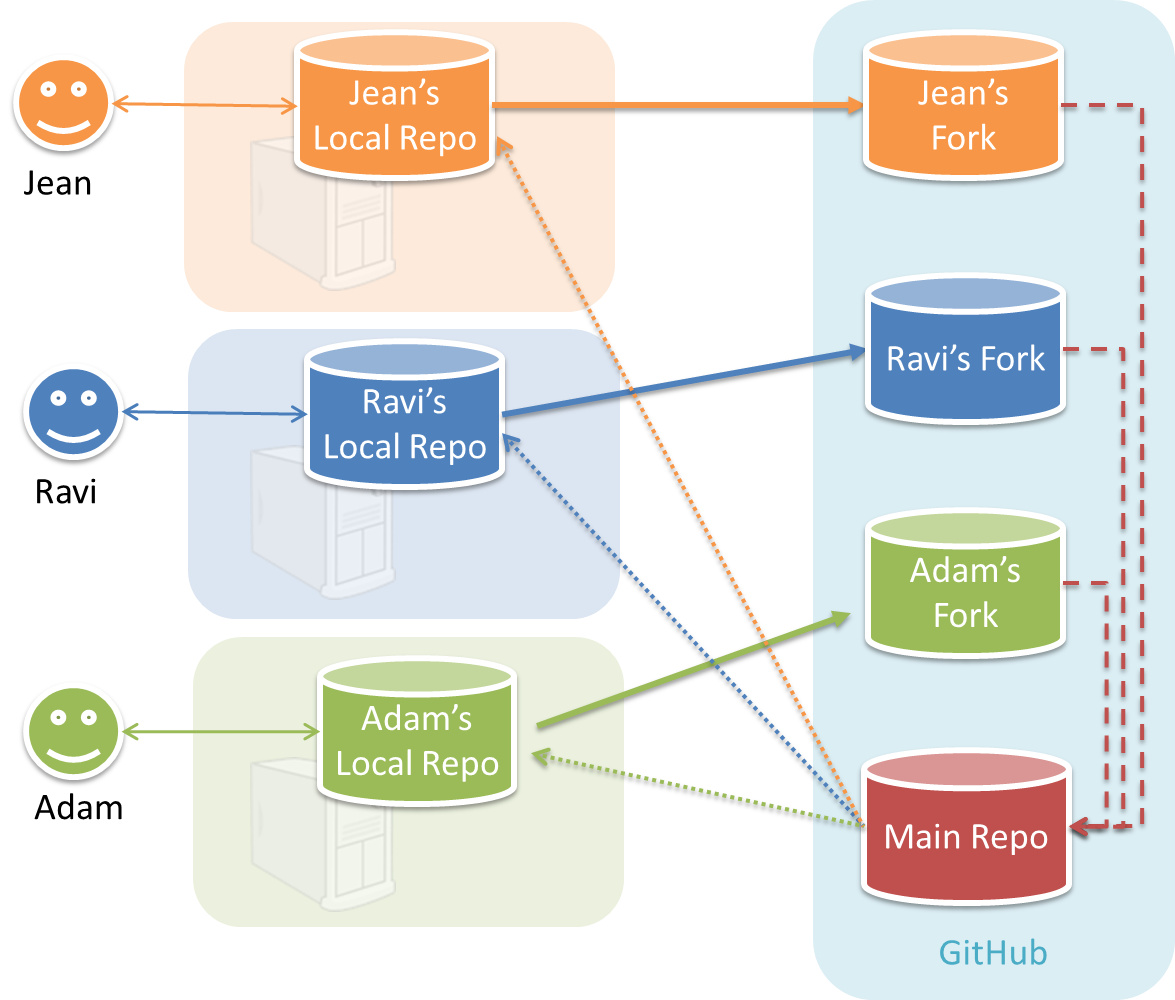
    In the forking workflow, the 'official' version of the software is kept in a remote repo designated as the 'main repo'. All team members fork the main repo create pull requests from their fork to the main repo.

    To illustrate how the workflow goes, let’s assume Jean wants to fix a bug in the code. Here are the steps:

    1. Jean creates a separate branch in her local repo and fixes the bug in that branch.
    2. Jean pushes the branch to her fork.
    3. Jean creates a pull request from that branch in her fork to the main repo.
    4. Other members review Jean’s pull request.
    5. If reviewers suggested any changes, Jean updates the PR accordingly.
    6. When reviewers are satisfied with the PR, one of the members (usually the team lead or a designated 'maintainer' of the main repo) merges the PR, which brings Jean’s code to the main repo.
    7. Other members, realizing there is new code in the upstream repo, sync their forks with the new upstream repo (i.e. the main repo). This is done by pulling the new code to their own local repo and pushing the updated code to their own fork.

    First, forking workflow requires you to pull from the team repo and push to your own fork. To be able to do the former, you need to add the team repo as a remote of your clone.

    • In SourceTree, choose RepositoryRepository Settings...
    • In the Repository Settings dialog,
      • click the Add button
      • add a new remote with the Remote name upstream (can be anything, but upstream is a common choice) and URL / Path pointing to the team repo
        e.g., https://github.com/AY1920S2-CS2113-M14-2/tp.git (note the .git at the end)

    Here are the steps to update the code using the forking workflow:

    • Step 1 Decide which update each person will do.
    • Step 2 Each person,
      • Step 2.a create a branch (e.g., johnDoe-AboutUs) in their local repo.
      • Step 2.b do the change in the branch.
      • Step 2.c push the branch to their own fork.
      • Step 2.d create a PR from their branch in the fork to the master branch of the team repo.
    • Step 3 Work as a team to merge one PR at a time.
      If a PR cannot be merged due to conflicts, resolve conflicts as you go (PR conflict resolution was covered in the week 6 lecture activity).
    • Step 4 Everyone sync their local repo and the fork with the team repo

    Follow up notes for the item(s) above:

    The workflow you followed above is very safe but has a high-overhead. You may simplify your workflow (at your own risk) after following the above workflow for a while.

    3 Brief the tutor about your tP plan for the next week

    • Let the tutor know how you plan to do the tP in a this term was explained in this week's topicsbreadth-first iterative manner in the coming week.