repl.it linkIndividual Project (iP):
Team Project (tP):
Week 7 [from Wed Feb 19 noon] - Topics
Detailed Table of Contents
- [W7.1] Java: JavaFX : OPTIONAL
- [W7.1a] C++ to Java → Miscellaneous Topics → JavaFX : OPTIONAL
- [W7.2] Documentation Tools
Javadoc
-
[W7.2a] Implementation → Documentation → Tools → JavaDoc → What
-
[W7.2b] Implementation → Documentation → Tools → JavaDoc → How
Markdown
-
[W7.2c] Implementation → Documentation → Tools → Markdown → What
-
[W7.2d] Implementation → Documentation → Tools → Markdown → How
AsciiDoc
- [W7.2e] Implementation → Documentation → Tools → AsciiDoc → What : OPTIONAL
- [W7.3] Code Quality: Code Comments
-
[W7.3a] Implementation → Code Quality → Comments → Introduction
-
[W7.3b] Implementation → Code Quality → Comments → Basic → Do not repeat the obvious
-
[W7.3c] Implementation → Code Quality → Comments → Basic → Write to the reader
-
[W7.3d] Implementation → Code Quality → Comments → Intermediate → Explain WHAT and WHY, not HOW
- [W7.4] SDLC Process Models: Basics
- [W7.5] Continuous Integration/Deployment
- [W7.6] RCS: Workflows
-
[W7.6a] Project Management → Revision Control → Forking flow
-
[W7.6b] Tools → Git and GitHub → Forking workflow
-
[W7.6c] Project Management → Revision Control → DRCS vs CRCS
-
[W7.6d] Project Management → Revision Control → Feature branch flow : OPTIONAL
-
[W7.6e] Project Management → Revision Control → Centralized flow : OPTIONAL
Guidance for the item(s) below:
JavaFX is not required for this module as we strongly discourage you from creating a GUI app. If you are still interest to learn JavaFX, you can refer to the JavaFX tutorial in the Duke repo you used for the iP (reason: the tutorials in the section below are outdated).
C++ to Java → Miscellaneous Topics → JavaFX
Can use JavaFX to build a simple GUI
JavaFX is a technology for building Java-based GUIs. Previously it was a part Java itself, but has become a third-party dependency since then. It is now being maintained by OpenJDK.
JavaFx 9 tutorial
Adapted (with permissions) from Marco Jakob's JavaFX 8 tutorial. Thanks to Marco Jakob for allowing us to adapt his tutorials for IntelliJ.
Table of contents:
After going through the two parts, you should be familiar with working with IntelliJ. You can continue with the original tutorial (which is written for Eclipse), with the following links:
Guidance for the item(s) below:
You'll need to add JavaDoc comments to the iP code this week. When adding a user guide to the iP, you'll need to use Markdown. Both those topics are covered below, briefly.
FYI, AsciiDoc is a more powerful (but also more complicated) replacement for Markdown. You don't need it for this module.
Javadoc
Implementation → Documentation → Tools → JavaDoc → What
Can explain JavaDoc
Javadoc is a tool for generating API documentation in HTML format from doc comments in source. In addition, modern IDEs use JavaDoc comments to generate explanatory tool tips.
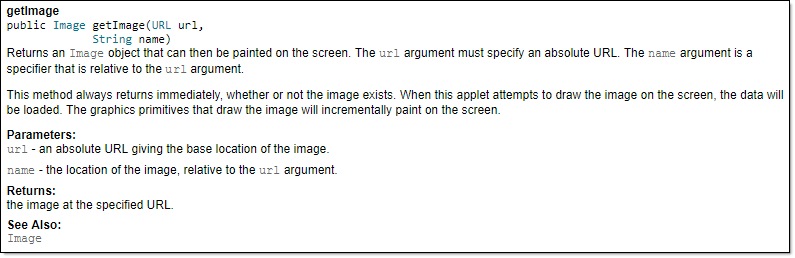
An example method header comment in JavaDoc format (adapted from Oracle's Java documentation)
/**
 * Returns an Image object that can then be painted on the screen.
 * The url argument must specify an absolute {@link URL}. The name
 * argument is a specifier that is relative to the url argument.
 * <p>
 * This method always returns immediately, whether or not the
 * image exists. When this applet attempts to draw the image on
 * the screen, the data will be loaded. The graphics primitives
 * that draw the image will incrementally paint on the screen.
 *
 * @param url an absolute URL giving the base location of the image
 * @param name the location of the image, relative to the url argument
 * @return the image at the specified URL
 * @see Image
 */
 public Image getImage(URL url, String name) {
        try {
            return getImage(new URL(url, name));
        } catch (MalformedURLException e) {
            return null;
        }
 }
Generated HTML documentation:
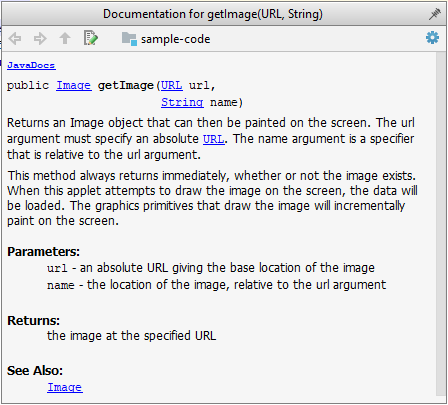
Tooltip generated by Intellij IDE:
Implementation → Documentation → Tools → JavaDoc → How
Can write Javadoc comments
In the absence of more extensive guidelines (e.g., given in a coding standard adopted by your project), you can follow the two examples below in your code.
A minimal javadoc comment example for methods:
/**
 * Returns lateral location of the specified position.
 * If the position is unset, NaN is returned.
 *
 * @param x  X coordinate of position.
 * @param y Y coordinate of position.
 * @param zone Zone of position.
 * @return Lateral location.
 * @throws IllegalArgumentException  If zone is <= 0.
 */
public double computeLocation(double x, double y, int zone)
    throws IllegalArgumentException {
  ...
}
A minimal javadoc comment example for classes:
package ...

import ...

/**
 * Represents a location in a 2D space. A <code>Point</code> object corresponds to
 * a coordinate represented by two integers e.g., <code>3,6</code>
 */
public class Point{
    //...
}
Resources
- A short tutorial on writing JavaDoc comments -- from tutorialspoint.com
- A more detailed description --from Oracle
Markdown
Implementation → Documentation → Tools → Markdown → What
Can explain Markdown
Markdown is a lightweight markup language with plain text formatting syntax.
Implementation → Documentation → Tools → Markdown → How
Can write documents in Markdown format
- A tutorial on Mastering Markdown --from GitHub
AsciiDoc
Implementation → Documentation → Tools → AsciiDoc → What
Can explain AsciiDoc
AsciiDoc is similar to Markdown but has more powerful (but also more complex) syntax.
Guidance for the item(s) below:
This is the final installment of the code quality topics. As you are learning about JavaDoc comments this week, you can also learn these guidelines to write better code comments.
Implementation → Code Quality → Comments → Introduction
Can explain the need for commenting minimally but sufficiently
Good code is its own best documentation. As you’re about to add a comment, ask yourself, ‘How can I improve the code so that this comment isn’t needed?’ Improve the code and then document it to make it even clearer. --Steve McConnell, Author of Clean Code
Some think commenting heavily increases the 'code quality'. This is not so. Avoid writing comments to explain bad code. Improve the code to make it self-explanatory.
Implementation → Code Quality → Comments → Basic → Do not repeat the obvious
Can improve code quality using technique: do not repeat the obvious
If the code is self-explanatory, refrain from repeating the description in a comment just for the sake of 'good documentation'.
Bad
//increment x
x++;

//trim the input
trimInput();
Bad
# increment x
x = x + 1

# trim the input
trim_input()
Implementation → Code Quality → Comments → Basic → Write to the reader
Can improve code quality using technique: write to the reader
Do not write comments as if they are private notes to yourself. Instead, write them well enough to be understood by another programmer. One type of comments that is almost always useful is the header comment that you write for a class or an operation to explain its purpose.
Examples:
Bad Reason: this comment will only make sense to the person who wrote it
// a quick trim function used to fix bug I detected overnight
void trimInput(){
    ....
}
Good
/** Trims the input of leading and trailing spaces */
void trimInput(){
    ....
}
Bad Reason: this comment will only make sense to the person who wrote it
def trim_input():
"""a quick trim function used to fix bug I detected overnight"""
    ...
Good
def trim_input():
"""Trim the input of leading and trailing spaces"""
    ...
Implementation → Code Quality → Comments → Intermediate → Explain WHAT and WHY, not HOW
Can improve code quality using technique: explain what and why, not how
Comments should explain what and why aspect of the code, rather than the how aspect.
What : The specification of what the code supposed to do. The reader can compare such comments to the implementation to verify if the implementation is correct
Example: This method is possibly buggy because the implementation does not seem to match the comment. In this case the comment could help the reader to detect the bug.
/** Removes all spaces from the {@code input} */
void compact(String input){
    input.trim();
}
Why : The rationale for the current implementation.
Example: Without this comment, the reader will not know the reason for calling this method.
// Remove spaces to comply with IE23.5 formatting rules
compact(input);
How : The explanation for how the code works. This should already be apparent from the code, if the code is self-explanatory. Adding comments to explain the same thing is redundant.
Example:
Bad Reason: Comment explains how the code works.
// return true if both left end and right end are correct or the size has not incremented
return (left && right) || (input.size() == size);
Good Reason: Code refactored to be self-explanatory. Comment no longer needed.
boolean isSameSize = (input.size() == size) ;
return (isLeftEndCorrect && isRightEndCorrect) || isSameSize;
Guidance for the item(s) below:
As you will be starting the tP soon, this is a good time to learn about 'processes' used for software projects. FYI, you are required to use a breadth-first iterative process for the tP. Read the topics below to learn what that means.
Project Management → SDLC Process Models → Introduction → What
Can explain SDLC process models
Software development goes through different stages such as requirements, analysis, design, implementation and testing. These stages are collectively known as the software development life cycle (SDLC). There are several approaches, known as software development life cycle models (also called software process models) that describe different ways to go through the SDLC. Each process model prescribes a "roadmap" for the software developers to manage the development effort. The roadmap describes the aims of the development stage(s), the artifacts or outcome of each stage as well as the workflow i.e. the relationship between stages.
Project Management → SDLC Process Models → Introduction → Sequential models
Can explain sequential process models
The sequential model, also called the waterfall model, models software development as a linear process, in which the project is seen as progressing steadily in one direction through the development stages. The name waterfall stems from how the model is drawn to look like a waterfall (see below).
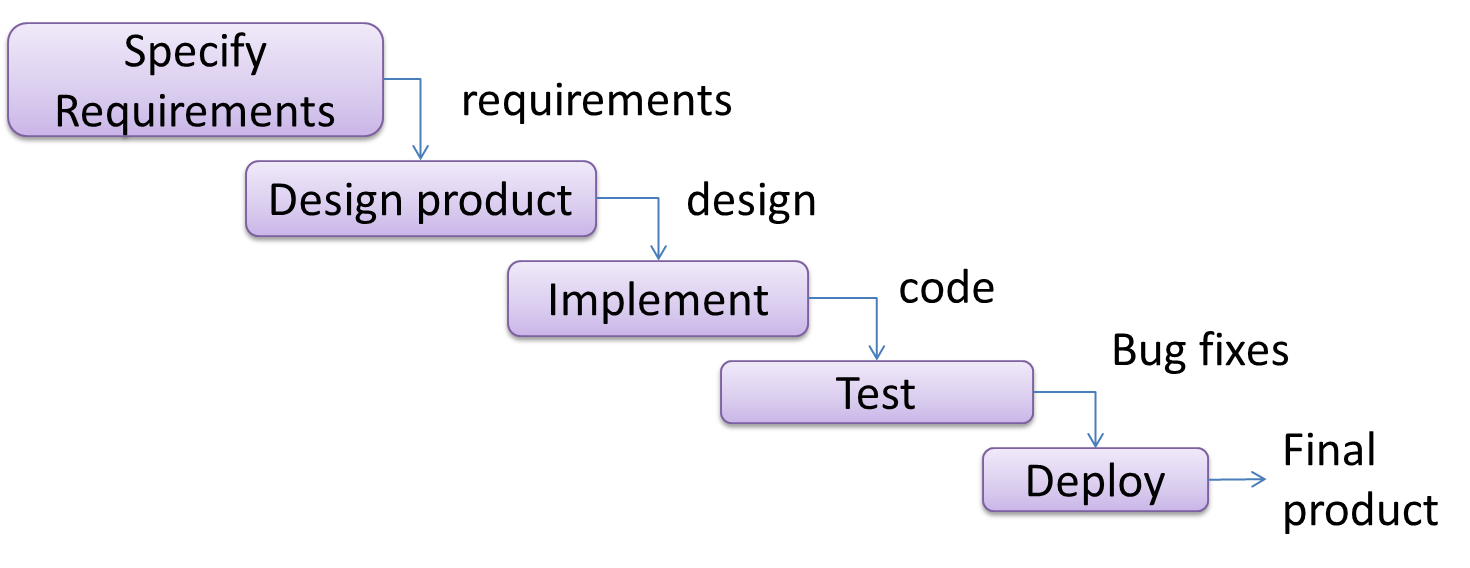
When one stage of the process is completed, it should produce some artifacts to be used in the next stage. For example, upon completion of the requirement stage a comprehensive list of requirements is produced that will see no further modifications. A strict application of the sequential model would require each stage to be completed before starting the next.
This could be a useful model when the problem statement that is well-understood and stable. In such cases, using the sequential model should result in a timely and systematic development effort, provided that all goes well. As each stage has a well-defined outcome, the progress of the project can be tracked with a relative ease.
The major problem with this model is that requirements of a real-world project are rarely well-understood at the beginning and keep changing over time. One reason for this is that users are generally not aware of how a software application can be used without prior experience in using a similar application.
Project Management → SDLC Process Models → Introduction → Iterative models
Can explain iterative process models
The iterative model (sometimes called iterative and incremental) advocates having several iterations of SDLC. Each of the iterations could potentially go through all the development stages, from requirement gathering to testing & deployment. Roughly, it appears to be similar to several cycles of the sequential model.
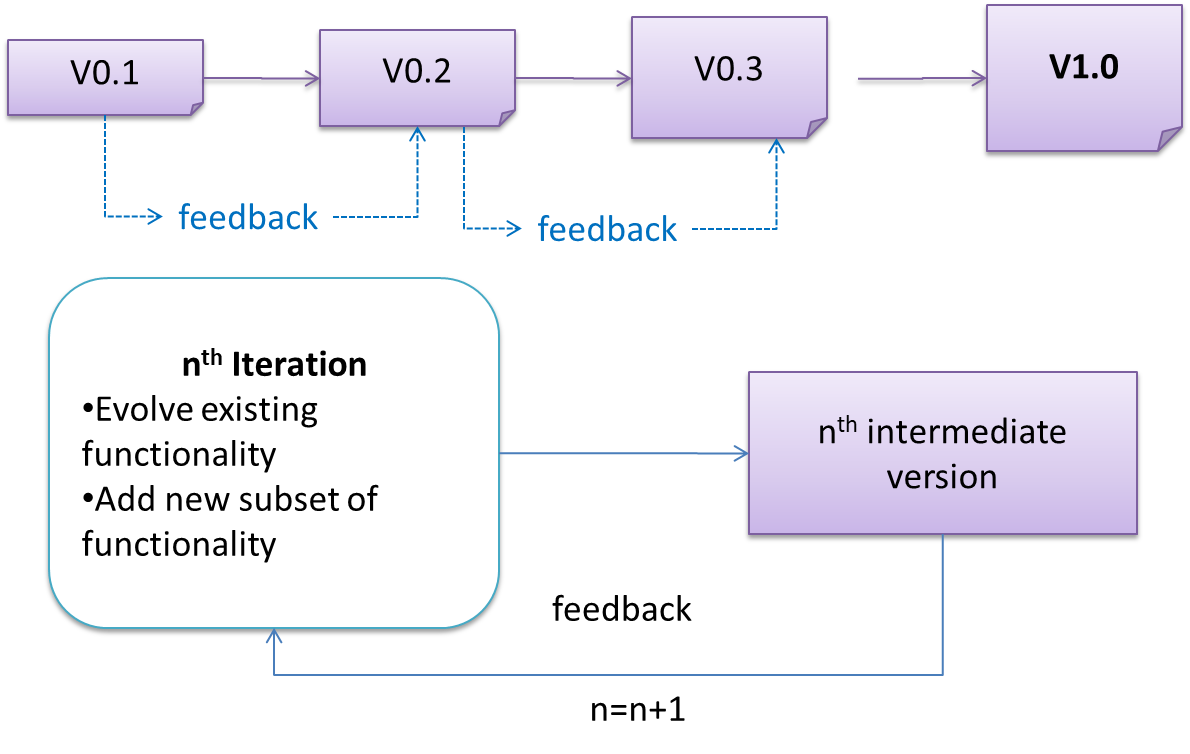
In this model, each of the iterations produces a new version of the product. Feedback on the version can then be fed to the next iteration. Taking the Minesweeper game as an example, the iterative model will deliver a fully playable version from the early iterations. However, the first iteration will have primitive functionality, for example, a clumsy text based UI, fixed board size, limited randomization etc. These functionalities will then be improved in later releases.
The iterative model can take a breadth-first or a depth-first approach to iteration planning.
- breadth-first: an iteration evolves all major components in parallel.
- depth-first: an iteration focuses on fleshing out only some components.
Most project use a mixture of breadth-first and depth-first iterations. Hence, the common phrase ‘an iterative and incremental process’.
Guidance for the item(s) below:
Modern software projects, and your tP, make heavy use of build/CI/CD tools The topics below give you an overview of those tools, to prepare you to start using them yourself.
Implementation → Integration → Introduction → What
Can explain integration
Combining parts of a software product to form a whole is called integration. It is also one of the most troublesome tasks and it rarely goes smoothly.
Implementation → Integration → Build Automation → What
Can explain build automation tools
Build automation tools automate the steps of the build process, usually by means of build scripts.
In a non-trivial project, building a product from source code can be a complex multi-step process. For example, it can include steps such as to pull code from the revision control system, compile, link, run automated tests, automatically update release documents (e.g. build number), package into a distributable, push to repo, deploy to a server, delete temporary files created during building/testing, email developers of the new build, and so on. Furthermore, this build process can be done ‘on demand’, it can be scheduled (e.g. every day at midnight) or it can be triggered by various events (e.g. triggered by a code push to the revision control system).
Some of these build steps such as to compile, link and package are already automated in most modern IDEs. For example, several steps happen automatically when the ‘build’ button of the IDE is clicked. Some IDEs even allow customization to this build process to some extent.
However, most big projects use specialized build tools to automate complex build processes.
Some popular build tools relevant to Java developers: Gradle, Maven, Apache Ant, GNU Make
Some other build tools : Grunt (JavaScript), Rake (Ruby)
Some build tools also serve as dependency management tools. Modern software projects often depend on third party libraries that evolve constantly. That means developers need to download the correct version of the required libraries and update them regularly. Therefore, dependency management is an important part of build automation. Dependency Management tools can automate that aspect of a project.
Maven and Gradle, in addition to managing the build process, can play the role of dependency management tools too.
Resources
- Getting Started with Gradle -- Documentation from Gradle
- Gradle Tutorial -- from tutorialspoint.com
Working With Gradle in Intellij IDEA (6 minutes)
Exercises
Gradle is a tool for ...
Gradle_is used used for,
- a. better revision control
- b. build automation
- c. UML diagramming
- d. project collaboration
(b)
Implementation → Integration → Build Automation → Continuous integration and continuous deployment
Can explain continuous integration and continuous deployment
An extreme application of build automation is called continuous integration (CI) in which integration, building, and testing happens automatically after each code change.
A natural extension of CI is Continuous Deployment (CD) where the changes are not only integrated continuously, but also deployed to end-users at the same time.
Some examples of CI/CD tools: Travis, Jenkins, Appveyor, CircleCI, GitHub Actions
Resources
- Travis CI for Beginners -- Documentation from Travis
Guidance for the item(s) below:
Next, you will learn a workflow called the 'Forking Flow', which combines the various Git and GitHub techniques you have been learning over the past few weeks. It is also the workflow you will use in the tP.
Project Management → Revision Control → Forking flow
Can explain forking workflow
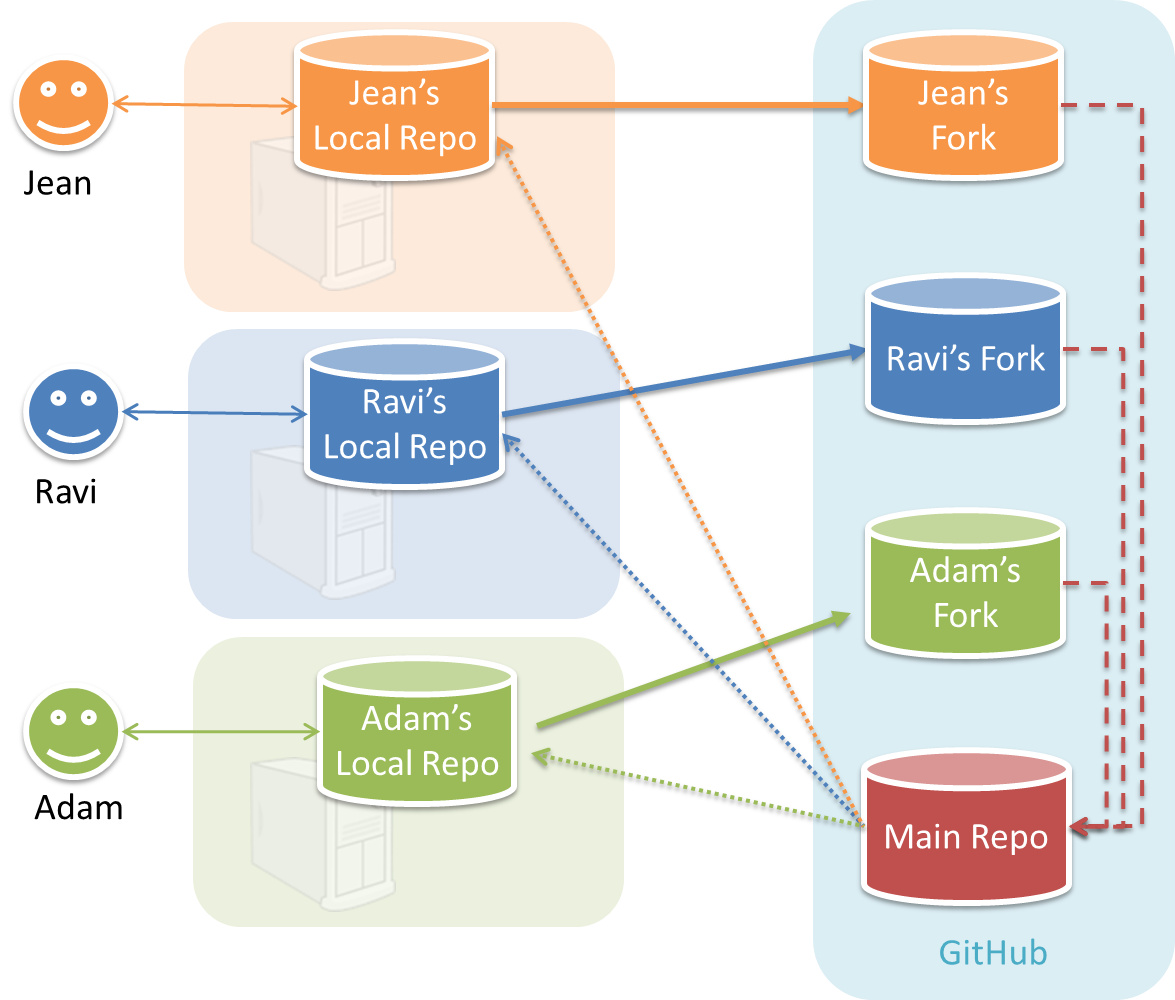
In the forking workflow, the 'official' version of the software is kept in a remote repo designated as the 'main repo'. All team members fork the main repo create pull requests from their fork to the main repo.
To illustrate how the workflow goes, let’s assume Jean wants to fix a bug in the code. Here are the steps:
- Jean creates a separate branch in her local repo and fixes the bug in that branch.
- Jean pushes the branch to her fork.
- Jean creates a pull request from that branch in her fork to the main repo.
- Other members review Jean’s pull request.
- If reviewers suggested any changes, Jean updates the PR accordingly.
- When reviewers are satisfied with the PR, one of the members (usually the team lead or a designated 'maintainer' of the main repo) merges the PR, which brings Jean’s code to the main repo.
- Other members, realizing there is new code in the upstream repo, sync their forks with the new upstream repo (i.e. the main repo). This is done by pulling the new code to their own local repo and pushing the updated code to their own fork.
Resources
- A detailed explanation of the Forking Workflow - From Atlassian
Guidance for the item(s) below:
The activity in the section below can be skipped as you will be doing a similar activity in a coming tutorial.
Tools → Git and GitHub → Forking workflow
Revision Control → Forking Workflow
Can follow Forking Workflow
This activity is best done as a team. If you are learning this alone, you can simulate a team by using two different browsers to log into GitHub using two different accounts.
-
One member: set up the team org and the team repo.
- Create a GitHub organization for your team. The org name is up to you. We'll refer to this organization as team org from now on.
- Add a team called
developersto your team org. - Add your team members to the
developersteam. - Fork se-edu/samplerepo-workflow-practice to your team org. We'll refer to this as the team repo.
- Add the forked repo to the
developersteam. Give write access.
-
Each team member: create PRs via own fork
- Fork that repo from your team org to your own GitHub account.
- Create a PR to add a file
yourName.md(e.g.jonhDoe.md) containing a brief resume of yourself (branch → commit → push → create PR)
-
For each PR: review, update, and merge.
- A team member (not the PR author): Review the PR by adding comments (can be just dummy comments).
- PR author: Update the PR by pushing more commits to it, to simulate updating the PR based on review comments.
- Another team member: Merge the PR using the GitHub interface.
- All members: Sync your local repo (and your fork) with upstream repo. In this case, your upstream repo is the repo in your team org.
-
Create conflicting PRs.
- Each team member: Create a PR to add yourself under the
Team Memberssection in theREADME.md. - One member: in the
masterbranch, remove John Doe and Jane Doe from theREADME.md, commit, and push to the main repo.
- Each team member: Create a PR to add yourself under the
-
Merge conflicting PRs one at a time. Before merging a PR, you’ll have to resolve conflicts. Steps:
- [Optional] A member can inform the PR author (by posting a comment) that there is a conflict in the PR.
- PR author: Pull the
masterbranch from the repo in your team org. Merge the pulledmasterbranch to your PR branch. Resolve the merge conflict that crops up during the merge. Push the updated PR branch to your fork. - Another member or the PR author: When GitHub does not indicate a conflict anymore, you can go ahead and merge the PR.
Guidance for the item(s) below:
Git is considered a DRCS. Read the topic below to learn what that means and how it differs from the alternative.
Project Management → Revision Control → DRCS vs CRCS
Can explain DRCS vs CRCS
RCS can be done in two ways: the centralized way and the distributed way.
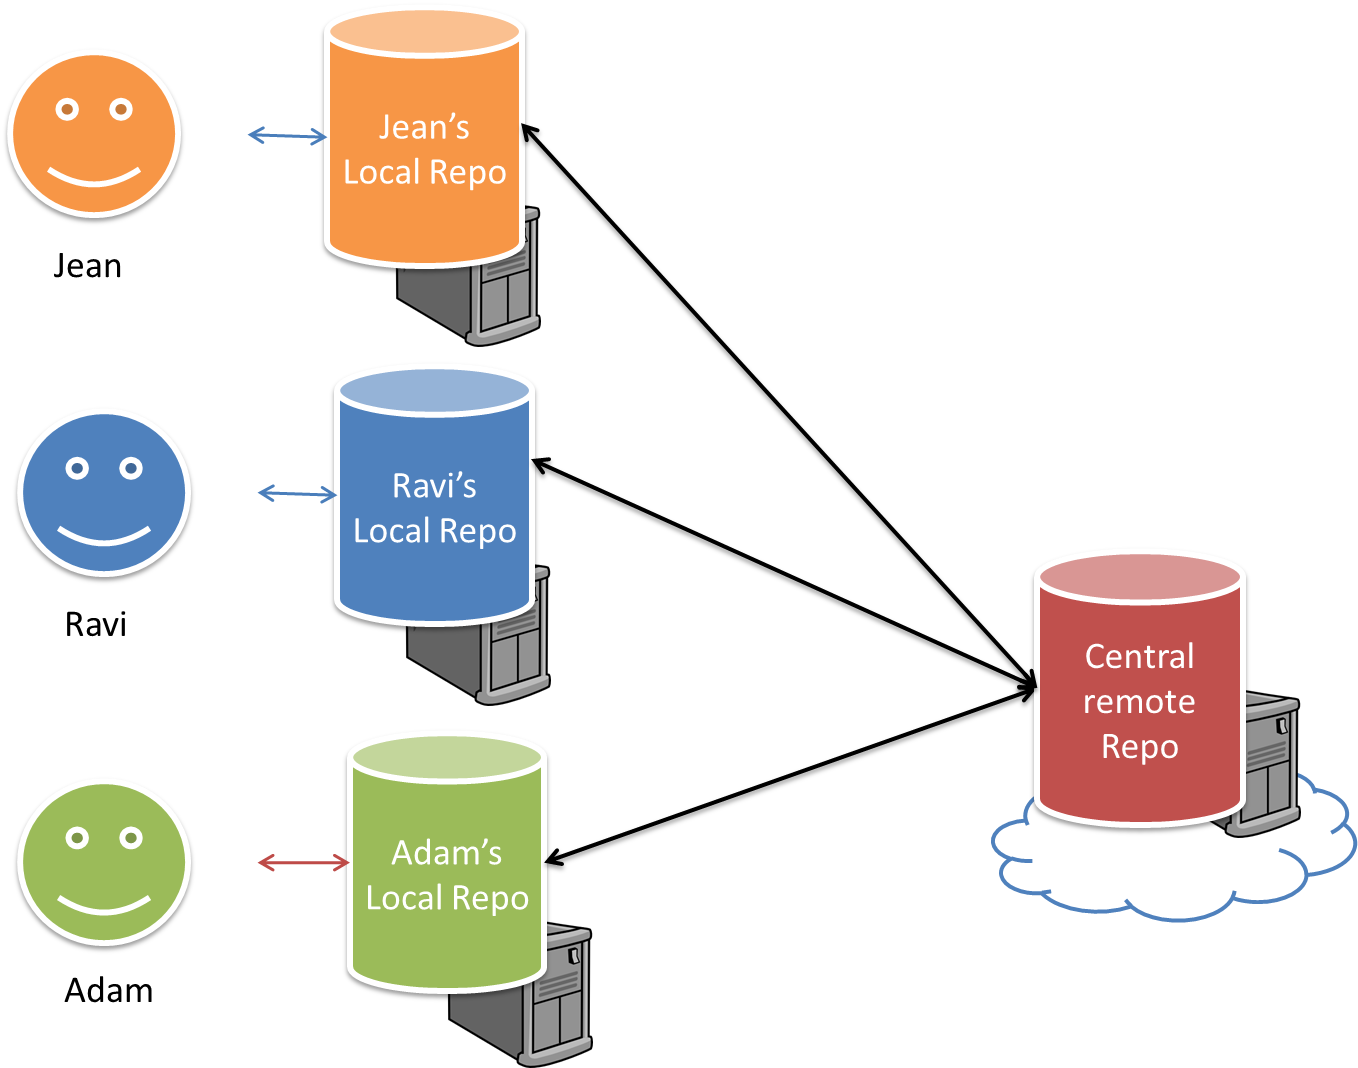
Centralized RCS (CRCS for short)uses a central remote repo that is shared by the team. Team members download (‘pull’) and upload (‘push’) changes between their own local repositories and the central repository. Older RCS tools such as CVS and SVN support only this model. Note that these older RCS do not support the notion of a local repo either. Instead, they force users to do all the versioning with the remote repo.
The centralized RCS approach without any local repos (e.g., CVS, SVN)
Distributed RCS (DRCS for short, also known as Decentralized RCS) allows multiple remote repos and pulling and pushing can be done among them in arbitrary ways. The workflow can vary differently from team to team. For example, every team member can have his/her own remote repository in addition to their own local repository, as shown in the diagram below. Git and Mercurial are some prominent RCS tools that support the distributed approach.
The decentralized RCS approach
Guidance for the item(s) below:
These are two workflows that are riskier (but simpler) than the forking flow. After following the forking flow for a while, you may switch to one of these, but at your own risk.
Project Management → Revision Control → Feature branch flow
Revision Control → Forking Workflow
Can explain feature branch flow
Feature branch workflow is similar to forking workflow except there are no forks. Everyone is pushing/pulling from the same remote repo. The phrase feature branch is used because each new feature (or bug fix, or any other modification) is done in a separate branch and merged to master branch when ready.
Resources
- A detailed explanation of the Feature Branch Workflow - From Atlassian
Project Management → Revision Control → Centralized flow
Revision Control → Feature Branch Workflow
Can explain centralized flow
The centralized workflow is similar to the feature branch workflow except all changes are done in the master branch.
Resources
- A detailed explanation of the Centralized Workflow - From Atlassian